SUSE Linux Enterprise Server (SLES) is an adaptable and easy-to-manage platform that allows developers and administrators to deploy business-critical workloads on-premises, in the cloud and at the edge. It is optimized for performance, security, and reliability. Since 2009, SUSE and Microsoft have been working together to provide unique, codeveloped, Azure-optimized solutions for SUSE SLES.
Example scenario
Imagine you work for a startup retailer that wants to create a website, and you have been asked to set up a LAMP stack (Linux OS, Apache webserver, MySQL database, PHP programming) using SUSE SLES on Azure.
What will we be doing?
Through the course of this post, we’ll discuss two tools that are unique to SUSE and how you can use them to add packages to your SUSE SLES VM on Azure.
What is the main goal?
By the end of this post, you will be able to deploy a SUSE Linux VM on Azure, install packages with YaST, and reconcile dependencies with zypper.
A virtual machine (VM) on Azure provides the infrastructure for running your workloads. Recall that your employer needs you to create a new VM for the LAMP stack. Here we will use the Azure portal to create the new VM. The portal walks you through the required information and provides hints and helpful messages during the creation.
- Sign in to the Azure portal
- On the Azure portal menu or from the Home page, under Azure services, select Virtual machines. Alternatively, you can enter Virtual machines in the top search box, and press Enter to get the virtual pane.
- In the top menu bar, select Add > Virtual machine. The Create a virtual machine pane appears.
- In the Basics tab:
- Choose the subscription you will be using for this exercise and Resource group and name it rg-lamp-demo
- Name your virtual machine vm-lamp-test-1 and select the default Availability option
- Choose the SUSE Enterprise Linux 15 SP2 + Patching option for your image
- Leave the Azure Spot instance box unchecked
- Choose the smallest size VM (Standard_B1s)
- Select the SSH public key for your authentication type
- Generate a new key pair and store it on your local machine along with the username
- Press next to customize your VM, or press Review + create to deploy your SLES VM
- Select the default options for the Disks and Networking settings
- Finish configuring the VM and creating the image by selecting Review + create.
- After the system validates your options, and gives you details about the VM being created, select Create to create and deploy the VM. The Azure dashboard will show the VM that’s being deployed. This may take several minutes.
- From the Azure portal, select Go to resource and the Overview pane to see the VM you just created
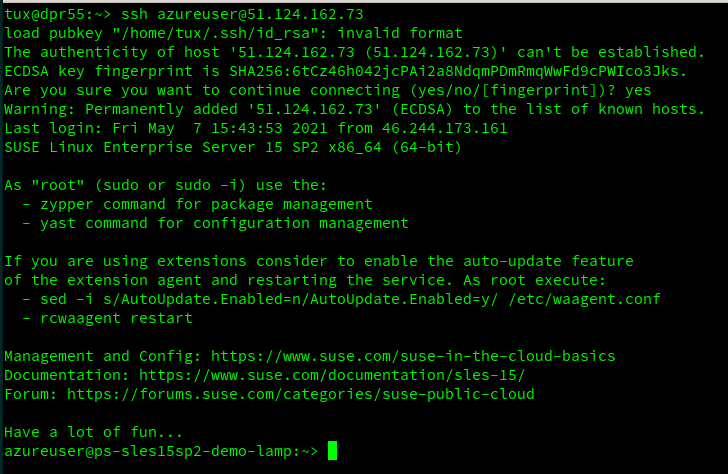
- Open the connect menu and choose ssh
- Follow the steps to connect your machine with ssh. If you are using a local Windows machine, you will need putty, Windows Subsystem for Linux (WSL), or another software that provides ssh under Windows. If you are using a local Linux machine, open a terminal.
YaST is an admin tool developed by SUSE that allows you to add packages to your machine (in addition to other things).
Once you’ve launched a pay-as-you-go SLES virtual machine image on Azure, you need to add packages for the Apache, MySQL, and PHP portion of the LAMP stack to build your website.
In this unit we’ll talk about what packages are, and how you can use YaST to manage them on your SLES virtual machine.
Packages add functionality to your machine
Your Linux engine is a blank slate that you need to fill to create the functionality and feature set you desire. This requires installing software. Many times, software packages are developed by individual contributors from the open-source community, which means that they don’t always work well together.
Distributors like SUSE provide bug fixes, maintenance and support of such packages and provide them as a “Linux Distribution” to give you ready-to-run options. The main SUSE distribution targeted to enterprise customers is the SUSE Linux Enterprise Server (SLES). There is also an open-source version called openSUSE.
SUSE uses the RPM package format to deliver such software to the system.
By choosing to run SLES, you automatically get access to over 3,500 RPM packages that have been pre-configured by SUSE engineers to work great together.
YaST is a specialized tool that helps you to administrate your system
YaST is a SUSE Linux Enterprise Server tool that provides a graphical interface for all essential installation and system configuration tasks. Whether you need to update packages, configure a printer, modify firewall settings, set up an FTP server, or partition a hard disk—you can do it using YaST. In this post, we’ll be using YaST to add packages to your VM. Following similar steps you can use YaST to update and delete packages as well.
Since all VMs in Azure are remote, you will not have a graphical environment to start and will only be able to log into the system over ssh. You will need load YaST using the sudo command, which allows you to perform administer-level functions from your unique log-in without using the administrator log-in ID. This distinction is important because it allows for better activity tracking and auditing.
YaST has two graphical interfaces: one for use with graphical desktop environments like KDE and GNOME and one that is an ncurses-based, pseudo-graphical interface for use on systems without an X server.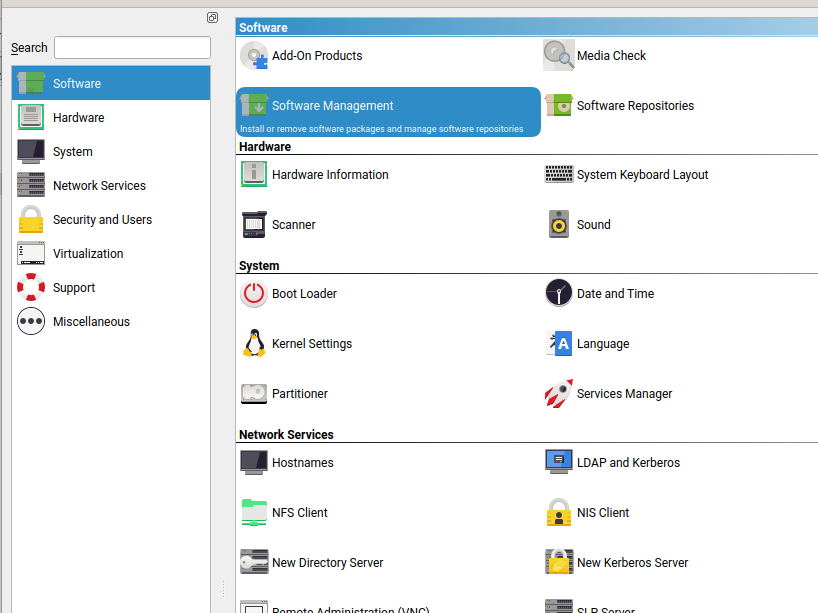
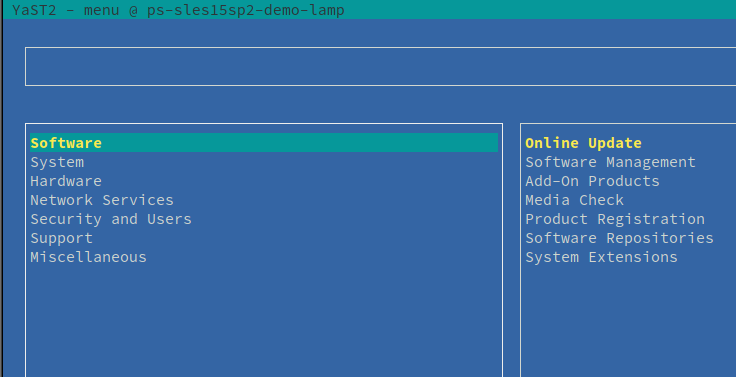
The ncurses-based, pseudo-graphical YaST interface is designed primarily to help system administrators to manage systems without an X server. The interface offers several advantages compared to the conventional GUI:
- You can navigate the ncurses interface using the keyboard, and there are keyboard shortcuts for practically all interface elements.
- The ncurses interface is light on resources, and runs fast even on modest hardware.
- You can run the ncurses-based version of YaST via an SSH connection, so you can administer remote systems.
Keep in mind that the minimum supported size of the terminal emulator in which to run YaST is 80×25 characters.
Note that when you first start YaST, not all of the functionality may automatically install. If you appear to be missing something, you can try searching for available packages with “YaST” in the name.
Packages are cumulative and most frequently used as collections
By nature, packages are cumulative and have defined dependencies that lead to specific outcomes. For example, if you want to run a relational database like MariaDB, you need to install the collection of packages, called a module, that enables MariaDB.
SUSE makes it easier to find the right packages for the tasks you want to complete by offering several different groupings of related packages in YaST.
- Modules group packages in like bundles i.e. Programming languages, Public Cloud adoption
- Patterns group packages by popular scenarios i.e. Run Oracle workloads, Enable a graphical interface
- The repository is like a directory that show packages across the entire server
You can view these different options through the TUI or GUI interface for YaST.
Zypper is a command-line package manager that automatically reconciles package dependencies.
With Apache webserver installed, it’s time to add MySQL database to your PAYG instance of SLES on Azure.
In this unit, we’ll talk about how SUSE handles package dependencies and explain what zypper package manager is and how to use it for installation.
Packages alert you of dependencies…One. At. A. Time.
While individual packages can alert you to dependencies on other packages for defined activities or modules, these alerts are raised at the package level, meaning dependencies are triggered one at a time. You must manually select the next package before another dependency is surfaced, which triggers another package that you must select, and so on. For modules with many packages, adding a complete set of packages using this method can take a long time.
SUSE’s package manager, zypper, reconciles package dependencies
SUSE created zypper, a command-line package manager, which makes use of libzpp (SAT solver) to reconcile package dependencies for you. With zypper, all related packages are flagged at once when you select an activity or grouping, so you can install, update, or delete them with a single command. The YaST GUI and TUI includes zypper built into it. YaST runs zypper automatically in the background every time you start. Compared to manually finding and selecting package dependencies through RPM, zypper saves time.
Packages and corresponding modules configuration are updated
As soon as SUSE becomes aware of an error within a package, an update package is shipped. If you run PAYG, the updated packages are pushed out to a SUSE update infrastructure at your Azure datacenter location and on to your machine when you connect. If you run BYOS, you can download the updates through SUSE directly.
You can manually pull updates using zypper
The difference between a patch and an update is that a patch contains one or more packages and an update is always a single package. You can add additional parameters for the update or patch. , you can only install security fixes by selecting–category security.
Let’s have a look at some basic zypper examples:
- List available repositories where packages come with
sudo zypper lrorsudo zypper repos. - List available patches with
sudo zypper lporsudo zypper list-patches. - List available updates with
sudo zypper luorsudo zypper list-updates. - Install updates/patches with
sudo zypper up,sudo zypper update, orsudo zypper patch.
Command line vs. GUI (zypper vs. YaST)
You might be wondering why did we use YaST to load apache and now we’re using zypper to add mariadb? Does it matter which one I use? The short answer is no. Zypper and YaST do the same things, they just go about it a little differently.
From command line, you can launch YaST and get a graphical menu that shows you all the different options you can use to administrate your system. Most of the time, graphical systems are preferred because they provide a visual overview of commands, so you don’t need to remember everything.
Zypper’s command-line interface is faster because you don’t have to navigate several windows or menu bars to execute the command. It also allows you to create your own workflow (or script) which is not possible in a graphical environment. If you use the commands and parameters regularly, zypper can be a faster way to get things done.
In the scenario for this post, the startup retailer you work for wanted to create a new website with a LAMP stack.
Through the units in the post, we discussed how to create a SUSE SLES VM on Azure through the Azure portal, add Apache webserver using YaST, and add MariaDB with zypper.
The purpose of this post was to communicate the role RPM packages play in customizing your virtual machine in the cloud and to introduce you to SUSE tools that make installing packages and managing package updates easier and more automated.
Learn: WordPress hosting Australia
Once you become familiar with YaST and zypper, you can use them to customize and refine other SUSE deployments on Azure such as:
- SLES for SAP Applications, which includes specialized, built-in features to reduce downtime, enhance security, optimize performance, and reduce the maintenance workload of sys admins.
- SLES for High Performance Computing (HPC), which includes infrastructure and tools to support parallel computation in the cloud.
- Others available on Azure Marketplace: SUMa, SQL on SLES, SAP Solution Templates