What are pull requests?

Here, we discuss how pull requests can help you request, review, and incorporate changes across your repository.

The GitHub flow

In addition to providing a platform for collaborative software development, GitHub also offers a prescribed workflow designed to optimize use of its various features. While this unit focuses on pull requests, it is recommended that you first review Understanding the GitHub flow .

Working on branches

Developers working on independent branches has become a ubiquitous concept in modern software development. By having their own branch, a developer can make any changes they need to without worrying about how those changes will impact other developers working on their own branches.

You have to merge eventually

While working on a branch is great for individual developer productivity, it opens a new challenge. At some point, each developer’s branch will need to be merged into a common branch, like master. As projects scale, there can be many merges that need to happen, and it becomes increasingly important to track and review each . This is where pull requests come in.

What is a pull request?

A pull request is a mechanism used to communicate that changes from one branch are ready to be merged into another. They offer an opportunity for stakeholders to review and discuss the proposed changes to ensure that the code quality in the base branch is kept as high as possible.

Author responsibilities

The author of a pull request is the person who created the pull request. They’re hoping to ultimately have the changes from the compare branch merged into the base branch. They’re generally responsible for answering questions about the changes and applying feedback.

Before creating a pull request, the author is responsible for ensuring the merge can succeed. It’s best practice to often pull down changes from the remote to your local copy to confirm that the code builds with the latest base changes.


Reviewer responsibilities

Reviewers may be assigned to review the pull request based on their expertise with or responsibility for the code in question. For example, there may be a database guru who reviews any database code. Or there might be a lead developer who reviews any code before it gets merged into master anywhere in the project.reviewing pull request

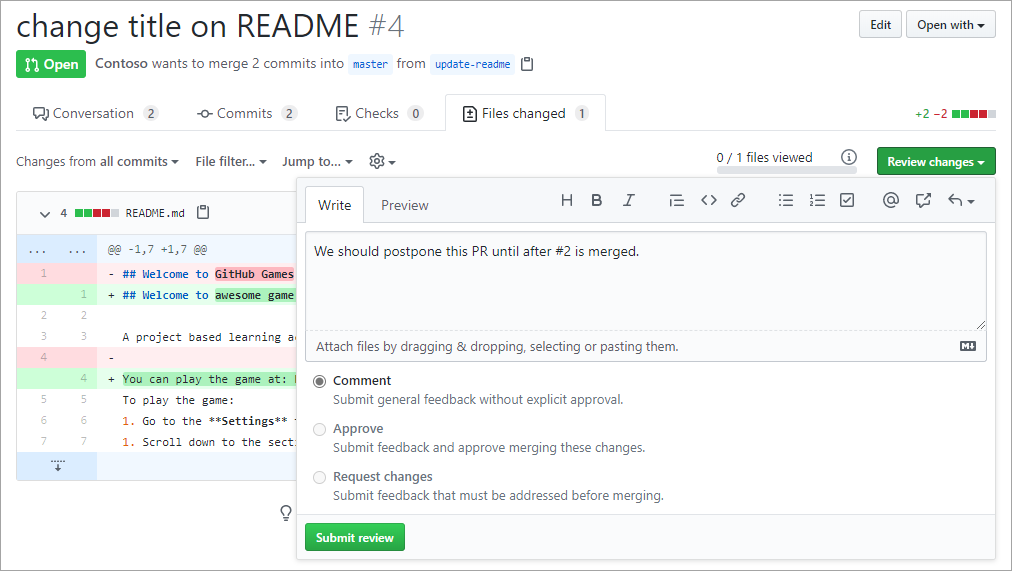
GitHub offers a visual experience for reviewing code that allows reviewers to see code changes in a diff view where changes are highlighted. They can then leave comments inline, suggest changes, or approve. Reviewer feedback is kept as part of the repository history so that changes and decisions can be easily traced within their original context.

As the name implies, reviewers are responsible for reviewing changes. When feedback is minor, such as typos, reviewers may leave comments or edit the files directly to incorporate fixes. To recommend more substantive changes, a pull request should be opened against the author’s branch.

Reviewers may be automatically assigned to a pull request by using a CODEOWNERS file . This file uses the same path syntax as .gitignore to map parts of the codebase to users or teams responsible for reviewing their changes. Learn how to make these reviews mandatory .

Learn more about Reviewing changes in pull requests .

Assignee responsibilities

While not mandatory, pull requests may be assigned to a specific user. That person takes responsibility for determining if and when the pull request is merged. This may require them to corral stakeholders into agreeing whether the merge should be approved.

Once a pull request has been merged, it’s recommended that you delete the branch it was based on. Allowing the branch to linger can result in headaches down the road. Remember that all branch history will have been merged into the base branch, so its commits can always be accessed later on.

What is GitHub Pages?

GitHub Pages are free static websites hosted directly from your GitHub repository. Using standard technologies like YAML and Markdown, anyone can build and maintain a site in minutes.

Suppose you want to set up a basic web site to share information about the project you’re working on. It might be a personal site, like as resume or portfolio. Or it might be a professional site, like a user guide or developer reference. With GitHub Pages, you can spin the site up in minutes and enable anyone with a basic understanding of Markdown to contribute to it. You also get all the benefits of GitHub for source control, including branches and pull requests.

In this module, you learn how to set up and use GitHub Pages to host both personal and professional websites.

Learning objectives

In this module, you will:

  • Enable GitHub Pages
  • Choose a theme with Jekyll
  • Use YAML front matter
  • Customize your site
  • Create and edit blog posts

Prerequisites

  • A GitHub account
  • The ability to navigate and edit files in GitHub


What is GitHub Pages?

Here, we discuss the process of creating and maintaining a GitHub Pages web site.

GitHub Pages are static sites hosted directly from your GitHub repository. But they’re more than just a collection of static files. By making use of site generation technologies like Jekyll and Liquid, developers define dynamic templates that are processed into complete static web sites. Every time a change is committed to the source branch associated with the site, it is re-generated using the latest updates and automatically published to the target URL.

Learn more about Publishing sources for GitHub Pages sites


How to enabling GitHub Pages

The first step in using GitHub Pages is to enable it from your repository’s Settings tab. You can opt to use the master branch, or specify the docs folder within it. If you ever want to disable GitHub Pages, you can do so here.

enabling-github-pages

Choosing a theme with Jekyll

Jekyll is the static site generator used by GitHub to build your website from the contents of your repository. In addition to providing great content convenience, it also conforms to a standard design convention. This style standardization allows for swappable themes, which you can select from the GitHub Pages configuration.

choosing-jekyll-theme

There are a variety of themes provided by GitHub. There is also an array of commercial and open source themes available from the Jekyll community.

jekyll-themes

Learn more about Jekyll Themes .

Using YAML front matter

The term front matter refers to YAML metadata that prepends the content of a file. For Jekyll, this includes generator instructions to indicate the layout style of a Markdown page (post, page, and so on). It may also include page metadata, such as the document title, or page content variables, such as a blog post’s author.

Below is a simple example that would use the post layout. This assumes there is a _layouts/post.html file that defines the container HTML. Other layout options may be offered by adding their respective HTML files in the _layouts folder.

Learn more about Front Matter .

Customizing your site

Once your site is up and running, you can customize details about your site via _config.yml. This file includes virtually all site-wide configuration options, including site metadata, navigation menus, theme colors, compiler options, and more.

Learn more about _config.yml Configuration .

Creating and editing content

Creating and editing pages on your site follows the standard GitHub experience. The files you use for your GitHub Pages web site enjoy all of the same benefits as other files in your GitHub repository, so you can edit them with any tool, create and merge branches, and link with issues or pull requests.

In addition to Markdown and HTML, Jekyll supports the Liquid template language syntax. Liquid provides the ability for users to dynamically insert variables and basic logic flow constructs into their content files. When compiled, the final product is standard HTML.

The example below shows a combination of for looping and variable insertion.

<ul>
  {% for post in site.posts %}
    <li>
      <h2><a href="{{ post.url }}">{{ post.title }}</a></h2>
      {{ post.excerpt }}
    </li>
  {% endfor %}
</ul>

Learn more about Liquid template language .

Working with blog posts

Despite not having a database to work with, Jekyll still supports the concept of blogging using a specific convention: _posts/2020-06-25-blog-post-name.md. As you can likely infer, all blog posts are stored in the _posts folder and use the date and name convention as shown. During compilation, Jekyll processes the files in this folder to produce a list of HTML blog posts.

The example below illustrates the structure of a simple blog post –  best web hosting. It includes metadata for subtitle, tags, and comments, which may or may not be supported by the theme you choose.

thank you for taking the time to read this “GitHub Pages” article.

A guided tour of GitHub

In this exercise you use GitHub Learning Lab to learn about key GitHub features, including issues, notifications, branches, commits, and pull requests.

GitHub Learning Lab is an integrated experience that’s easy to use. You get feedback and instructions throughout the lab as you work in your GitHub repository.

Here are a few suggestions to make the Learning cloud Lab exercise more enjoyable.

  • GitHub Learning Lab is installed on your account in the first step of this lab. If you’re asked, be sure to install it on all repositories. This won’t affect the organizations that you’re a member of, just the personal repositories that the lab creates for you.
  • After the install, you may be returned to the main page. To get back to your lab, just use the button on the bottom of this page.
  • GitHub will create a repository for you to use. Give permissions to GitHub Learning Lab.
  • GitHub Learning Lab will set itself as a reviewer on your pull requests so that it can give you the next steps just in time. Sometimes reviewing your pull request will take a few minutes.
  • When you’re given a link for creating or editing a file or told to open a tab, be sure to open it in another tab in your browser. This way you can come back to the instructions without leaving the file.
  • Comments and instructions will continue on your pull request or in an issue on your repository.

For self-hosted  Git ,you should buy Cloud Hosting from cloud provides.

Happy Gitsing 🙂