Content Delivery Networks (CDNs) can significantly speed up the delivery of assets on a web site. However, as not all websites are the same, it’s important to determine whether your own deployments will benefit.
For a global training business that publishes significant numbers of videos, Azure blob storage is a good match to your business model. Azure Blob storage also enables simple web publishing. However, your company’s plans to expand could overload a single point of distribution.
In this unit, you’ll learn about how Azure CDN works, and how to create one to improve the performance of a static website.
What is a CDN?
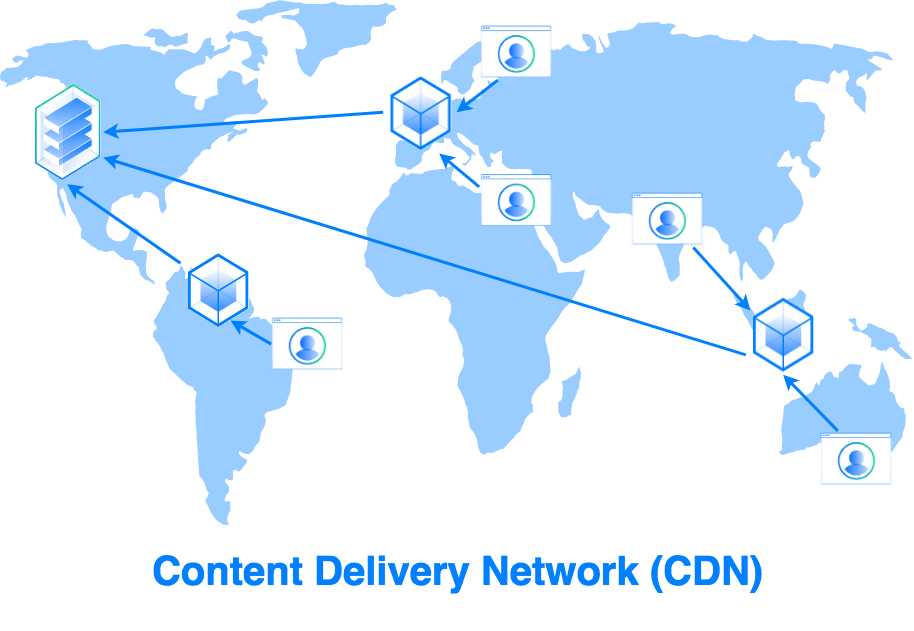
A CDN is a network of web servers that cache website content in different geographical locations. CDNs help to minimize latency by caching website content at point-of-presence (POP) locations that are close to large clusters of users. The use of a CDN is transparent to users of your site.
Geographic distance between a website user and the server hosting the site can be a major contributor to latency. Distance creates latency because of two main factors:
- First, the transmission speed of electrical signals is finite. The longer the distance is the longer it takes for a sent message to reach the other side.
- Second, long-distance connections between two computers tend to pass through a relatively large number of internet routers, and each “hop” adds latency.
Using a CDN to cache content closer to users reduces both the transmission delay and the number of router hops.
Enabling a CDN
The process of enabling a CDN for a site depends on the CDN provider you use, but typically requires three steps:
- Enter a service agreement with the CDN provider. The service agreement is completed through a web portal.
- Configure the CDN.
- Modify your site implementation to use the CDN URL for assets that you want cached on the CDN. The changes you’ll need to make will vary significantly depending on the implementation of your site.
How a CDN works
When a user requests a file or asset, the request is routed to the closest POP.
If the data is present on the POP, the data is retrieved.
If the data isn’t present, the POP will request it from the origin server, return the data to the user and store local copy. Follow-on requests for the data will then be local to the POP.
There are four types of CDN available in Azure:
- Standard Microsoft
- Standard Akamai
- Standard Verizon
- Premium Verizon
The types vary by features and caching options.
This module focuses on the Standard Microsoft CDN. For more information on each type, see the Further Reading section of the Summary unit.
What is an Azure CDN?
Azure Content Delivery Network (CDN) is Azure’s content delivery network. It’s a distributed network of servers that is used to cache and store content. These servers are in locations that are close to end users to minimize latency.
The server locations are referred to as Point-of-presence (POP) locations. CDNs store cached data on edge servers, or servers close to your users, in these POP locations.
Features and Benefits of Microsoft Azure CDNs
Features that Microsoft Azure CDNs offer are:
- Dynamic site acceleration – speed up the delivery of static files
- HTTPS custom domain support – enable encrypted connections to custom domains, such as
https://www.contoso.com
- Azure diagnostics logs – view core analytic information and send the data to an Azure Storage Account, Azure Event Hubs, or Log Analytics Workspace
- File compression – increase performance by reducing the number of bytes in transit
- Geo-filtering – create rules on your CDN endpoint that uses specific paths to allow or block content in selected countries
For more information on these features, see the Further Reading section of the Summary unit.
The benefits from using Microsoft Azure CDNs include:
- Better performance and a smoother user experience with large or streamed files.
- Improved results with applications that require multiple round trips to display content.
- Greater scaling, especially with rapidly spiking loads, such as global launch events.
- Reduced traffic to the origin server.
Assessing the Suitability of CDNs
CDNs are typically best suited to technologies that employ many large static files. They can also be useful where you need the ability to serve files to a large number of simultaneous users worldwide, for example at a product launch. However, the standard Microsoft CDN in Azure doesn’t provide significant advantage with dynamic sites.
CDNs and Web Servers
Azure CDN supports Web servers running on virtual machines in Azure as origin servers. You can also connect Azure CDN to Azure Websites. By doing that, your site is distributed globally to reduce latency and increase user satisfaction. When you connect your Web site into CDN and propagate the files, you end up with an identical file structure in CDN.
Creating a CDN requires specifying a new CDN in Azure. Then you configure an endpoint that points to the origin server or blob storage account. Azure requires unique names for the CDN path and the origin server URL. The exercise in the next unit covers this procedure.
CDNs with Serverless apps and Web apps
A serverless web app in Azure requires no deployment, configuration, or management of servers. This model contains the following components:
- Blob storage – static web files (HTML, CSS, and JavaScript) are stored in Azure Blob storage, which implements static website hosting. Any dynamic interaction is through JavaScript calls to backend APIs. In consequence, there’s no server-side code to render the web page.
- Function apps – uses an event-driven model to invoke functions (pieces of code) by using triggers (events). With a serverless app, the trigger might be an HTTP get request.
- API Management – provides an API gateway that publishes and manages the APIs that client functions use. The gateway also helps to decouple the front-end applications from the APIs. API management can translate URLs, apply transforms to data requests between front and back ends, and configure response headers.
Azure CDN caches the serverless web app content, providing lower latency and faster content delivery to users. CDN can also provide an endpoint for encrypted HTTPS connections. Azure CDN provides similar interaction with Azure Web apps.
CDN Components
Now let’s look in more detail of how CDNs work. There are two concepts here: The CDN profile and CDN endpoints. This section also covers POP propagation times.
CDN Profiles
A CDN profile is a container for one or more CDN endpoints. Each CDN endpoint specifies a pricing tier and provides a link to the cached content on the POP.
When you create a profile, you can specify to create a CDN endpoint or you can create endpoints later. Note how you specify a pricing tier when you create the profile.
CDN Endpoints
When you create an endpoint, you must ensure that the endpoint type matches the origin source correctly. For example, static websites in Azure require an endpoint set to “custom origin”. With storage accounts, where you can create a CDN matched to that account.
For more information on integrating a storage account into an Azure CDN, see the Further Reading section of the Summary unit.
POP Propagation Times
Propagation times between POPs vary, according to which CDN profile and pricing tier you’re using.
- Azure CDN Microsoft Standard profile typically propagates in 10 minutes
- Azure CDN Verizon Standard and Azure CDN Verizon Premium profile typically complete in 10 minutes
- Azure CDN Akamai Standard profile usually propagates in 1 minute