How to Access Azure Hosting Batch account using the .NET client library

In the previous unit, you created Azure hosting  Cloud Batch and Azure Storage accounts. Then you uploaded FFmpeg as an application so that Batch jobs can use it for their tasks. Let’s review our scenario once more.

You’d like to automate the process of converting MP4 video files into animated GIFs. To do this, you create an app that can upload video files for conversion, start the conversion in parallel across all the uploaded files, monitor the progress, and finally download the results.

In this unit, we’ll look at Azure hosting Batch client libraries we can use to access the Batch and Storage accounts we created in the preceding exercise.

Azure hosting client libraries

There are two NuGet packages you’ll need to import into your app. The first is the Azure hosting Batch client library, Microsoft.Azure.Batch. You’ll use this library to create and delete Azure hosting  Batch Pools, create and delete workload jobs, create and delete tasks, and monitor running tasks.

The next library we’ll use in the solution is the Azure Storage client library, Microsoft.Azure.Storage.Blob, which allows you to connect to, and manage, files in an Azure hosting Storage account. You’ll use this library to manage the files in the Blob storage container. The app will scan the folder for all the uploaded videos, and gives access to the job to write out the tasks converted videos.

The Azure hosting Batch Management library, Microsoft.Azure.Management.Batch, is a third library that isn’t needed for your app because you manually created the Batch and Storage accounts.

We’ll add the NuGet packages we need with the dotnet add package command.

Typical usage pattern

Using the above libraries a typical approach to setting up a batch process is:

  1. Create Batch Service account (Batch Management API)
  2. Create a Storage account (Storage API)
  3. Create a Blob client to manage file processing (Storage API)
  4. Upload files to process (Storage API)
  5. Create a pool of compute nodes (Batch API)
  6. Create a job to run on those nodes (Batch API)
  7. Add a task to the job to run (Batch API)
  8. Monitor the tasks progress (Batch API)
  9. Download processed files when finished (Storage API)
  10. Delete the input storage container, delete the pool, delete the job (Batch API & Storage API)

Azure web hosting Batch Pools

A powerful feature of Azure web hosting Batch is how it manages compute resources. By defining pools of resources, Azure Batch has the flexibility to be set to a specific number of nodes. This is a good option if the size of the processing is well-defined and there’s a requirement to have a known fixed cost. The other option is to allow the pool to scale up or down automatically based on a formula you define. This can take into account fluctuations in demand, and allow an application to scale to meet that demand. This also has the added benefit of keeping the costs as low as possible.

When creating Azure web hosting Batch pools, you specify a number of attributes:

  • Target number of nodes (default limit 100)
  • The node’s operating system and version (a range of Windows and Linux images are available)
  • Type of node, dedicated or low-priority (dedicated nodes are more expensive but wont be preempted, low-priotity nodes are cheaper as they take advantage of surplus capacity in a region, but could have their tasks suspended if the resources are required elsewhere)
  • The nodes performance as size of CPU, memory, and storage
  • Auto-scaling policy (scaling is controlled by a formula you specify, for example based on the percentage of CPU in use)
  • Task scheduling policy (control the maximum number of tasks a node can run in parallel, and choose how tasks are distributed between nodes)
  • Start up tasks to be performed when nodes boot (used to set up the node to be able to run the tasks, like installing required applications)
  • Network configuration (subnet and VNet options)
  • Application packages (allow applications to be easily deployed to every node in a pool)

How to Setup Batch and Storage accounts in the Azure portal

Before you manage the Azure Batch services from a .Net application, you have to create the Azure Batch account and Storage account. You can use the Azure portal, Powershell, Azure CLI, or the Batch Management API to create these accounts.

In this unit, you’ll create an Azure Batch and Azure Storage account using the Azure portal.

Create New Storage Account

  1. Navigate to the Azure portal  in your favorite browser.
  2. On the Azure portal menu or from the Home page, select Create a resource.
  3. In the Search the Marketplace search box type storage, then select Storage account.
  4. Select an existing resource group or create a new one.
  5. Select Create to open the Create storage account form, as shown in the following screenshot.storage-account
  6. In the Storage account name field, enter a unique name. An example might be cutifypets<date><your initials>.
  7. Select a location close to you from the available options.
  8. Leave all the other options as their defaults and select Review + create, followed by Create.
  9. Wait for the deployment to complete. We now have a storage account that we’ll use in our processing to store input and output files. We’ll associate this storage account with our Batch account shortly.

Create new Batch Account

In order to create Batch workloads, we need to create an account within the Batch service.

  1. In the left navigation bar, select Create a resource.
  2. In the Search the Marketplace search box type batch, then select Batch Service from the list.
  3. Select Create to open the New Batch account form.batch-service
  4. Select an existing resource group, or create a new one for the resource we are adding in this module. To simplify cleanup once you have finished with this module, we recommend creating a new resource group. Note the name of the resource group you are using – it will be needed throughout these exercises.
  5. In the Account account name, enter a unique name. For example, you could enter cutifypets<date><your initials>.
  6. Select the link called Select a storage account, and in the panel that opens select the storage account your created earlier.
  7. Leaving all the other options as their defaults, select Review + create.
  8. Select Create.

    1 batch service

  9. Wait for the deployment to complete.
  10. On the Your deployment is complete screen, select the link to the Batch account, as shown in the following screenshot.

Create an application package containing ffmpeg

For our scenario, we’ve decided to enlist the help of FFmpeg to do our video conversion. FFmpeg is a powerful open-source multimedia framework that can, among many other things, decode, encode and transcode multimedia files. it’s a great choice for making website animated GIFs from our pet videos. To use the framework, we’ll add it as an application package to our Batch account. First we need to download a copy from the official FFmpeg site so we can then upload it into our Batch account.

  1. Open a new tab in your browser, and navigate to https://ffmpeg.zeranoe.com/builds/win64/static/ffmpeg-3.4-win64-static.zip.
  2. Save the zip file locally.
  3. Back in the Batch account UI in the portal, select Applications under the Features section of the sidebar, and then select Add to open up the New application configuration form.add-application-to-batch
  4. In Application id type ffmpeg.
  5. In Version type 3.4.
  6. In Application package, select the folder icon to the right.
  7. Navigate to the folder containing ffmpeg-3.4-win64-static.zip that you downloaded, and select Open.
  8. Select Submit to upload the app to our Batch account. This step can take a few moments, so wait for it to complete.
  9. Leave the Azure portal open for the next exercise.

Create Azure Batch workloads from .NET app

Azure Batch is a collection of resources you combine together to produce a large-scale parallel, highly performant solution.

You decide to write the app that manages the entire Azure Batch process as a .NET Core console application for now. First, the app uploads the pet videos to the cloud. It then creates an Azure Batch pool with compute nodes (Virtual Machines). The app then creates a job to run on those nodes.

Azure Batch
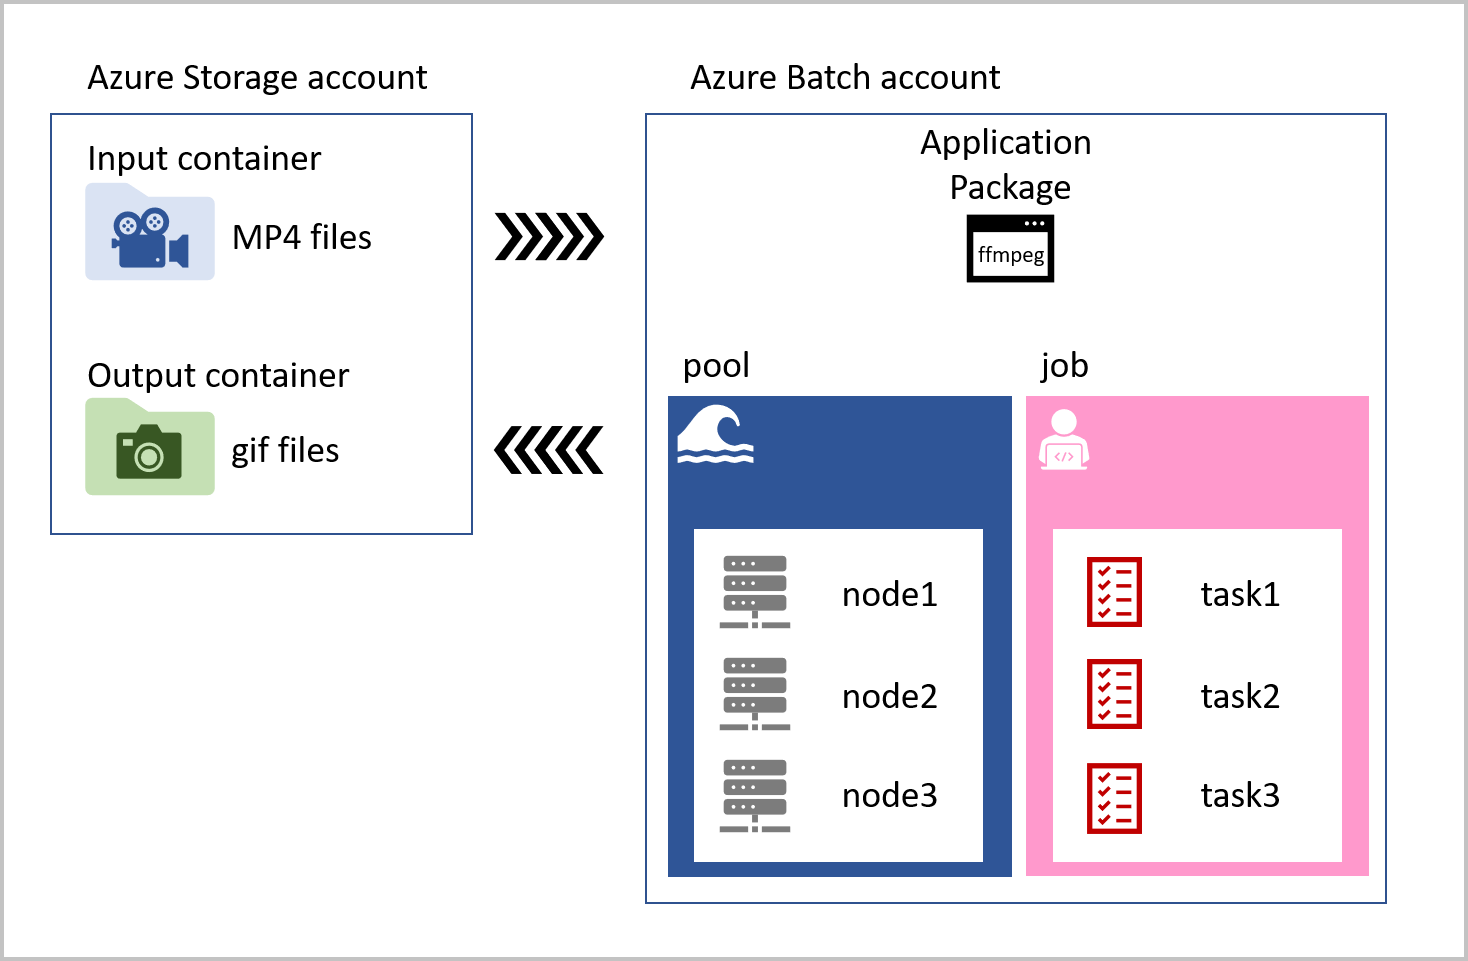
The job that runs on each compute node contains tasks for every video that has been uploaded to the input storage container. The task loads the MP4 pet videos, convert them to animated GIFs, and saves the files to an output container. The task reference the ffmpeg library that is stored as an application package in the Azure Batch account. Our solution is visualized in the following diagram.

Azure Batch is used in combination with Azure Storage. Azure Storage provides the location for any input data, a place for logging and monitoring information, and storage for the final output. The applications that an Azure Batch runs can also be stored there, or a more flexible option is to use the application package feature of Azure Batch.

The components of Azure Batch are:

Azure Batch account: A container that holds the following resources needed for our Azure Batch solution:

  • Application Package: Used to add applications that can be used by tasks in a Batch. An Azure Batch account can contain up to 20 application packages. A request can be made to increase this limit if your company requires more.
  • Pool: Contains compute nodes, which are the engines that run your Batch job. You specify the number, size, and operating system of nodes at creation time. An Azure Batch account can contain many pools.
  • Node: Each node can be assigned a number of tasks to run, the tasks are allocated and managed by Azure Batch. Nodes are associated with a specific pool.
  • Job: Jobs manage collections of tasks. A job is associated with a specific pool. An Azure Batch account can have many jobs.
  • Task: Tasks run applications. These can be contained in an application package, or in an Azure Storage container. Tasks process input files, and on completion can write to output containers.

Before you can start to manage the Azure Batch components from within a .NET application, you have to create the Azure Batch account and Azure Storage account. You can use Azure portal, Powershell, Hosting options or Azure CLI to create these accounts.

Why use an app to manage Batch workloads

Using an app to control Azure Batch processing enables you to automate the running and monitoring of the tasks in your Azure Batch. The rich set of client APIs that are available allow you to control the entire Batch workflow from your code. Once the batch processing has completed, the app can then delete the created resources automatically, keeping the Azure costs low.

Batch workloads make it possible to scale to thousands of nodes, making solutions that need processor intensive compute resources, like video trans-coding, weather forecasting, and image analysis more feasible. All these use cases become more efficient when they’re managed programmatically.

Batch client service APIs

Microsoft has released Batch APIs for a range of languages. Using these client libraries, you can programmatically control all the components of the Batch process. From the authentication, processing files, creating pools of nodes, creating jobs with tasks, and then monitoring the state of those running tasks.

In .NET, these Batch APIs are loaded as NuGet packages into your apps. We’ll also use the Azure Storage client library to manage files and assets in our solution.

How to use a .NET app to control Azure Batch

The steps you’ll be following in the rest of the module create Azure Batch and Azure Storage accounts using the Azure portal. Then you’ll upload the ffmpeg application as an application package to make it available to use in tasks. Your app will be using tasks that run ffmepg to convert the videos.

With the Batch and Storage accounts created in the Azure portal, you’ll then need to create a .NET Core console app in the Cloud Shell that uses the Azure Batch and Azure Storage client libraries.

Your app will use the Azure Storage client library to upload the MP4 videos into blob storage. The app will then use the Batch client library to create a pool with three nodes (Windows Server VMs), create a job, and then add video conversion tasks to the job to run on those nodes. With the tasks running, the app needs to monitor their status, check they complete successfully, and clear down unwanted resources.