GitHub Actions is a feature of GitHub that allows users to automate tasks directly on GitHub. It provides a way for users to easily create custom automated workflows or “Actions” that can be triggered by various events such as pushing code to the repository, creating or editing an issue, or manually triggering the workflow. These workflows can be used to build, test, package, release, and deploy applications and software, as well as automate other types of tasks.
Here, we’ll introduce GitHub Actions and workflows. You’ll learn the types of actions you can use and where to find them. You’ll also look at examples of these types of actions and how they fit in a workflow.
What is GitHub Actions?
GitHub Actions are packaged scripts to automate tasks in a software development workflow in GitHub. You can configure GitHub Actions to trigger complex workflows that meet your organization’s needs; each time developers check new source code into a specific branch, at timed intervals, or manually. The result is a reliable and sustainable automated workflow, which leads to a significant decrease in development time.
GitHub decreases time from idea to deployment
GitHub is designed to help teams of developers and DevOps engineers build and deploy applications quickly. There are many features in GitHub that enable this, but they generally fall into one of two categories:
- Communication: Consider all of the ways that GitHub makes it easy for a team of developers to communicate about the software development project: code reviews in pull requests, GitHub issues, project boards, wikis, notifications, and so on.
- Automation: GitHub Actions lets your team automate workflows at every step in the software-development process, from integration to delivery to deployment. It even lets you automate adding labels to pull requests and checking for stale issues and pull requests.
When combined, these features have allowed thousands of development teams to effectively decrease the amount of time it takes from their initial idea to deployment.
Use workflow automation to decrease development time
In this module we’ll focus on automation, so let’s take a moment to understand how teams can use automation to reduce the amount of time it takes to complete a typical development and deployment workflow.
Consider all of the tasks that must happen after the code is written, but before the code can be reliably used for its intended purpose. Depending on your organization’s goals, you’ll likely need to perform one or more of the following tasks:
- Ensure the code passes all unit tests
- Perform code quality and compliance checks to make sure the source code meets the organization’s standards
- Check the code and its dependencies for known security issues
- Build the code integrating new source from (potentially) multiple contributors
- Ensure the software passes integration tests
- Version the new build
- Deliver the new binaries to the appropriate filesystem location
- Deploy the new binaries to one or more servers
- If any of these tasks do not pass, report the issue to the proper individual or team for resolution
The challenge is to do these tasks reliably, consistently, and in a sustainable manner. This is an ideal job for workflow automation. If you’re already relying on GitHub, you’ll likely want to set up your workflow automation using GitHub Actions.
Where can you find GitHub Actions?
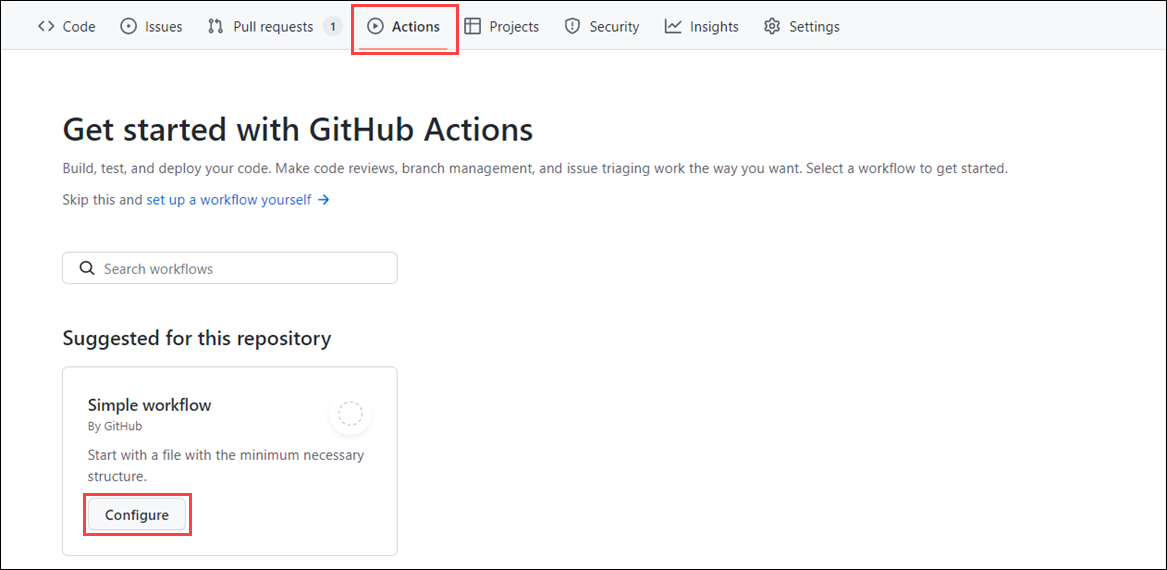
GitHub Actions are scripts that adhere to a yml data format. Each repository has an Actions tab that provides a quick and easy way to get started with setting up your first script. If you see a workflow that you think might be a great starting point, just select the Configure button to add the script and begin editing the source yml.
However, beyond those GitHub Actions featured on the Actions tab, you can:
- Search for GitHub Actions in the GitHub Marketplace. The GitHub Marketplace allows you to discover and purchase tools that extend your workflow.
- Search for open-source projects. For example, the GitHub Actions organization features many popular open-source repos containing GitHub Actions you can use.
- Write your own GitHub Actions from scratch. Furthermore, if you want, you could make them open source, or even publish them to the GitHub Marketplace.
Using open-source GitHub Actions
Many GitHub Actions are open source and available for anyone who wants to use them. However, just like with any open-source software, you need to carefully check them before using them in your project. Similar to recommended community standards with open-source software, such as including a README, code of conduct, contributing file, and issue templates, just to name a few, you can follow the following recommendations when using GitHub Actions:
- Review the action’s
action.ymlfile for inputs, outputs, and to make sure the code does what it says it does. - Check if the action is in the GitHub Marketplace. This is a good check, even if an action does not have to be on the GitHub Marketplace to be valid.
- Check if the action is verified in the GitHub Marketplace. This means that GitHub has approved the use of this action. However, you should still review it before using it.
- Include the version of the action you’re using by specifying a Git ref, SHA, or tag.
Two types of GitHub actions
There are two types of GitHub actions: container actions and JavaScript actions.
With container actions, the environment is part of the action’s code. These actions can only be run in a Linux environment that GitHub hosts. Container actions support many different languages.
JavaScript actions don’t include the environment in the code. You’ll have to specify the environment to execute these actions. You can run these actions in a VM in the cloud or on-premises. JavaScript actions support Linux, macOS, and Windows environments.
The anatomy of a GitHub action
Here’s an example of an action that performs a git checkout of a repository. This action, actions/checkout@v1, is part of a step in a workflow. This step also builds the Node.js code that was checked out. We’ll talk about workflows, jobs, and steps in the next section.
steps:
- uses: actions/checkout@v1
- name: npm install and build webpack
run: |
npm install
npm run build
Suppose you want to use a container action to run containerized code. Your action might look like this:
name: "Hello Actions"
description: "Greet someone"
author: "octocat@github.com"

inputs:
MY_NAME:
description: "Who to greet"
required: true
default: "World"

runs:
uses: "docker"
image: "Dockerfile"

branding:
icon: "mic"
color: "purple"
Notice the inputs section. Here, you’re getting the value of a variable called MY_NAME. This variable will be set in the workflow that runs this action.
In the runs section, notice you specify docker in the uses attribute. When you do this, you’ll need to provide the path to the docker image file. Here, it’s called Dockerfile. We won’t get into the specifics of Docker here, but if you would like more information, check out the Introduction to Docker Containers.
The last section, branding, personalizes your action in the GitHub Marketplace if you decide to publish it there.
You can find a complete list of action metadata at Metadata syntax for GitHub Actions.
What is a GitHub Actions workflow?
A GitHub Actions workflow is a process that you set up in your repository to automate software-development lifecycle tasks, including GitHub Actions. With a workflow, you can build, test, package, release, and deploy any project on GitHub.
To create a workflow, you add actions to a .yml file in the .github/workflows directory in your GitHub repository.
In the exercise coming up, your workflow file, main.yml, will look like this.
name: A workflow for my Hello World file
on: push
jobs:
build:
name: Hello world action
runs-on: ubuntu-latest
steps:
- uses: actions/checkout@v1
- uses: ./action-a
with:
MY_NAME: "Mona"
Notice the on: attribute. This is a trigger to specify when this workflow will run. Here, it triggers a run when there’s a push event to your repository. You can specify single events like on: push, an array of events like on: [push, pull_request], or an event-configuration map that schedules a workflow or restricts the execution of a workflow to specific files, tags, or branch changes. The map might look something like this:
on:
# Trigger the workflow on push or pull request,
# but only for the main branch
push:
branches:
- main
pull_request:
branches:
- main
# Also trigger on page_build, as well as release created events
page_build:
release:
types: # This configuration does not affect the page_build event above
- created
An event will trigger on all activity types for the event unless you specify the type or types. For a comprehensive list of events and their activity types, see: Events that trigger workflows in the GitHub documentation.
A workflow must have at least one job. A job is a section of the workflow that will be associated with a runner. A runner can be GitHub-hosted or self-hosted, and the job can run on a machine or in a container. You’ll specify the runner with the runs-on: attribute. Here, you’re telling the workflow to run this job on ubuntu-latest.
Each job will have steps to complete. In our example, the step uses the action actions/checkout@v1 to check out the repository. What’s interesting is the uses: ./action-a value, which is the path to the container action that you build in an action.yml file. We looked at the contents of an action.yml file in the What is GitHub Actions? section.
The last part of this workflow file sets the MY_NAME variable value for this workflow. Recall the container action took an input called MY_NAME.
For more information on workflow syntax, see Workflow syntax for GitHub Actions
GitHub-hosted versus self-hosted runners
We briefly mentioned runners as being associated with a job. A runner is simply a server that has the GitHub Actions runner application installed. In the previous workflow example, there was a runs-on: ubuntu-latest attribute within the jobs block, which told the workflow that the job will run using the GitHub-hosted runner that is running in the environment ubuntu-latest.
When it comes to runners, there are two options to choose from: GitHub-hosted runners or self-hosted runners. If you use a GitHub-hosted runner, each job runs in a fresh instance of a virtual environment that is specified by the GitHub-hosted runner type you define, runs-on: {operating system-version}. With self-hosted runners, you need to apply the self-hosted label, its operating system, and the system architecture. For example, a self-hosted runner with a Linux operating system and ARM32 architecture would look like the following, runs-on: [self-hosted, linux, ARM32].
Each type of runner has its benefits, but GitHub-hosted runners offer a quicker, simpler way to run your workflows, albeit with limited options. Self-hosted runners are a highly configurable way to run workflows in your own custom local environment. Self-hosted runners can be run on-premises or in the cloud. You can also use self-hosted runners to create a custom hardware configuration with more processing power or memory to run larger jobs, install software available on your local network, and choose an operating system not offered by GitHub-hosted runners.
GitHub Actions may have usage limits
GitHub Actions has some usage limits, depending on whether your runner is GitHub-hosted or self-hosted and your GitHub plan. For more information on usage limits, check out Usage limits, billing, and administration in the GitHub documentation.
Don’t forget to tell us about your favorite GitHub features in the comment below.
Read More: DigitalOcean Promo Code 2023: $200 credit for 60 days
 PowerShell