Creating a web application with artificial intelligence (AI) doesn’t need to involve a lot of code or creating services from scratch. Let’s imagine we wanted to create a website that can translate text for the user.
For the front end, we want something that will allow us to integrate our services without having to jump through a lot of hoops. A framework like Flask is a perfect choice. Flask is described by its creators as a “micro-framework”, meaning it provides the core services required, such as routing and templating, but otherwise allows you to use whatever backend services your application needs. It’s also lightweight, making it quick to set up and deploy. We don’t need a database or anything fancy. We just need a framework to create our UI, and be able to call the back-end service.
For the back end, rather than creating a machine learning model on your own, you can use a collection of Microsoft AI services (known as Azure Cognitive Service). These services can either be accessed via an SDK or an HTTP call. We can use the Translator service to meet our primary goal of translating text.
In this blog post, we’re going to explore Flask and the Translator service. We’ll see how we can create a web application to translate text into various languages.
Setting up a development environment
To get started writing our Flask application with Python, we need to set up our development environment, which will require a couple of items to be installed. Fortunately, the tools we’ll use are relatively common, so they’ll serve you well even beyond this module. You might even have them installed! We’ll use these tools to develop and test your application locally.
In this unit, you’ll learn how to install Python tooling and create a virtual Python environment. You’ll install Flask, which is the framework we’ll use for creating the website.
At a high level, we’ll perform the following steps:
- Install Visual Studio Code (if not already installed)
- Install Python (if not already installed)
- Create a directory for your code
- Create a virtual environment
- Install Flask and other libraries
Install Visual Studio Code
Visual Studio Code is an open-source code editor that allows you to create almost any type of application you might like. It’s backed by a robust extension marketplace where you can find add-ons to help make your life as a developer easier.
Install Python
To complete this unit, you must have Python 3.6 or later installed on your computer. There’s a chance you might already have Python installed, especially if you’ve already used it. You can confirm whether it’s installed by executing one of the following commands:
python --version
If Python is installed, the output shows the Python version number. If you need to install Python, follow the steps in the Install Python 3 documentation for Visual Studio Code. At the top of the article, choose the instructions for your configuration: Windows, Linux, or Mac.
If you’re using Windows, make sure that the folder location where you installed Python is added to your PATH environment variable. If you miss this step you’ll receive an error message “Python isn’t found”, even after performing the installation.
Create the project directory
Create a directory in the location of your choice. This directory will be your project directory, and will contain all of the code we’ll create. You can create a directory from a command or terminal window with one of the following commands:
# Windows md contoso cd contoso## macOS or Linux mkdir contoso cd contoso
Create a Python virtual environment
A Python virtual environment isn’t necessarily as complex as it sounds. Rather than creating a virtual machine or container, a virtual environment is a folder that contains all of the libraries we need to run our application, including the Python runtime itself. By using a virtual environment, we make our applications modular, allowing us to keep them separate from one another and avoid versioning issues. As a best practice you should always use virtual environments when working with Python.
To use a virtual environment, we’ll create and activate it. We create it by using the venv module, which you installed as part of your Python installation instructions earlier. When we activate it, we tell our system to use the folder we created for all of its Python needs.
# Windows
# Create the environment
python -m venv venv
# Activate the environment
.\venv\scripts\activate # macOS or Linux # Create the environment python -m venv venv # Activate the environment source ./venv/bin/activate
Install Flask and other libraries
With our virtual environment created and activated, we can now install Flask, the library we need for our website. We’ll install Flask by following a common convention, which is to create a requirements.txt file. The requirements.txt file isn’t special in and of itself; it’s a text file where we list the libraries required for our application. But it’s the convention typically used by developers, and makes it easier to manage applications where numerous libraries are dependencies.
During later exercises, we’ll use a couple of other libraries, including requests (to call Translator service) and python-dotenv (to manage our keys). While we don’t need them yet, we’re going to make our lives a little easier by installing them now.
-
- In the command or terminal window, run the following command to open the directory in Visual Studio Code:
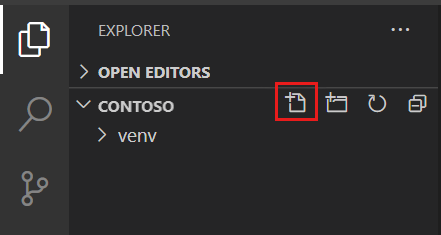
code - In Visual Studio Code, in the Explorer window, select New File next to the contoso directory

- Name the file requirements.txt, and add the following text:
flask python-dotenv requests - Save the file by clicking Ctrl-S, or Cmd-S on a Mac
- Return to the command or terminal window and perform the installation by using pip to run the following command:
- In the command or terminal window, run the following command to open the directory in Visual Studio Code:
pip install -r requirements.txtThe command downloads the necessary libraries and their dependencies.
Congratulations! You’ve now setup your environment for development!
Flask fundamentals
Flask is an open-source web “micro-framework”. When the creators use the term “micro-framework”, they mean that the framework will perform the required tasks of a web framework, but that it doesn’t include advanced features, or other specific requirements that your application must follow to work correctly. This approach allows Flask to be extremely flexible, and perfect for use as a front end to existing back ends or APIs – like Cognitive Services!
When creating a web application with any framework, there are a couple of core concepts we need to understand – routing, methods, and templating. Let’s explore these concepts before we write our code.
Responding to user requests with routes
When a user uses a web application, they indicate what they want to do, or the information they’re seeking, by browsing to different uniform resource locators (or URLs). They might type out an address directly (say https://adventure-works.com), or select a link, or a button that includes the appropriate URL. On an e-commerce site you might have URLs that look like the following:
https://adventure-works.com/for the main pagehttps://adventure-works.com/products/widgetfor details on a Widgethttps://adventure-works.com/cart/buyto complete a purchase
As a developer, we actually don’t need to worry about the first part of the URL, or the domain (adventure-works.com in our example). Our application is put into action based on whatever comes after the domain name, starting with the /. The portion after the domain name is what’s known as a route.
A route is a path to an action. Similar to tapping on a button in a mobile app, a route indicates the action the user wants to perform. We’ll register different routes in our web application to respond to the various requests our application supports.
In our application, we indicate how we want to respond to a particular route request by providing a function. A route is a map to a function. When we think about writing code in general, this concept is relatively natural. When we want to perform a particular action, we call a function. Our users will do the exact same thing! They’ll just do it a little differently, by accessing a route.
Methods or verbs
Routes can be accessed in many ways, through what are known as methods or verbs (the two terms mean the same thing and can be used interchangeably). How the route is accessed provides additional context about the state of the user request and what action the user wants to perform.
There are many methods available when creating a web application, but the two most common (and the only two we’ll focus on) are GET and POST. GET typically indicates that the user is requesting information, while POST indicates that the user needs to send us something and receive a response.
A common application flow that uses GET and POST revolves around using a form. Let’s say we create an application where the user wants to register for a mailing list:
- The user accesses the sign-up form via GET
- The user completes the form and selects the submit button
- The information from the form is sent back to the server by using POST
- A “success” message is returned to the user
As you might suspect, the user doesn’t directly indicate the verb they want to use, it is controlled by the application. Generally speaking, if the user navigates to a URL directly, by typing it in or by selecting a link, they access the page by using GET. When they select a button for a form, they typically send the information via POST.
Templates
Hypertext Markup Language, or HTML, is the language used to structure the information displayed on a browser, while Cascading Style Sheets, or CSS, is used to manage the style and layout. When creating an application, most of the HTML will be static, meaning it won’t change. However, to make our pages dynamic we need to be able to programmatically put information into an HTML page. Nearly every web framework supports this requirement through templates.
A template allows you to write the core HTML (or a template) and indicate placeholders for the dynamic information. Probably the most common syntax for placeholders is {{ }}. Jinja, the templating engine for Flask, uses this syntax.
<h1>Welcome, {{ name }}</h1>In the preceding example, we have our HTML of h1 (a header), with the text we want to display. The {{ name }} indicates that we want to display a variable named name right after Welcome. By using this syntax we can write our HTML with our existing skills, and inject the dynamic information as needed.
Create an app
We’re going to create our application iteratively, focusing on specific concepts as we go. To start, we’ll create the landing page for our application, which will display the form the user will use.
Typically, the entry point for Flask applications is a file named app.py. We’re going to follow this convention and create the core of our application. We’ll perform the following steps:
- Create our core application
- Add the route for our application
- Create the HTML template for our site
- Test the application
Create core application
-
- Returning to the instance of Visual Studio Code we were using previously, create a new file named app.py by clicking New file in the Explorer tab
- Add the code to create your Flask application
- Returning to the instance of Visual Studio Code we were using previously, create a new file named app.py by clicking New file in the Explorer tab
from flask import Flask, redirect, url_for, request, render_template, session

app = Flask(__name__)
The import statement includes references to Flask, which is the core of any Flask application. We’ll use render_template in a while, when we want to return our HTML.
app will be our core web application. We’ll use it when we register our routes in the next step.
Learn More: 5 Best Web Hosting Reddit Users Recommend in 2022 (FAST & SECURE)
Add the route
Our application will use one route – /. This route is sometimes called either the default or the index route, because it’s the one that will be used if the user doesn’t provide anything beyond the name of the domain or server.
Add the following code to the end of app.py
@app.route('/', methods=['GET'])
def index():
return render_template('index.html')
By using @app.route, we indicate the route we want to create. The path will be /, which is the default route. We indicate this will be used for GET. If a GET request comes in for /, Flask will automatically call the function declared immediately below the decorator, index in our case. In the body of index, we indicate that we’ll return an HTML template named index.html to the user.
Create the HTML template for our form
Jinja, the templating engine for Flask, focuses quite heavily on HTML. As a result, we can use all the existing HTML skills and tools we already have. We’re going to use Bootstrap to lay out our page, to make it a little prettier. By using Bootstrap, we’ll use different CSS classes on our HTML. If you’re not familiar with Bootstrap, you can ignore the classes and focus on the HTML (which is really the important part).
Templates for Flask need to be created in a folder named templates, which is fitting. Let’s create the folder, the necessary file, and add the HTML.
- Create a new folder named templates by selecting New Folder in the Explorer tool in Visual Studio Code
- Select the templates folder you created, and select New File to add a file to the folder
- Name the file index.html
- Add the following HTML
<!DOCTYPE html>
<html lang="en">
<head>
<meta charset="UTF-8">
<meta name="viewport" content="width=device-width, initial-scale=1.0">
<link rel="stylesheet" href="https://cdn.jsdelivr.net/npm/bootstrap@4.5.3/dist/css/bootstrap.min.css"
integrity="sha384-TX8t27EcRE3e/ihU7zmQxVncDAy5uIKz4rEkgIXeMed4M0jlfIDPvg6uqKI2xXr2" crossorigin="anonymous">
<title>Translator</title>
</head>
<body>
<div class="container">
<h1>Translation service</h1>
<div>Enter the text you wish to translate, choose the language, and click Translate!</div>
<div>
<form method="POST">
<div class="form-group">
<textarea name="text" cols="20" rows="10" class="form-control"></textarea>
</div>
<div class="form-group">
<label for="language">Language:</label>
<select name="language" class="form-control">
<option value="en">English</option>
<option value="it">Italian</option>
<option value="ja">Japanese</option>
<option value="ru">Russian</option>
<option value="de">German</option>
</select>
</div>
<div>
<button type="submit" class="btn btn-success">Translate!</button>
</div>
</form>
</div>
</div>
</body>
</html>
The core components in the HTML above are the textarea for the text the user wishes to translate, and the dropdown list (select), which the user will use to indicate the target language. If you want to add more languages, you can consult the list of supported languages for other options. Set the value attribute to the language code, for example, pl for Polish.
Finding the Best Django Hosting Providers 2022
Test the application
With our initial site created, it’s time to test it! We’re going to use the integrated terminal inside Visual Studio Code to make our lives a little easier.
- Open the integrated terminal by selecting Ctrl-` or Cmd-` on a Mac
- Run the following command to set the Flask runtime to development, which means that the server will automatically reload with every change
# Windows
set FLASK_ENV=development

# Linux/macOS
export FLASK_ENV=development
- Run the application!
flask run - Open the application in a browser by navigating to http://localhost:5000
You should see the form displayed! Congratulations!
(Continue )