The Azure web hosting batch client API allows you to programmatically control all the components of an Azure web hosting Batch account.
Continuing to enhance your companies console app, you’ll now add all the components needed to convert the videos you uploaded in the last exercise.
By the end of this exercise, you’ll have a working Batch process that can convert MP4 videos to animated GIFs. The app will add a job to the existing pool, and add and start the video conversion tasks on cloud web hosting.
Enhance the code using the batch client
- In the Cloud Shell, edit the
Program.csfile in the editor: - Add a constant to Program.cs for the JobId we’ll use in our Batch job.
- Replace these lines in the Main method:
With a using block for the batchClient
using (BatchClient batchClient = BatchClient.Open(sharedKeyCredentials))
{
    // Create the Batch pool, which contains the compute nodes that execute the tasks.
    await CreateBatchPoolAsync(batchClient, PoolId);

    // Create the job that runs the tasks.
    await CreateJobAsync(batchClient, JobId, PoolId);

    // Create a collection of tasks and add them to the Batch job.
    await AddTasksAsync(batchClient, JobId, inputFiles, outputContainerSasUrl);
}
Create a job on cloud web hosting
- Add this new method,
CreateJobAsync()to Program.cs to create and add a job to the pool.
private static async Task CreateJobAsync(BatchClient batchClient, string jobId, string poolId)
{
        Console.WriteLine("Creating job [{0}]...", jobId);

        CloudJob job = batchClient.JobOperations.CreateJob();
        job.Id = jobId;
        job.PoolInformation = new PoolInformation { PoolId = poolId };

        await job.CommitAsync();
}
The code above uses the batch client to create a job. The method assigns the given job id and information about the pool.
Add a task
- With the job created, the last step is to add a task to the job. Add the following method,
AddTaskAsync(), to Program.cs.
private static async Task<List<CloudTask>> AddTasksAsync(BatchClient batchClient, string jobId, List<ResourceFile> inputFiles, string outputContainerSasUrl)
{
    Console.WriteLine("Adding {0} tasks to job [{1}]...", inputFiles.Count, jobId);

    // Create a collection to hold the tasks added to the job
    List<CloudTask> tasks = new List<CloudTask>();

    for (int i = 0; i < inputFiles.Count; i++)
    {
        // Assign a task ID for each iteration
        string taskId = String.Format("Task{0}", i);

        // Define task command line to convert the video format from MP4 to animated GIF using ffmpeg.
        // Note that ffmpeg syntax specifies the format as the file extension of the input file
        // and the output file respectively. In this case inputs are MP4.
        string appPath = String.Format("%AZ_BATCH_APP_PACKAGE_{0}#{1}%", appPackageId, appPackageVersion);
        string inputMediaFile = inputFiles[i].FilePath;
        string outputMediaFile = String.Format("{0}{1}",
            System.IO.Path.GetFileNameWithoutExtension(inputMediaFile),
            ".gif");

        // This is the dos command built by using the ffmpeg application package, the paths from the input container
        string taskCommandLine = String.Format("cmd /c {0}\\ffmpeg-3.4-win64-static\\bin\\ffmpeg.exe -i {1} {2}", appPath, inputMediaFile, outputMediaFile);

        // Create a cloud task (with the task ID and command line) and add it to the task list
        CloudTask task = new CloudTask(taskId, taskCommandLine);
        task.ResourceFiles = new List<ResourceFile> { inputFiles[i] };

        // Task output file will be uploaded to the output container in Storage.
        List<OutputFile> outputFileList = new List<OutputFile>();
        OutputFileBlobContainerDestination outputContainer = new OutputFileBlobContainerDestination(outputContainerSasUrl);
        OutputFile outputFile = new OutputFile(outputMediaFile,
                                                new OutputFileDestination(outputContainer),
                                                new OutputFileUploadOptions(OutputFileUploadCondition.TaskSuccess));
        outputFileList.Add(outputFile);
        task.OutputFiles = outputFileList;
        tasks.Add(task);
    }

    // Call BatchClient.JobOperations.AddTask() to add the tasks as a collection rather than making a
    // separate call for each. Bulk task submission helps to ensure efficient underlying API
    // calls to the Batch service.
    await batchClient.JobOperations.AddTaskAsync(jobId, tasks);

    return tasks;
}
This final method does all the complex actions of the web app. A task is added to the job for each file that has been uploaded. The task takes the form of a shell command. The app (ffmpeg) has been installed on each node at a specific location because we used an application package. The Batch service stores that location in an environment variable on the node so that it can be accessed via:
%AZ_BATCH_APP_PACKAGE_ffmpeg#3.4%
Using this approach it’s easy to upload and increment newer versions of the ffmpeg web app. The command looks into the zip folder, and executes:
ffmpeg.exe -i input-filename output-filename
For the best performance, the tasks are added as a list to the batchClient.JobOperations.AddTaskAsync. This is more efficient than making a separate call for each file.
Test the console app
- Select the ellipses in the top-right corner of the code editor.
- Select Close Editor, and in the dialog select Save.
- In the integrated terminal, build and run the app.
- The below messages are written to the terminal.
Creating container [input].
Creating container [output].
Uploading file ~\cutifypets\InputFiles.mp4 to container [input]...
Uploading file ~\cutifypets\InputFiles.mp4 to container [input]...
Uploading file ~\cutifypets\InputFiles.mp4 to container [input]...
Uploading file ~\cutifypets\InputFiles.mp4 to container [input]...
Uploading file ~\cutifypets\InputFiles.mp4 to container [input]...
Uploading file ~\cutifypets\InputFiles.mp4 to container [input]...
Creating pool [WinFFmpegPool]...
Creating job [WinFFmpegJob]...
Adding 2 tasks to job [WinFFmpegJob]...
- The console web app closes as soon as it has added the tasks. In Azure web hosting, the pool, nodes, job, and tasks are created. There’s nothing monitoring what’s happening within the app as it has exited. To see the current status of the conversion, and check the results, return to the Azure portal.
- In the Azure portal, on the Dashboard select the Batch account beginning
cutify.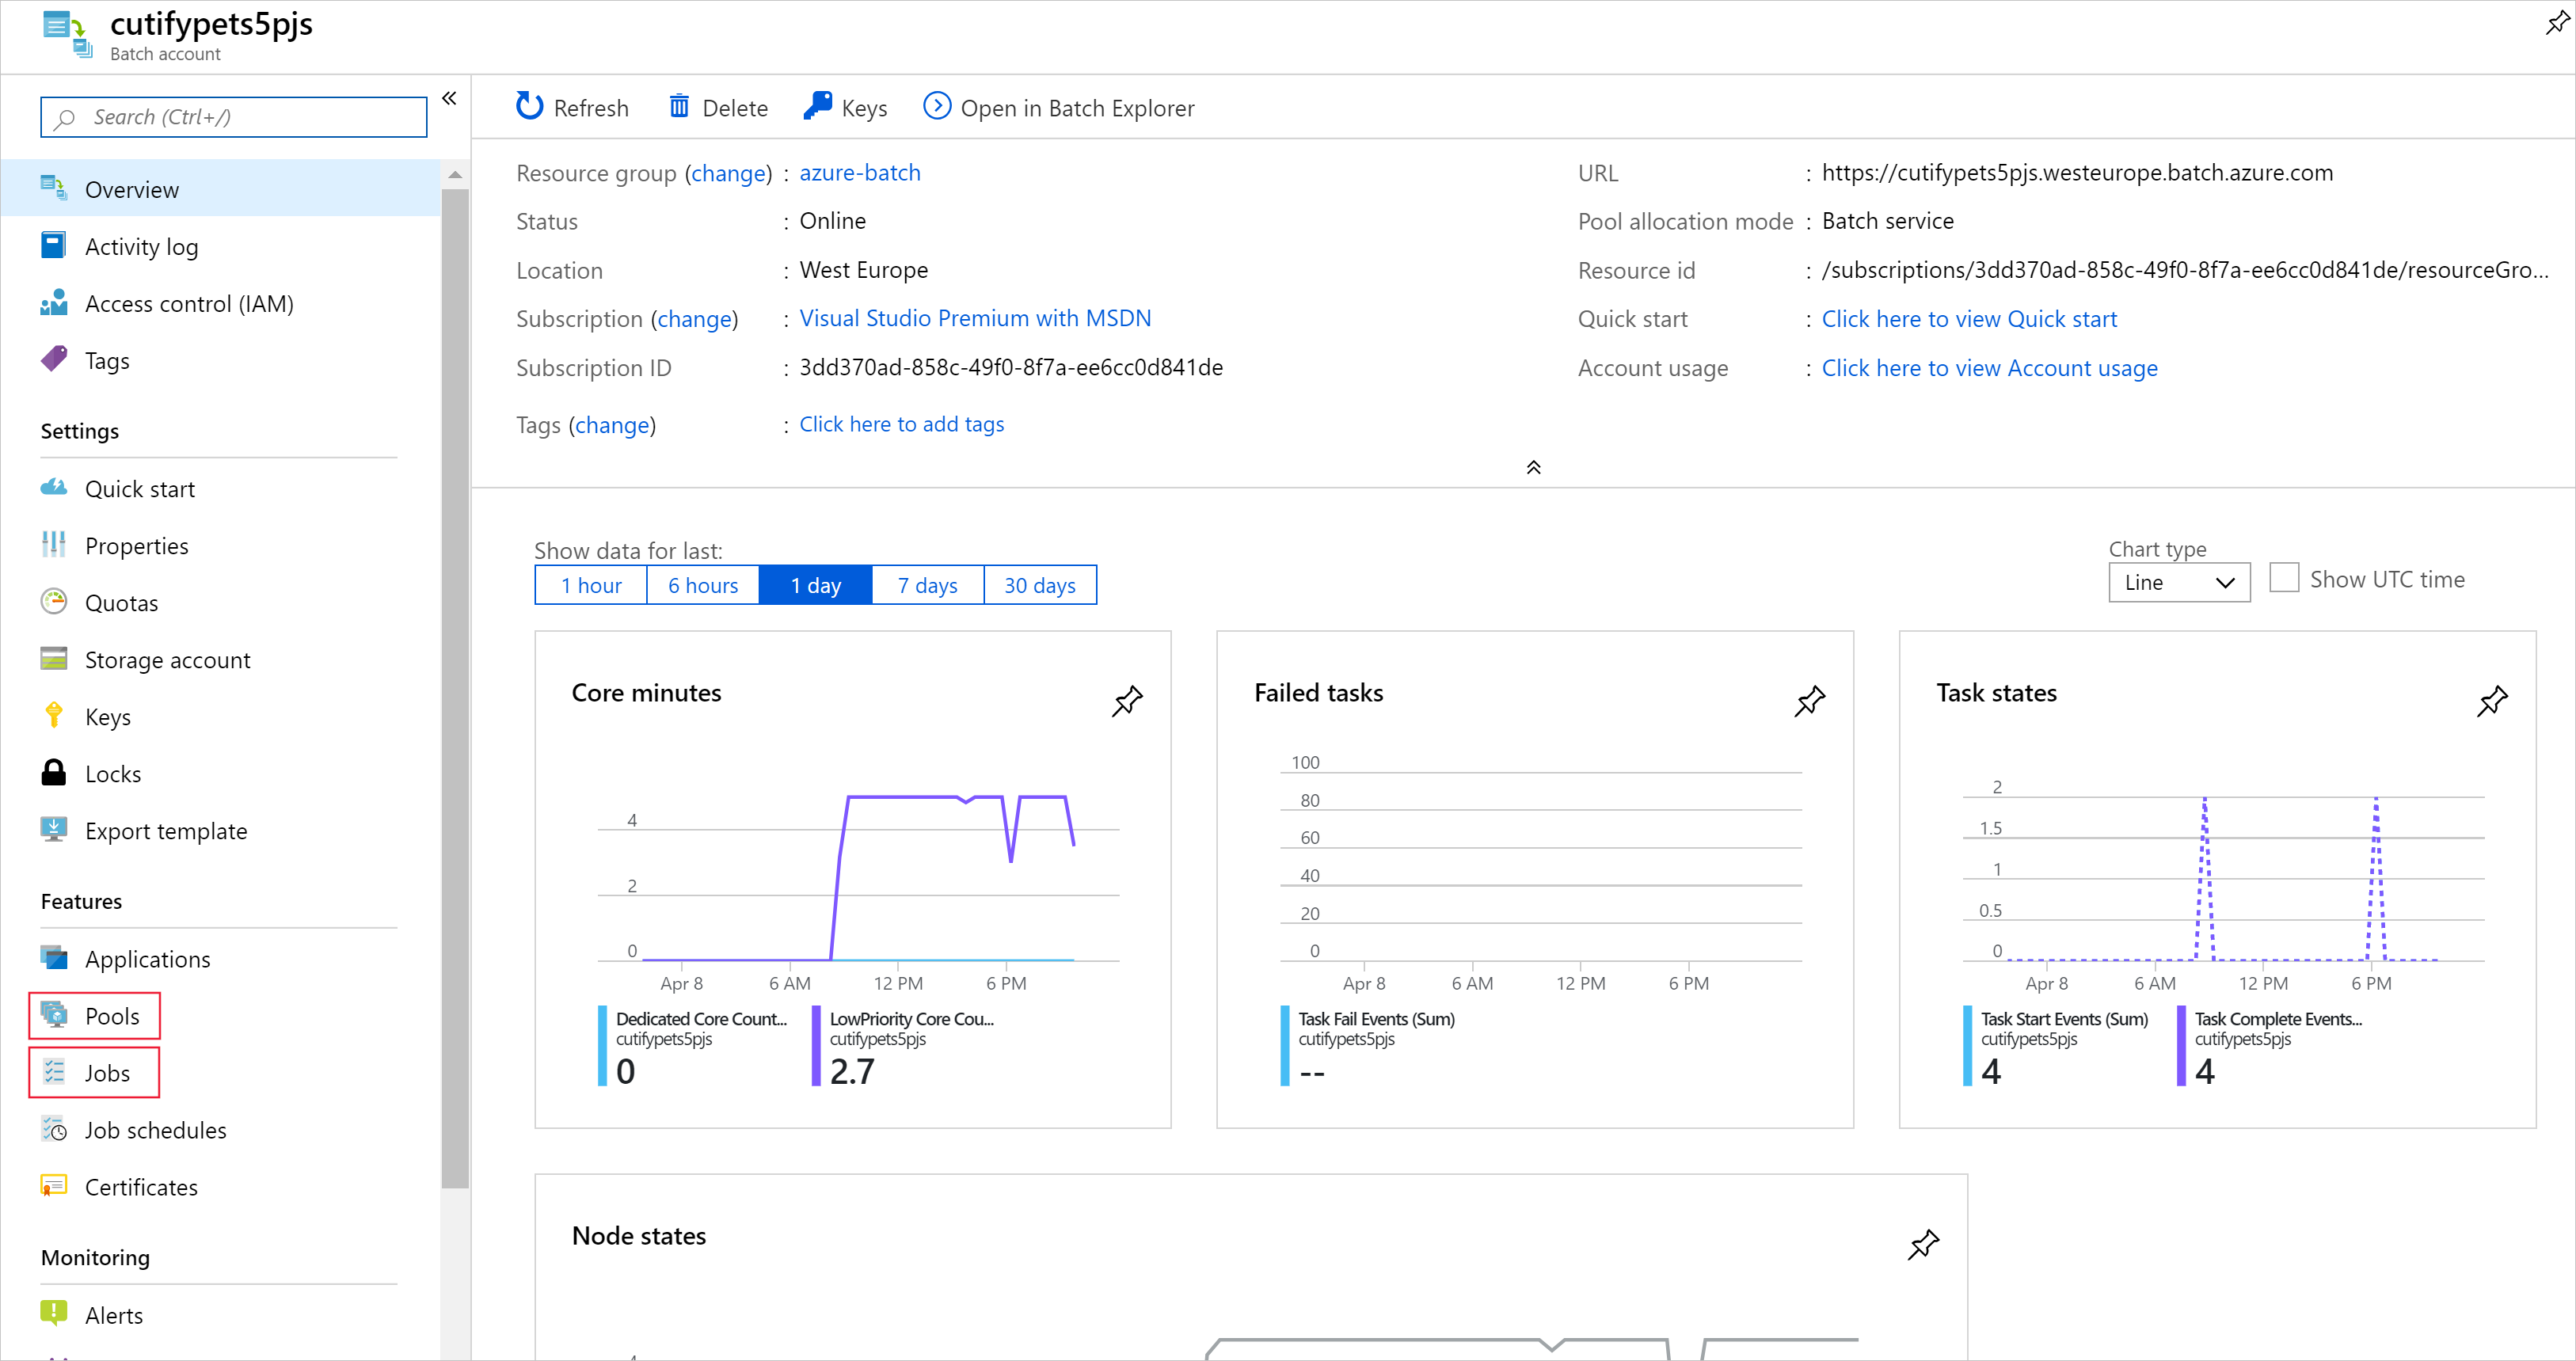
- The health dashboard is shown on the Overview page, from here you can check the status of the current running job and the pool of hosting nodes.
- On the left, select Jobs, select WinFFmpegJob. On this page, you’ll see the current status of the tasks.
- When the tasks have completed, on the left select Storage accounts, then select the storage account your created in the first exercise.
- On the left select Blobs, then select the output folder
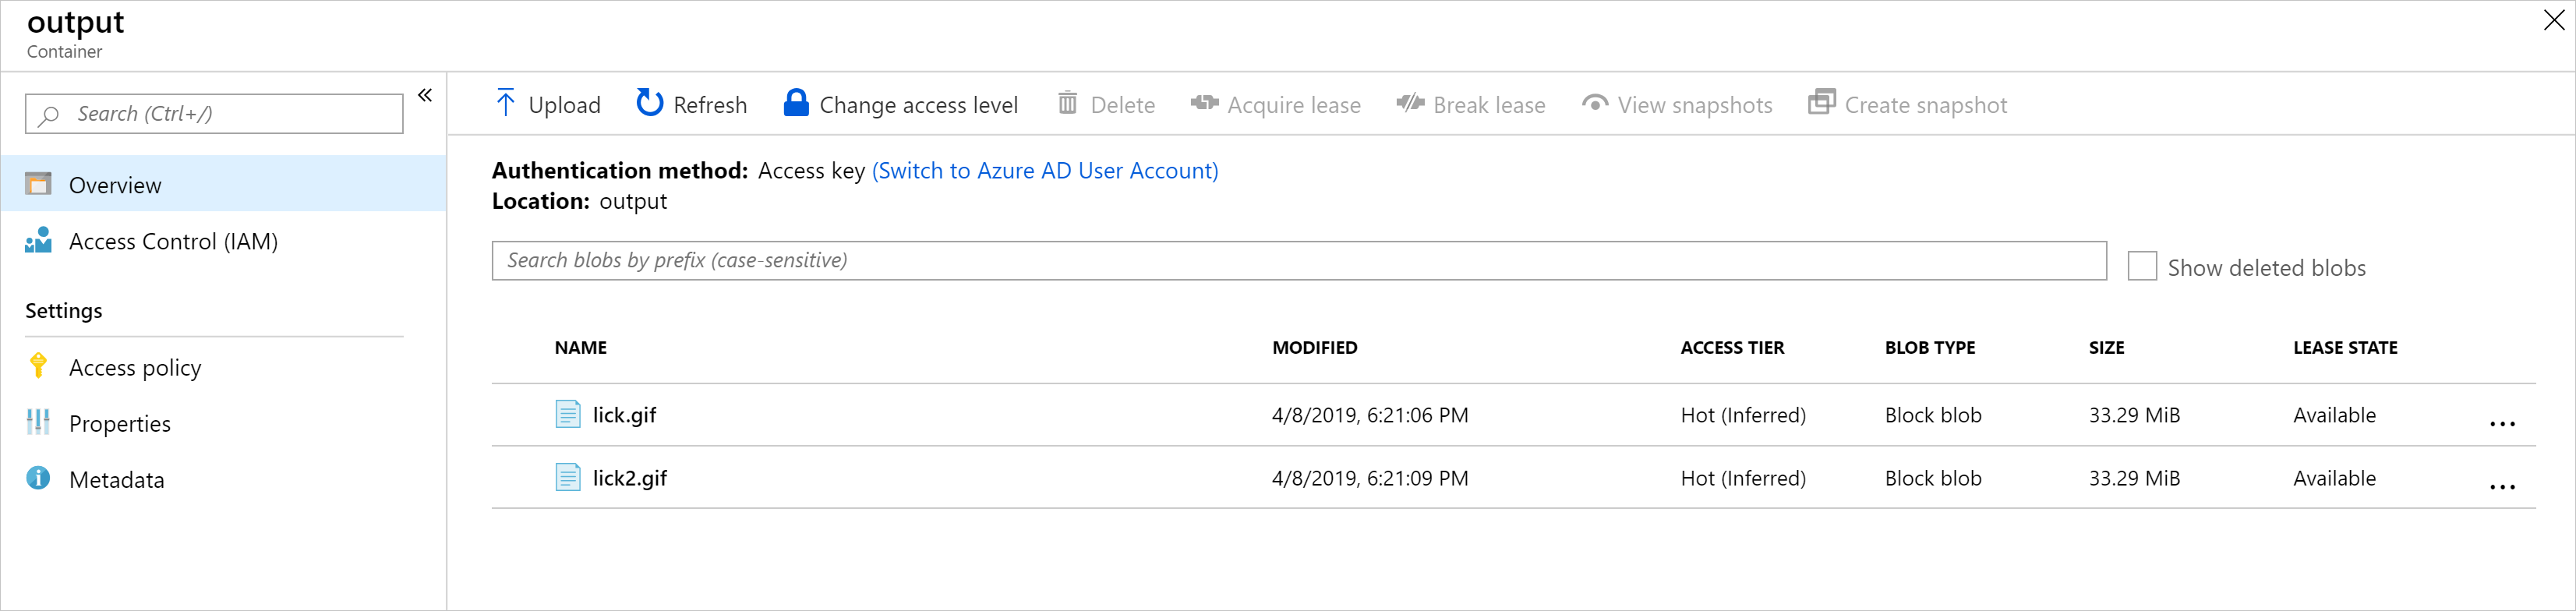
- Download a file to check the cutest pet video from cloud.