Modern Cloud Security Layer [Explain]

Healthcare organizations store personal and potentially sensitive customer data. Financial institutions store account numbers, balances, and transaction history. Retailers store purchase history, account information, and demographic details of customers. A security incident might expose this sensitive data, which might cause personal embarrassment or financial harm. How do you ensure the integrity of their data and ensure that your systems are secure?

In this article, you’ll learn about the important elements of the security pillar.

What is security?

Security is ultimately about protecting the data that your organization uses, stores, and transmits. The data that your organization stores or handles is at the heart of your securable assets. This data might be sensitive data about customers, financial information about your organization, or critical line-of-business data that supports your organization. Securing the infrastructure on which the data exists, along with the identities used to access it, is also critically important.

Your data might be subject to additional legal and regulatory requirements, depending on where you’re located, the type of data you’re storing, or the industry in which your application operates.

For instance, in the healthcare industry in the United States, there’s a law called the Health Insurance Portability and Accountability Act (HIPAA). In the financial industry, the Payment Card Industry Data Security Standard is concerned with the handling of credit card data. Organizations that store data that’s in scope for these laws and standards are required to ensure that certain safeguards are in place for the protection of that data. In Europe, the General Data Protection Regulation (GDPR) lays out the rules of how personal data is protected, and defines individuals’ rights related to stored data. Some countries require that certain types of data do not leave their borders.

When a security breach occurs, there can be substantial impacts to the finances and reputation of both organizations and customers. This breaks down the trust that customers are willing to instill in your organization, and can affect the organization’s long-term health.
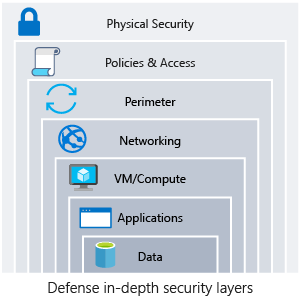
Defense in depth

A multilayered approach to securing your environment will increase the security posture of your environment. Commonly known as defense in depth, we can break down the layers as follows:

  • Data
  • Applications
  • VM/compute
  • Networking
  • Perimeter
  • Policies and access
  • Physical security

Each layer focuses on a different area where attacks can happen, and creates a depth of protection if one layer fails or is bypassed by an attacker. If you were to focus on just one layer, an attacker would have unfettered access to your environment if they got through this layer.

Addressing security in layers increases the work an attacker must do to gain access to your systems and data. Each layer will have different security controls, technologies, and capabilities that will apply. When you’re identifying the protections to put in place, cost is often of concern. You’ll need to balance cost with business requirements and overall risk to the business.

cloud-security-layers

No single security system, control, or technology will fully protect your architecture. Security is more than just technology; it’s also about people and processes. Creating an environment that looks holistically at security and makes it a requirement by default will help ensure that your organization is as secure as possible.

Protect from common attacks

At each layer, there are some common attacks that you’ll want to protect against. The following list isn’t all-inclusive, but it can give you an idea of how each layer can be attacked and what types of protections you might need.

  • Data layer: Exposing an encryption key or using weak encryption can leave your data vulnerable if unauthorized access occurs.
  • Application layer: Malicious code injection and execution are the hallmarks of application-layer attacks. Common attacks include SQL injection and cross-site scripting (XSS).
  • VM/compute layer: Malware is a common method of attacking an app hosting environment, which involves executing malicious code to compromise a system. After malware is present on a system, further attacks that lead to credential exposure and lateral movement throughout the environment can occur.
  • Networking layer: Unnecessary open ports to the internet are a common method of attack. These might include leaving SSH or RDP open to virtual machines. When these protocols are open, they can allow brute-force attacks against your systems as attackers attempt to gain access.
  • Perimeter layer: Denial-of-service (DoS) attacks often happen at this layer. These attacks try to overwhelm network resources, forcing them to go offline or making them incapable of responding to legitimate requests.
  • Policies and access layer: This layer is where authentication occurs for your application. This layer might include modern authentication protocols such as OpenID Connect, OAuth, or Kerberos-based authentication such as Active Directory. The exposure of credentials is a risk at this layer, and it’s important to limit the permissions of identities. You also want to have monitoring in place to look for possible compromised accounts, such as logins coming from unusual places.
  • Physical layer: Unauthorized access to facilities through methods, such as door drafting and theft of security badges, can happen at this layer.

Shared security responsibility

Revisiting the model of shared responsibility, we can reframe this in the context of security. Depending on the type of service you select, some security protections will be built in to the service, while others will remain your responsibility. Careful evaluation of the services and technologies that you select will be necessary, to ensure that you’re providing the proper security controls for your architecture.

What is PowerShell?

powershellPowerShell

Microsoft PowerShell is a free and open source command shell, scripting language, and remote management framework. PowerShell is intended for network administrators, cloud hosting administration, not professional web programmers, and has replaced the old CMD shell and VBScript as the most popular shell and scripting language for Windows. PowerShell is also available for GNU/Linux and Mac OS on GitHub (https://github.com/PowerShell/PowerShell).

Strictly speaking, PowerShell is part of the Windows Management Framework (WMF), so Microsoft and others often refer to “WMF” instead of to “PowerShell”, but this is a branding and marketing mistake, so manual will almost always just refer to PowerShell and rarely to WMF.
Similar to the CMD shell, you can work in PowerShell interactively, manually typing and executing commands as needed while “in” the shell, or it can run uncompiled scripts written in a scripting language specifically for it. PowerShell scripts end with the “psi” filename extension, not “bat” or “cmd”, and are simple text files.

Unlike the CMD shell, however, PowerShell is built on top of the .NET Framework and is itself a compiled .NET program. PowerShell does not pipe text streams, as virtually every other Windows- or UNIX-based shell does, but complete .NET objects, including all of their properties and methods!

These properties and methods are accessible to your PowerShell scripts, and PowerShell was specifically designed around them. This object-orientation in a shell scripting language is sometimes disorienting to administrators with prior shell language experience.

How to Create status badges and configure environment protections on Github

In this article, we learn how to remove workflow artifacts from GitHub and change the default retention period. Next, you learn how to create a workflow status badge and add it to your README.md file. Finally, you identify some important workflow environment protections and how to enable them.

Remove workflow artifacts from GitHub

By default, GitHub stores any build logs and uploaded artifacts for 90 days before they are deleted. This retention period can be customized based on the type of repository and the usage limits set for your specific GitHub product. There is a lot more information regarding usage limits and artifact retention than what makes sense to cover here, so check out Usage limits, billing, and administration for more information.

But let’s say you’re reaching your organization’s storage limit for GitHub artifacts and packages and you want to remove old artifacts without increasing your usage limits and blocking your workflows. You can reclaim used GitHub Actions storage by deleting artifacts before they expire on GitHub. You can do this two ways as described in the following sections. Please note that both ways require write access to the repository.


Manually delete artifacts from your repository

To manually delete an artifact on GitHub you need to navigate to the Actions tab, select the workflow from the left sidebar, and then select the run you want to see.


You can also use the Artifacts REST API to delete artifacts. This API will also allow you to download and retrieve information about work artifacts.

Change the default retention period

You can change the default artifact and log retention period for your repository, organization, or enterprise account. Keep in mind that changing the retention period will only apply to new artifacts and log files and does not apply to existing objects. The process to configure these settings is a bit different for a repository, organization, or enterprise. Check the summary at the end of this module for more information on configuring artifacts and log retentions.

In addition to configured settings across a repository, organization, or enterprise, you can define a custom retention period for individual artifacts right within the workflow file. This is good for individual use cases where you want a specific artifact’s retention to be different than the default or configured setting. This can be done using retention-days and then a value within the step with the upload-artifact action.

The following example uploads an artifact that will persist for 10 days instead of the default 90 days.

- name: 'Upload Artifact'
uses: actions/upload-artifact@v2
with:
name: my-artifact
path: my_file.txt
retention-days: 10

Add a workflow status badge to your repository

It’s helpful to know the status of a workflow without having to visit the Actions tab to see if it successfully completed. Adding workflow status badges to your repository README.md file allows you to quickly see if your workflows are passing or failing. While it’s common to add a status badge to a repository README.md file, it can also be added to any web page. By default, status badges display the workflow statuses on your default branch, but you can also display workflow status badges on other branches using the branch and event parameters.

Below is an example of what needs to be added to a file to see a workflow status badge.

![example branch parameter.](https://github.com/mona/special-octo-eureka/actions/workflows/grading.yml/badge.svg?branch=my-workflow)

For example, adding the branch parameter along with the desired branch name at the end of the URL will show the workflow status badge for that branch instead of the default branch. This makes it easy to create a table-like view within your README.md file to display workflow statuses based on branches, events, services, or environments to name a few.

workflow

You also have the ability to create a status badge using GitHub. To do this, navigate to the workflows section within the Actions tab and select a specific workflow. The Create status badge option will allow you to generate the markdown for that workflow and set the branch and event parameters.

create-status-badge

Add workflow environment protections

Security is a big deal, so it makes sense to configure your workflow environment with protection rules and secrets. With these in place, a job won’t start or access any defined secrets in the environment until all of the environment’s protection rules pass. Currently, protection rules and environment secrets only apply to public repositories.


There are two environment protection rules that can be applied to workflows within public repositories, required reviewers and wait timer.

  • Required reviewers allow you to set a specific person or team to approve workflow jobs that reference the job’s environment.
  • Wait timer can be used to delay a job for a specific amount of time after the job has been triggered.

So, for example, let’s say you need to create a workflow to a production environment that a dev team needs to approve before the deployment occurs. The steps would look like the following:

  1. Create a production environment within the repository.
  2. Configure the required reviewers environment protection to require an approval from the specific dev team.
  3. Configure the specific job within the workflow to look for the production environment.

You can create and configure new repository environments from the repository’s Settings tab under Environments.