Deploy a cloud-native ASP.NET Core microservice

Imagine you’re a software developer for an online retailer named eShopOnContainers. The retailer’s online storefront is a cloud-native, microservices-based ASP.NET Core app. To enhance the team’s agile development practices, you’ll implement a Continuous Integration and Continuous Deployment (CI/CD) pipeline. The pipeline has a series of automated tasks to compile, test, configure, and deploy from the build environment through all environments. You’ve decided to use GitHub Actions to fulfill the requirement. Because each microservice can be deployed independently, you’ve also decided to start with enabling CI/CD for a single service.

This module guides you through the process of implementing a CI/CD pipeline using GitHub Actions. You’ll begin with a simplified, revamped version of eShopOnContainers—the companion reference app for the guide .NET Microservices: Architecture for Containerized .NET Applications. This new reference app version includes a discount coupon feature that can be used at checkout time in the shopping basket. The feature is supported by an ASP.NET Core web API known as the coupon service. CI/CD will be enabled for the coupon service in this module.

You’ll use your own Azure subscription to deploy the resources in this module. To estimate the expected costs for these resources, see the preconfigured Azure Calculator estimate  of the resources that you’ll deploy. If you don’t have an Azure subscription, create a free account  before you begin.

Set up the environment

In this unit, you’ll use a script to deploy the existing eShopOnContainers app to Azure Kubernetes Service (AKS)

Launch Azure Cloud Shell

  1. Open the Azure Cloud Shell  in your browser.
  2. Select a directory with access to the Azure subscription in which you want to create resources.
  3. Select Bash from the environment drop-down in the upper left.

Run the deployment script

  1. In a new browser window, fork the repository github.com/MicrosoftDocs/mslearn-microservices-devops-aspnet-core to your own GitHub account. For instructions on forking, see Forking Projects.
  2. Run the following command in the command shell. When prompted for Repo URL, enter the URL of your fork created in the first step.

    Bash

    . <(wget -q -O - https://aka.ms/microservices-devops-aspnet-core-setup)
    

     Tip

    You can use the Copy button to copy commands to the clipboard. To paste, right-click on a new line in the Cloud Shell window and select Paste or use the Shift+Insert keyboard shortcut (⌘+V on macOS).

    The preceding command retrieves and runs a setup script from a GitHub repository. The script completes the following steps:

    • Installs the required version of the .NET Core SDK.
    • Clones the eShopOnContainers app from your fork of the GitHub repository.
    • Provisions AKS and Azure Container Registry (ACR) resources.
    • Launches the Cloud Shell editor to view the code.
    • Deploys the containers to AKS.
    • Displays connection information upon completion.

     Important

    The script installs the required version of the .NET Core SDK alongside the version pre-installed in Azure Cloud Shell. To revert to the default configuration in Cloud Shell, see the instructions in the Summary unit.

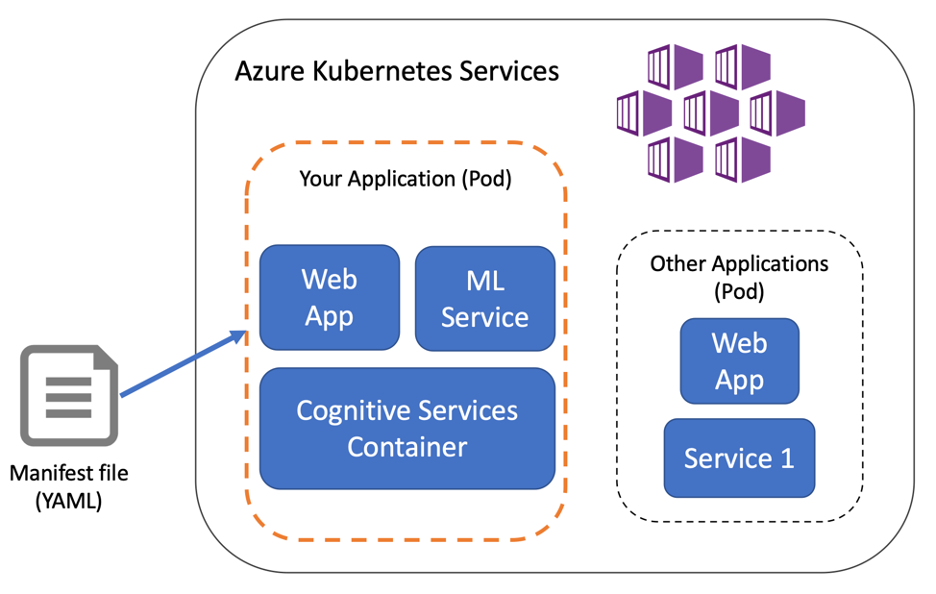
The script takes several minutes to complete. It deploys a modified version of the eShopOnContainers reference app. The solution architecture of the app is pictured in the following diagram:

eShopOnContainers solution architecture diagram

This module focuses on adding CI/CD for the coupon service depicted in the preceding diagram.

 Note: Non-blocking warnings are expected in the deployment process. If an unexpected exception occurs, you can reset any changes made by the script by running the following command:

cd ~ && \
  rm -rf ~/clouddrive/aspnet-learn && \
  az group delete --name eshop-learn-rg --yes

Implement Azure Cloud Policy

Group Policies, or GPOs, have been used by Windows server administrators for a long time, to manage security, provide consistency across the Windows Server environment in your organization. Some examples of group policies are enforcement of password complexity, mapping shared network drives and configuring networked printers.

Azure cloud hosting offers similar features in Azure Resource Manager using Azure cloud policy. A policy provides a level of governance over your Azure subscriptions. Policy can enforce rules and controls over your Azure resources. Some examples of how you might use this include limiting the regions you can deploy a resource to, enforcing naming standards, or controlling resource sizes. Azure provides many example policies that you can use or you can define custom policies using JSON.


Policies are assigned to a specific scope, which could be a management group (a group of subscriptions that are managed together), a subscription, a resource group, or even an individual resource. Most commonly policy will be applied at the subscription or resource group level. Individual policies can be grouped using a structure known as initiatives, which are sometimes called policy sets. Policies have a scope of assignment that can be defined at the individual resource, the resource group, the subscription, or a management group (a group of subscriptions managed together), or all of the subscriptions in a given tenant.

Another example of how you might implement Azure cloud hosting Policy is tagging of resources. Azure tags, which are described below, store metadata about Azure cloud resources in key-value pairs, and are commonly used to highlight environment type (test, QA, or production) or cost center for a given resource. A policy that required all resources to have a tag for environment and cost center would cause an error and block the deployment of any Azure cloud resource that did not have the required tags.

Azure Cognitive Services Deploy to a Container

You have tested the container locally, which is great for development. Now you need to decide how to deploy it. You have the choice to deploy as a stand-alone Docker container or within a Kubernetes environment. Whichever mode you choose, you still have the option to deploy on-premises or on Azure. In this section, we will focus on what these deployment options look like within Azure.

Deploy to Azure Container Instances

Azure Container Instances is a serverless environment to run the containers. Here you can run containers on-demand with minimal setup. However, you will want to configure one or more of the security options: Azure Firewall, TLS/SSL support, and running with a managed identity.

Running containers within Azure cloud Container Instances is common for independent containers.
It allows running your container with minimal setup and you only pay for containers that are running. However, there is not much coordination with other resources, such as additional containers that connect to it. For deployments with multiple containers working together, the preferred option is Kubernetes.

Deploy to Azure Kubernetes Service

Running containers within Azure Kubernetes Service is a common path for applications that have multiple moving parts and components. Kubernetes is popular because it enables scripted deployments and easy scaling of containers. Organizations maintain control over the full application environment and deploy the containers together. The file defining your deployment is called a Kubernetes manifest. Kubernetes runs the containers described in the manifest file and self-heals if container failures occur.

container-deploy-azure

Publish to Azure Container Registry

You will need to access your image from a repository whether running in Kubernetes or Docker. Azure Container Registry is a private repository for your container images. You will publish the image you built here so it can be accessed by your deployment process. It supports role-based access, which you use to ensure the image is only available to the correct people and services. You can access images stored in the registry using your Azure credentials or from another Azure service.

Next you will deploy the language detection component of your health care application.


Exercise: Deploy a container

For the health care application, you would deploy a language detection container in coordination with other containers. For example, one container may be the customer facing web app and another would run the model to recommend treatments. Since multiple containers will be deployed together, you will choose Kubernetes. Remember that the application is designed to work on-premises or in Azure, so Kubernetes fits the need. You will do the task in two parts, which are detailed below: publish a container image and deploy to Azure Kubernetes Service.

Publish Docker images to Azure Container Registry

For the first step in deployment, you will tag the Docker image and publish to Azure Container Registry.

  1. Use Azure CLI to log in and retrieve the Container Registry address by replacing <acr_name> and <resource_group> with your resource names.
    az acr login --name <acr-name>
    
    az acr list --resource-group <resource-group> --output table

The output of these commands includes your login server name, in this case cogsvcacr.azurecr.io

TABLE 1
NAME RESOURCE GROUP LOCATION SKU LOGIN SERVER
cogsvcacr cognitive-services-demo-rg westus2 Basic cogsvcacr.azurecr.io

Next, find the correct docker image to publish. Use the image you created in the previous section, named cog-svc-language.

docker images


REPOSITORY TAG IMAGE ID
cog-svc-language latest 49379c513da1

3. Tag the docker image by adding the login server and push the tagged image to the Azure Container Registry. The operation may take several minutes. Be sure to replace and with the correct values.

docker tag <service-image-name> <login-server>/cog-svc:v1
docker push <login-server>/cog-svc:v1


Deploy container to Azure Kubernetes Service

To deploy to Kubernetes, you need a manifest file. This file defines the desired deploy state, including which image, port, billing endpoint, and API key will be used. In a complete project, the file will include additional resources that interact with your Cognitive Services container. However, for this example you will deploy the single Cognitive Service container and use it from your local application.

    1. Create the manifest file by copying following YAML and save as cog-svc.yml.
apiVersion: v1
kind: Service
metadata:
name: cog-svc
spec:
selector:
app: cog-svc
type: LoadBalancer
ports:
- name: cog-svc
port: 5000
targetPort: 5000
protocol: TCP
---
apiVersion: apps/v1
kind: Deployment
metadata:
name: cog-svc
spec:
replicas: 1
selector:
matchLabels:
app: cog-svc
template:
metadata:
labels:
app: cog-svc
spec:
containers:
- name: cog-svc
image: <login-server>/cog-svc:v1>
ports:
- name: public-port
containerPort: 5000
livenessProbe:
httpGet:
path: /status
port: public-port
initialDelaySeconds: 30
timeoutSeconds: 1
periodSeconds: 10

automountServiceAccountToken: false 
  1. In the cog-svc.yml file that was created, replace the value for image with the full name of the tagged cloud container.

Install kubectl, the command-line interface for working with Kubernetes.

az aks install-cli


You will authenticate to Azure Kubernetes Service before deploying the containers. Azure CLI provides a way to store Kubernetes Service credentials by appending to the file /.kube/config. Retrieve and store the credentials for the Azure Kubernetes Service with the following command, replacing and with your values.

az aks get-credentials --resource-group <resource-group> --name <aks-name>

Run the deploy with the apply command.

kubectl apply -f cog-svc.yml

If your output does not show that the application was created, check that your credentials are set and that your network location is allowed to access the Kubernetes service.

To test out the service, you need the public IP address. Run the following command to confirm the service is running and retrieve the public IP.

kubectl get service cog-svc

7. A simple test from the browser will confirm you can access the service and run API commands using the swagger UI. Open your browser to http://:5000/swagger to test it out.ontainer-deploy-swagger

In this simple deployment, we included a public port, which makes this container accessible to everyone. This is not how you will want to deploy a long running container. You will learn about securing the container and deployment in the next section.