How to Move an app to Azure Cosmos DB table storage

Companies that use Azure Storage tables for business-critical applications may find that Azure Cosmos DB provides a better service for their needs.

Suppose that your lenses database, which is implemented in Azure Storage tables, has been working well. The company has recently expanded into several new countries, and you have found that the performance of the database is not always as good in those countries as it is in your country. Your technical director has asked you to determine if there is a way to eliminate these problems without rewriting the app that uses the database.

Here, you will learn how Azure Cosmos DB provides a more scalable alternative to Azure Storage tables and does not require developers to rewrite code.

Features of Azure Storage tables

Azure Storage is a service that provides the following data services:

FEATURES OF AZURE STORAGE TABLES
Data Service Description
Blob storage Store, secure, and access Binary Large Objects (Blobs). Blobs can be any file and this service is often used with image, videos, and other media.
Queue storage Store messages in a queue to organize communications between systems. Queues help to improve communications, because messages won’t be lost at times of high demand. Instead, the queue may lengthen, but the receiving component keeps picking up and processing the messages until it catches up.
File storage Store files in file shares in the cloud for access with the Server Message Block (SMB) protocol.
Table storage Store data in a NoSQL database to underpin applications.

In this module, we’ll concentrate on Azure Storage tables. This service provides a way to store semi-structured data in the cloud. The data is highly available to clients because it is replicated to multiple nodes or locations.

Storage tables are an example of a NoSQL database. Such databases don’t impose a strict schema on each table like a SQL database does. Instead, each entity in the table can have a different set of properties. It’s up to you to ensure that these properties are organized, and to ensure that apps that query the data can work with results that may have different values. A primary advantage of this semi-structured approach to data is that the database can evolve more quickly to meet changing business requirements.

Tables in Azure Storage can scale to large quantities of data; you can store any number of tables and any number of entities in a table. The only limits are the capacity of the storage account, which depends on the type of storage account you created. For example, a standard storage account can store 2 PB of data in US and European data centers, or 500 TB in other locations.

Azure storage accounts replicate data to multiple locations to ensure high-availability. You can choose from the following types of replication in a storage account:

TABLE 2
Replication Type Description
Locally redundant storage Data is replicated to a different storage scale unit with the same data center. This data remains available if a single node fails in the data center. Your data may be unavailable if an entire data center fails.
Zone-redundant storage Data is replicated to three storage clusters in a single region. This data remains available if a single data center fails. Your data may be unavailable if there is a region-wide outage.
Geo-redundant storage Data is replicated to a secondary region, hundreds or thousands of miles from the primary region. This data remains available even if there is a region-wide outage.
Read-access geo-redundant storage Data replicated to a secondary region, where it is available for clients to read. You can use this replication to provide a source of data that is closer to users than the primary. Closer data can improve performance by avoiding the need to read data from hundreds or thousands of miles away.

Features of Azure Cosmos DB

Azure Cosmos DB is Microsoft’s globally distributed, multi-model database service with Azure.

Multi-model means that you can use one of many data access methods and APIs to read and write data. For example, you can use SQL, but if you prefer a NoSQL approach, you can use MongoDB, Cassandra, or Gremlin. Azure Cosmos DB includes the Tables API, which means that if you move your data from Azure Storage tables into Azure Cosmos DB, you don’t have to rewrite your apps. Instead, you just change their connection strings.

Azure Cosmos DB can replicate data for read and write access to multiple regions. Clients can connect to a local replica both to query but also to modify data, which is not possible in Azure Storage tables.

Differences between Azure Storage tables and Azure Cosmos DB tables

There are some differences in behavior between Azure Storage tables and Azure Cosmos DB tables to remember if you are considering a migration. For example:

  • You are charged for the capacity of an Azure Cosmos DB table as soon as it is created, even if that capacity isn’t used. This charging structure is because Azure Cosmos DB uses a reserved-capacity model to ensure that clients can read data within 10 ms. In Azure Storage tables, you are only charged for used capacity, but read access is only guaranteed within 10 seconds.
  • Query results from Azure Cosmos DB are not sorted in order of partition key and row key as they are from Storage tables.
  • Row keys in Azure Cosmos DB are limited to 255 bytes.
  • Batch operations are limited to 2 MBs.
  • Cross-Origin Resource Sharing (CORS) is not currently supported by Azure Cosmos DB.
  • Table names are case-sensitive in Azure Cosmos DB. They are not case-sensitive in Storage tables.

While these differences are small, you should take care to review your apps to ensure that a migration does not cause unexpected problems.

How to choose a storage location

Each organization has different priorities for their NoSQL database system. Once you have identified those priorities, use this table to help you choose whether to use Azure Storage tables or Azure Cosmos DB tables to persist data for your applications:

HOW TO CHOOSE A STORAGE LOCATION
Priority Azure Storage Tables Azure Cosmos DB Tables
Latency Responses are fast, but there is no guaranteed response time. < 10 ms for reads, < 15 ms for writes
Throughput Maximum 20,000 operations/sec No upper limit on throughput. Over 10 million operations/sec/table.
Global distribution Single region for writes. A secondary read-only region is possible with read-access geo-redundant replication. Replication of data for read and write to more than 30 regions.
Indexes A single primary key on the partition key and the row key. No other indexes. Indexes are created automatically on all properties.
Data consistency Strong in the primary region. If you are using read-access geo-redundant replication, it may take time for changes to reach the secondary region. You can choose from five different consistency levels depending on your needs for availability, latency, throughput, and consistency.
Pricing Optimized for storage. Optimized for throughput.
SLAs 99.99% availability. 99.99% availability for single region and relaxed consistency databases. 99.999% availability for multi-region databases.


Read more about web hosting


How to migrate an app to Azure Cosmos DB

If you have decided to move to Azure Cosmos DB, and you currently have data in one or more Azure Storage tables, you must consider how to move that data into Azure Cosmos DB. Microsoft provides two tools to complete this task:

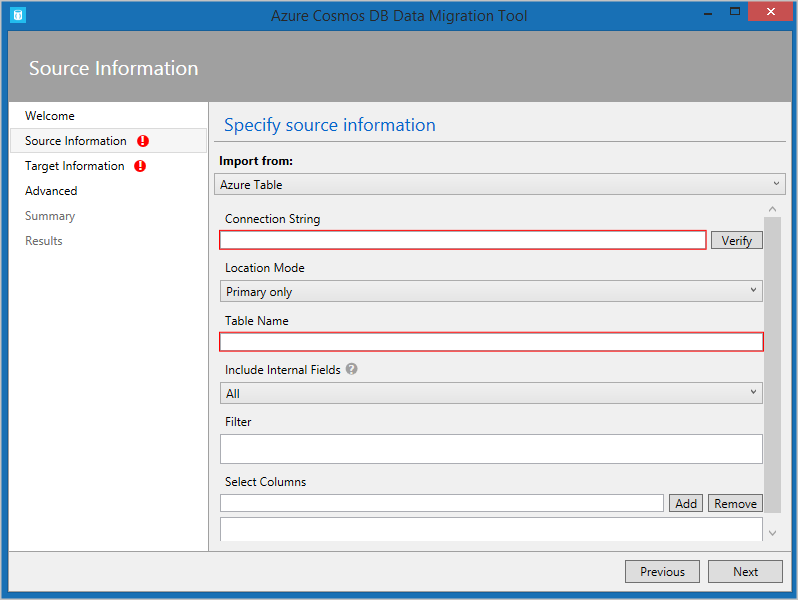
  • The Azure Cosmos DB Data Migration Tool. This open-source tool is built specifically to import data into Azure Cosmos DB from many different sources, including tables in Azure Storage, SQL databases, MongoDB, text files in JSON and CSV formats, HBase, and other databases. The tool has both a command-line version and a GUI version. You supply the connection strings for the data source and the Azure Cosmos DB target, and you can filter the data before migration.
  • AzCopy. This command-line only tool is designed to enable developers to copy data to and from Azure Storage accounts. The process has two stages:
    • Export the data from the source to a local file.
    • Import from that local file to a database in Cosmos, specifying the destination database by using its URL and access key.

data import

Manage and deploy web applications on compute web hosting nodes

The Azure web hosting batch client API allows you to programmatically control all the components of an Azure web hosting Batch account.

Continuing to enhance your companies console app, you’ll now add all the components needed to convert the videos you uploaded in the last exercise.

By the end of this exercise, you’ll have a working Batch process that can convert MP4 videos to animated GIFs. The app will add a job to the existing pool, and add and start the video conversion tasks on cloud web hosting.

Enhance the code using the batch client

  1. In the Cloud Shell, edit the Program.cs file in the editor:
  2. Add a constant to Program.cs for the JobId we’ll use in our Batch job.
  3. Replace these lines in the Main method:

With a using block for the batchClient

using (BatchClient batchClient = BatchClient.Open(sharedKeyCredentials))
{
    // Create the Batch pool, which contains the compute nodes that execute the tasks.
    await CreateBatchPoolAsync(batchClient, PoolId);

    // Create the job that runs the tasks.
    await CreateJobAsync(batchClient, JobId, PoolId);

    // Create a collection of tasks and add them to the Batch job.
    await AddTasksAsync(batchClient, JobId, inputFiles, outputContainerSasUrl);
}


Create a job on cloud web hosting

  1. Add this new method, CreateJobAsync() to Program.cs to create and add a job to the pool.
private static async Task CreateJobAsync(BatchClient batchClient, string jobId, string poolId)
{
        Console.WriteLine("Creating job [{0}]...", jobId);

        CloudJob job = batchClient.JobOperations.CreateJob();
        job.Id = jobId;
        job.PoolInformation = new PoolInformation { PoolId = poolId };

        await job.CommitAsync();
}

The code above uses the batch client to create a job. The method assigns the given job id and information about the pool.

Add a task

  1. With the job created, the last step is to add a task to the job. Add the following method, AddTaskAsync(), to Program.cs.
private static async Task<List<CloudTask>> AddTasksAsync(BatchClient batchClient, string jobId, List<ResourceFile> inputFiles, string outputContainerSasUrl)
{
    Console.WriteLine("Adding {0} tasks to job [{1}]...", inputFiles.Count, jobId);

    // Create a collection to hold the tasks added to the job
    List<CloudTask> tasks = new List<CloudTask>();

    for (int i = 0; i < inputFiles.Count; i++)
    {
        // Assign a task ID for each iteration
        string taskId = String.Format("Task{0}", i);

        // Define task command line to convert the video format from MP4 to animated GIF using ffmpeg.
        // Note that ffmpeg syntax specifies the format as the file extension of the input file
        // and the output file respectively. In this case inputs are MP4.
        string appPath = String.Format("%AZ_BATCH_APP_PACKAGE_{0}#{1}%", appPackageId, appPackageVersion);
        string inputMediaFile = inputFiles[i].FilePath;
        string outputMediaFile = String.Format("{0}{1}",
            System.IO.Path.GetFileNameWithoutExtension(inputMediaFile),
            ".gif");

        // This is the dos command built by using the ffmpeg application package, the paths from the input container
        string taskCommandLine = String.Format("cmd /c {0}\\ffmpeg-3.4-win64-static\\bin\\ffmpeg.exe -i {1} {2}", appPath, inputMediaFile, outputMediaFile);

        // Create a cloud task (with the task ID and command line) and add it to the task list
        CloudTask task = new CloudTask(taskId, taskCommandLine);
        task.ResourceFiles = new List<ResourceFile> { inputFiles[i] };

        // Task output file will be uploaded to the output container in Storage.
        List<OutputFile> outputFileList = new List<OutputFile>();
        OutputFileBlobContainerDestination outputContainer = new OutputFileBlobContainerDestination(outputContainerSasUrl);
        OutputFile outputFile = new OutputFile(outputMediaFile,
                                                new OutputFileDestination(outputContainer),
                                                new OutputFileUploadOptions(OutputFileUploadCondition.TaskSuccess));
        outputFileList.Add(outputFile);
        task.OutputFiles = outputFileList;
        tasks.Add(task);
    }

    // Call BatchClient.JobOperations.AddTask() to add the tasks as a collection rather than making a
    // separate call for each. Bulk task submission helps to ensure efficient underlying API
    // calls to the Batch service.
    await batchClient.JobOperations.AddTaskAsync(jobId, tasks);

    return tasks;
}

This final method does all the complex actions of the web app. A task is added to the job for each file that has been uploaded. The task takes the form of a shell command. The app (ffmpeg) has been installed on each node at a specific location because we used an application package. The Batch service stores that location in an environment variable on the node so that it can be accessed via:

%AZ_BATCH_APP_PACKAGE_ffmpeg#3.4%

Using this approach it’s easy to upload and increment newer versions of the ffmpeg web app. The command looks into the zip folder, and executes:

ffmpeg.exe -i input-filename output-filename

For the best performance, the tasks are added as a list to the batchClient.JobOperations.AddTaskAsync. This is more efficient than making a separate call for each file.

Test the console app

  1. Select the ellipses in the top-right corner of the code editor.
  2. Select Close Editor, and in the dialog select Save.
  3. In the integrated terminal, build and run the app.
  4. The below messages are written to the terminal.
Creating container [input].
Creating container [output].
Uploading file ~\cutifypets\InputFiles.mp4 to container [input]...
Creating pool [WinFFmpegPool]...
Creating job [WinFFmpegJob]...
Adding 2 tasks to job [WinFFmpegJob]...
  1. The console web app closes as soon as it has added the tasks. In Azure web hosting, the pool, nodes, job, and tasks are created. There’s nothing monitoring what’s happening within the app as it has exited. To see the current status of the conversion, and check the results, return to the Azure portal.
  2. In the Azure portal, on the Dashboard select the Batch account beginning cutify.result
  3. The health dashboard is shown on the Overview page, from here you can check the status of the current running job and the pool of  hosting nodes.
  4. On the left, select Jobs, select WinFFmpegJob. On this page, you’ll see the current status of the tasks.
  5. When the tasks have completed, on the left select Storage accounts, then select the storage account your created in the first exercise.
  6. On the left select Blobs, then select the output folderoutput
  7. Download a file to check the cutest pet video from cloud.

How to Create a pool of compute nodes to run Azure Web Hosting

To run a web hosting batch job, we need to add a pool to our Batch account. A pool contains compute nodes, which are the engines that run your Batch job. You specify the number, size, and operating system of nodes at creation time. In this exercise, you’ll modify the web hosting console app you made in the previous exercise to add a pool to your web hosting Batch account

Your company wants to control the costs of the app, and have asked you to use a fixed number of nodes.

Add settings for your new pool

In the web hosting Cloud Shell, edit the Program.cs file in the editor:

code Program.cs

Add the following properties to the Program class in Program.cs:

private const string PoolId = "WinFFmpegPool";
private const int DedicatedNodeCount = 0;
private const int LowPriorityNodeCount = 3;
private const string PoolVMSize = "STANDARD_D2_v2";
private const string appPackageId = "ffmpeg";
private const string appPackageVersion = "3.4";

The above settings will be used in the code to create the pool. Looking at each variable we can explain them as follows.

  • PoolId: The name our code will use to reference the pool in other web hosting batch client calls.
  • LowPriorityNodeCount: You are going to create a pool with three low-priority virtual machines (VMs)
  • PoolVMSize: The VMs will be STANDARD_A1_v2, which gives the nodes 1 CPU, 2 GB of RAM, and 10 GB of SSD storage
  • appPackageId: The name of the application package to use on the nodes you create
  • appPackageVersion: The version of the application to use on the nodes you create

Update the Main() method to support asynchronous calls on webhosting.

We’ll be making several asynchronous calls to web hosting cloud services, so the first thing to do is to make Main asynchronous. With C# .NET version 7.1 and onwards, async Main methods in console applications are supported.

  1. Change the web hosting console app to allow async method calls, by first adding System.Threading.Tasks library.
using System.Threading.Tasks;
using System.Collections.Generic; // Also add generics to allow the app to use Lists

Next, update the Main method signature as follows:

static async Task Main(string[] args)

Create a pool

  1. Add the following new method to the Program class to create a Batch pool. The method will:
    • Create an image reference object to store the settings for the nodes to be added to the pool.
    • Use the image reference to create a VirtualMachineConfiguration object on your web hosting.
    • Create an unbound pool using the properties declared above and the VirtualMachineConfiguration.
    • Add an application package reference to the pool.
    • Create the pool on Azure web hosting.
    • Take two parameters, the batchClient and PoolId.
private static async Task CreateBatchPoolAsync(BatchClient batchClient, string poolId)
    {
        CloudPool pool = null;
        Console.WriteLine("Creating pool [{0}]...", poolId);

        // Create an image reference object to store the settings for the nodes to be added to the pool
        ImageReference imageReference = new ImageReference(
                publisher: "MicrosoftWindowsServer",
                offer: "WindowsServer",
                sku: "2012-R2-Datacenter-smalldisk",
                version: "latest");

        // Use the image reference to create a VirtualMachineConfiguration object
        VirtualMachineConfiguration virtualMachineConfiguration =
        new VirtualMachineConfiguration(
            imageReference: imageReference,
            nodeAgentSkuId: "batch.node.windows amd64");

        try
        {
            // Create an unbound pool. No pool is actually created in the Batch service until we call
            // CloudPool.CommitAsync(). This CloudPool instance is therefore considered "unbound," and we can
            // modify its properties.
            pool = batchClient.PoolOperations.CreatePool(
                poolId: poolId,
                targetDedicatedComputeNodes: DedicatedNodeCount,
                targetLowPriorityComputeNodes: LowPriorityNodeCount,
                virtualMachineSize: PoolVMSize,
                virtualMachineConfiguration: virtualMachineConfiguration);  

            // Specify the application and version to install on the compute nodes
            pool.ApplicationPackageReferences = new List<ApplicationPackageReference>
            {
                new ApplicationPackageReference
                {
                ApplicationId = appPackageId,
                Version = appPackageVersion
                }
            };

            // Create the pool
            await pool.CommitAsync();
        }
        catch (BatchException be)
        {
            // Accept the specific error code PoolExists as that is expected if the pool already exists
            if (be.RequestInformation?.BatchError?.Code == BatchErrorCodeStrings.PoolExists)
            {
                Console.WriteLine("The pool [{0}] already existed when we tried to create it", poolId);
            }
            else
            {
                throw; // Any other exception is unexpected
            }
        }
    }

Call CreateBatchPoolAsync from our Main method. The Main method should now be the following:

static async Task Main(string[] args)
{
    // Read the environment variables to allow the app to connect to the Azure Batch account
    batchAccountUrl = Environment.GetEnvironmentVariable(envVarBatchURI);
    batchAccountName = Environment.GetEnvironmentVariable(envVarBatchName);
    batchAccountKey = Environment.GetEnvironmentVariable(envVarKey);

    // Show the user the batch the app is attaching to
    Console.WriteLine("URL: {0}, Name: {1}, Key: {2}", batchAccountUrl, batchAccountName, batchAccountKey);

    // The batch client requires a BatchSharedKeyCredentials object to open a connection
    var sharedKeyCredentials = new BatchSharedKeyCredentials(batchAccountUrl, batchAccountName, batchAccountKey);
    var batchClient = BatchClient.Open(sharedKeyCredentials);

    // Create the Batch pool, which contains the compute nodes that execute tasks.
    await CreateBatchPoolAsync(batchClient, PoolId);
}

Test the app

  1. Select the ellipses in the top-right corner of the code editor.
  2. Select Close Editor, and in the dialog select Save.
  3. In the webhosting Cloud Shell, compile and run the app with the following command.
dotnet run

The app will take a few minutes to run, and output:

URL: <your batch account url, Name: <your batch name>, Key: <your batch key>
Creating pool [WinFFmpegPool]...


Remember that each node is a VM running Windows 2012 server, with only one CPU and 2 GB of ram. It takes time for the Batch to transfer those Windows VM images from the webhosting Azure Virtual Machine Marketplace, create the VM infrastructure and networking, and finally start each node. This is the most time consuming part of most Batch solutions. A typical Batch workflow doesn’t clean up the pool and its nodes.