Create a Serverless Web Application with Azure Functions

Overview

In this tutorial, you’ll Create an Azure function app in the Azure portal,execute a function using triggers,monitor and test your Azure function from the Azure portal.

Imagine you work for an escalator company that has invested in IoT technology to monitor its product in the field. You oversee the processing of temperature sensor data from the drive gears of the escalators. You monitor the temperature data and add a data flag to indicate when the gears are too hot. In downstream systems, this data helps determine when maintenance is required.

Your company receives sensor data from several locations and from different escalator models. The data arrives in different formats, including batch file uploads, scheduled database pulls, messages on a queue, and incoming data from an event hub. You want to develop a reusable service that can process your temperature data from all these sources.

When designing a service such as this with traditional enterprise architecture strategies, you would need to consider server infrastructure and maintenance up front: scope out necessary hardware, plan to install it, coordinate with IT to manage it, etc. An alternative to all that work is serverless computing. With serverless computing, your cloud provider manages the provisioning and maintenance of the infrastructure letting you focus completely on building the app logic. Azure Functions is a key component of the serverless computing offering from Azure and enables you to run pieces of code or functions, written in the programming language of your choice, in the cloud.

To help decide whether serverless computing is right for you, let’s first learn what serverless is all about.

What is serverless compute?

Serverless compute can be thought of as a function as a service (FaaS), or a microservice that is hosted on a cloud platform. Your business logic runs as functions and you don’t have to manually provision or scale infrastructure. The cloud provider manages infrastructure. Your app is automatically scaled out or down depending on load. Azure has several ways to build this sort of architecture. The two most common approaches are Azure Logic Apps and Azure Functions, which we focus on in this module.

What is Azure Functions?

Azure Functions is a serverless application platform. It allows developers to host business logic that can be executed without provisioning infrastructure. Functions provides intrinsic scalability and you are charged only for the resources used. You can write your function code in the language of your choice, including C#, F#, JavaScript, Python, and PowerShell Core. Support for package managers like NuGet and NPM is also included, so you can use popular libraries in your business logic.

Benefits of a serverless compute solution

Serverless compute is a great option for hosting business logic code in the cloud. With serverless offerings such as Azure Functions, you can write your business logic in the language of your choice. You get automatic scaling, you have no servers to manage, and you are charged based on what is used — not on reserved time. Here are some additional characteristics of a serverless solution for you to consider.

Avoids over-allocation of infrastructure

Suppose you’ve provisioned VM servers and configured them with enough resources to handle your peak load times. When the load is light, you are potentially paying for infrastructure you’re not using. Serverless computing helps solve the allocation problem by scaling up or down automatically, and you’re only billed when your function is processing work.

Stateless logic

Stateless functions are great candidates for serverless compute; function instances are created and destroyed on demand. If state is required, it can be stored in an associated storage service.

Event driven

Functions are event driven. This means they run only in response to an event (called a “trigger”), such as receiving an HTTP request, or a message being added to a queue. You configure a trigger as part of the function definition. This approach simplifies your code by allowing you to declare where the data comes from (trigger/input binding) and where it goes (output binding). You don’t need to write code to watch queues, blobs, hubs, etc. You can focus purely on the business logic.

Functions can be used in traditional compute environments

Functions are a key component of serverless computing, but they are also a general compute platform for executing any type of code. Should the needs of your app change, you can take your project and deploy it in a non-serverless environment, which gives you the flexibility to manage scaling, run on virtual networks, and even completely isolate your functions.

Drawbacks of a serverless compute solution

Serverless compute will not always be the appropriate solution to hosting your business logic. Here are a few characteristics of functions that may affect your decision to host your services in serverless compute.

Execution time

By default, functions have a timeout of 5 minutes. This timeout is configurable to a maximum of 10 minutes. If your function requires more than 10 minutes to execute, you can host it on a VM. Additionally, if your service is initiated through an HTTP request and you expect that value as an HTTP response, the timeout is further restricted to 2.5 minutes. Finally, there’s also an option called Durable Functions that allows you to orchestrate the executions of multiple functions without any timeout.

Execution frequency

The second characteristic is execution frequency. If you expect your function to be executed continuously by multiple clients, it would be prudent to estimate the usage and calculate the cost of using functions accordingly. It might be cheaper to host your service on a VM.

While scaling, only one function app instance can be created every 10 seconds, for up to 200 total instances. Keep in mind, each instance can service multiple concurrent executions, so there is no set limit on how much traffic a single instance can handle. Different types of triggers have different scaling requirements, so research your choice of trigger and investigate its limits.


Create a function app in the Azure portal

This module requires a sandbox to complete. A sandbox gives you access to Azure resources. Your Azure subscription will not be charged. The sandbox may only be used to complete training on Microsoft Learn. Use for any other reason is prohibited, and may result in permanent loss of access to the sandbox.

Choose your development language

You are now ready to start implementing the temperature service. In the previous unit, you determined that a serverless solution would best fit your needs. Let’s start by creating a function app to hold our Azure Function.

What is a function app?

Functions are hosted in an execution context called a function app. You define function apps to logically group and structure your functions and a compute resource in Azure. In our elevator example, you would create a function app to host the escalator drive gear temperature service. There are a few decisions that need to be made to create the function app; you need to choose a service plan and select a compatible storage account.

Choosing a service plan

Function apps may use one of two types of service plans. The first service plan is the Consumption service plan. This is the plan that you choose when using the Azure serverless application platform. The Consumption service plan provides automatic scaling and bills you when your functions are running. The Consumption plan comes with a configurable timeout period for the execution of a function. By default, it is 5 minutes, but may be configured to have a timeout as long as 10 minutes.

The second plan is called the Azure App Service plan. This plan allows you to avoid timeout periods by having your function run continuously on a VM that you define. When using an App Service plan, you are responsible for managing the app resources the function runs on, so this is technically not a serverless plan. However, it may be a better choice if your functions are used continuously or if your functions require more processing power or execution time than the Consumption plan can provide.

Storage account requirements

When you create a function app, it must be linked to a storage account. You can select an existing account or create a new one. The function app uses this storage account for internal operations such as logging function executions and managing execution triggers. On the Consumption service plan, this is also where the function code and configuration file are stored.

Create a function app

Let’s create a function app in the Azure portal.

  1. Sign into the Azure portal  using the same account you activated the sandbox with.
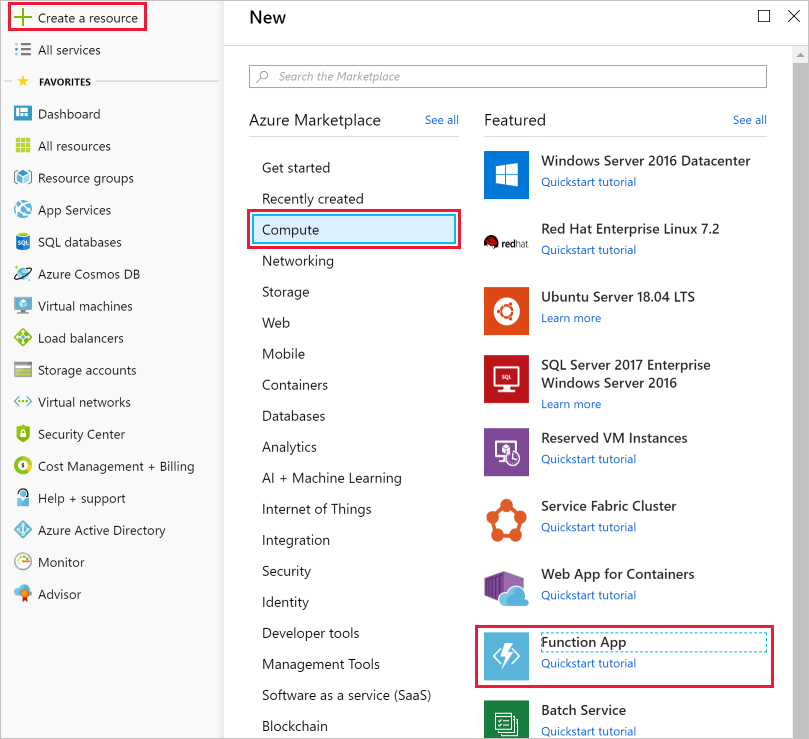
  2. Select the Create a resource button found on the upper left-hand corner of the Azure portal, and then select Get started > Serverless Function App to open the Function App Create blade. Alternatively, you can use the Compute > Function App option, which will open the same blade.

     Important

    We are currently working to update our sandbox to support the new workflow for creating an Azure Function in the portal. The instructions will be updated when that is available. Until then, you can use the version of the create experience that matching the current instructions by clicking the notification bar labeled Looking for the classic Function App create experience? at the top of the Function App page. This experience can also be reached by choosing the Function App (Classic) option from the Azure Marketplace.

    create-function-app-blade

  3. Choose a globally unique app name. This will serve as the base URL of your service. For example, you can name it escalator-functions-xxxxxxx, where the x’s can be replaced with your initials and your birth year. If this isn’t globally unique, you can try any other combination. Valid characters are a-z, 0-9 and -.
  4. Select the Azure sandbox subscription Concierge Subscription.
  5. Select the existing resource group called “[sandbox resource group name]“.
  6. Select Windows for OS.
  7. For Hosting Plan, select Consumption Plan, which is the serverless hosting option.
  8. Select a geographical location close to you. In a production system, you would want to select a location near your customers or consumers of the function.
  9. For Runtime Stack, select Node.js from the dropdown, which is the language in which we implement the function examples in this exercise.
  10. Create a new storage account. Azure will give it a name based on the app name. You can change it if you like, but it must also be unique.
  11. Make sure that Azure Application Insights is On and select the region closest to you (or your customers).
  12. Select Create; deployment will take a few minutes. You’ll receive a notification once it’s complete.

Verify your Azure function app

  1. From the Azure portal left-hand menu, select Resource groups. You should then see a resource group named [sandbox resource group name] in the list of available groups.Screenshot of the Azure portal showing the Resource groups blade with the Resource groups menu item and [sandbox resource group name] list item highlighted.
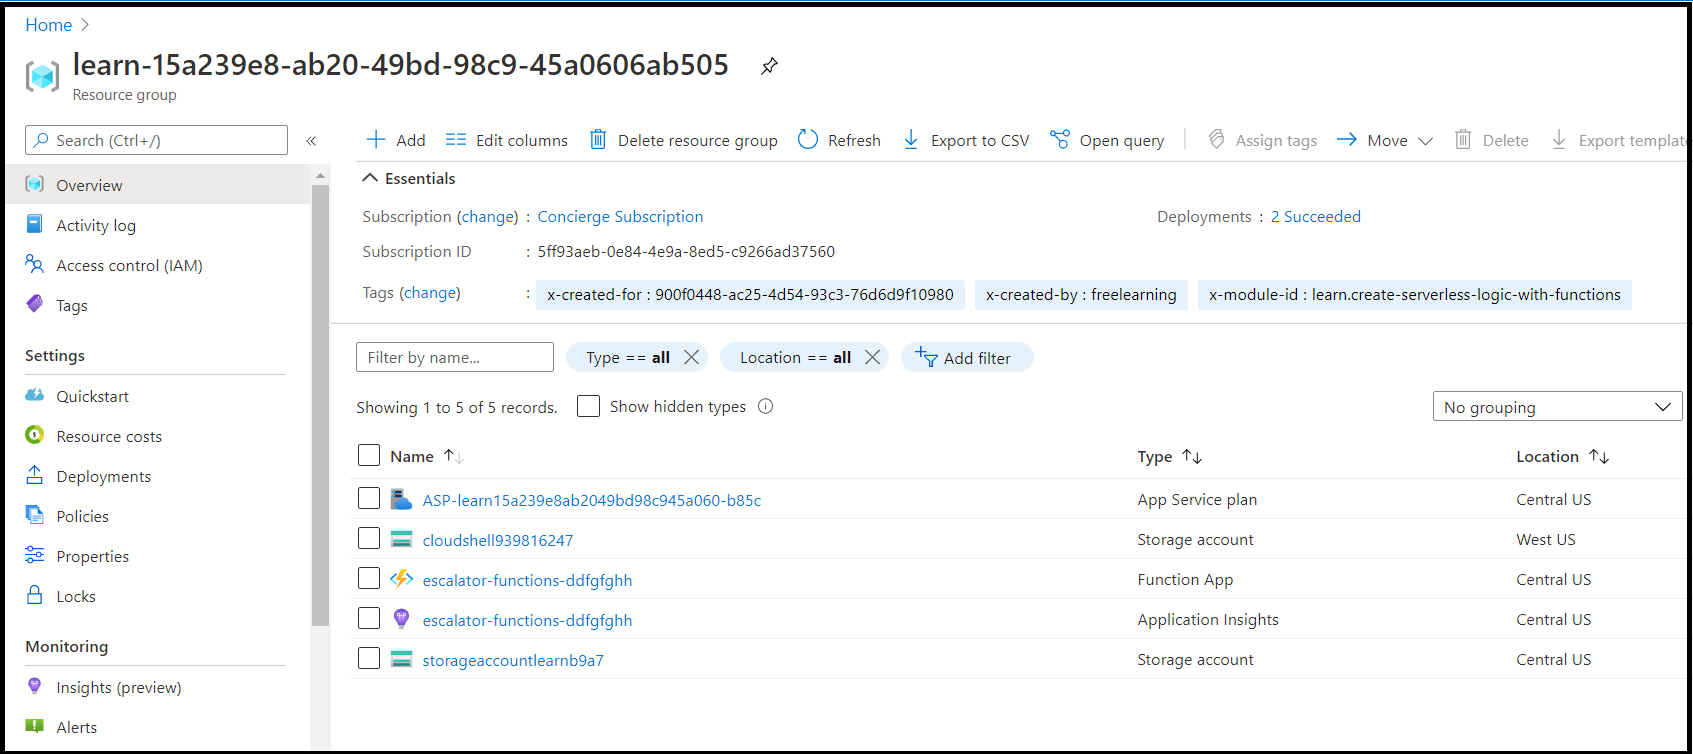
  2. Select the resource group [sandbox resource group name]. You should then see a resource list like the following list.Screenshot of the Azure portal showing all resources within the [sandbox resource group name] group, including entries for an App Service plan, a Storage account, Application Insights resource, and an App Service.

The item with the lightning bolt Function icon, listed as an App Service, is your new function app. You can click on it to open the details about the new function – it has a public URL assigned to it, if you open that in a browser, you should get a default web page that indicates your Function App is running.


Run your code on-demand with Azure Functions

Now that we have a function app created, let’s look at how to build, configure, and execute a function.

Triggers

Functions are event driven, which means they run in response to an event.

The type of event that starts the function is called a trigger. You must configure a function with exactly one trigger.

Azure supports triggers for the following services.

Service Trigger description
Blob storage Start a function when a new or updated blob is detected.
Azure Cosmos DB Start a function when inserts and updates are detected.
Event Grid Start a function when an event is received from Event Grid.
HTTP Start a function with an HTTP request.
Microsoft Graph Events Start a function in response to an incoming webhook from the Microsoft Graph. Each instance of this trigger can react to one Microsoft Graph resource type.
Queue storage Start a function when a new item is received on a queue. The queue message is provided as input to the function.
Service Bus Start a function in response to messages from a Service Bus queue.
Timer Start a function on a schedule.

Bindings

Bindings are a declarative way to connect data and services to your function. Bindings know how to talk to different services, which means you don’t have to write code in your function to connect to data sources and manage connections. The platform takes care of that complexity for you as part of the binding code. Each binding has a direction – your code reads data from input bindings and writes data to output bindings. Each function can have zero or more bindings to manage the input and output data processed by the function.

A trigger is a special type of input binding that has the additional capability of initiating execution.

Azure provides a large number of bindings to connect to different storage and messaging services.

A sample binding definition

Let’s look at an example of configuring a function with an input binding (trigger) and an output binding. Let’s say we want to write a new row to Azure Table storage whenever a new message appears in Azure Queue storage. This scenario can be implemented using an Azure Queue storage trigger and an Azure Table storage output binding.

The following snippet is the function.json file for this scenario.

JSON
{
  "bindings": [
    {
      "name": "order",
      "type": "queueTrigger",
      "direction": "in",
      "queueName": "myqueue-items",
      "connection": "MY_STORAGE_ACCT_APP_SETTING"
    },
    {
      "name": "$return",
      "type": "table",
      "direction": "out",
      "tableName": "outTable",
      "connection": "MY_TABLE_STORAGE_ACCT_APP_SETTING"
    }
  ]
}

Our JSON configuration specifies that our function will be triggered when a message is added to a queue named myqueue-items. The return value of our function is then written to the outTable table in Azure Table storage. For PowerShell functions, output bindings are explicitly written to with the Push-OutputBinding cmdlet.

This example is a simple illustration of how we configure bindings for a function. We could change the output to be an email using a SendGrid binding, or put an event onto a Service Bus to notify some other component in our architecture, or even have multiple output bindings to push data to various services.

 Tip

To view and edit the contents of function.json in the Azure portal, click the Advanced editor option on the Integrate tab of your function.

Creating a function in the Azure portal

Azure provides several pre-made function templates for common scenarios.

Quickstart templates

When adding your first function, you are presented with the Quickstart screen where you can choose the trigger for your function. Based on your selections, Azure will generate the function code and configuration for you with some sample code provided to display out the input data received in the log.

Custom function templates

The selection of Quickstart templates provides easy access to the most common scenarios. However, Azure provides over 30 additional templates you can start with. These can be selected from the template list screen when creating subsequent functions or be selected by using the Custom function option on the Quickstart screen.

When you create a function from a template, several files are created. For example, if you opted to use the Webhook + API Quickstart using JavaScript, the files generated would be a configuration file, function.json, and a source code file, index.js. The functions you create in a function app appear under the Functions menu item in the function app portal.

When you select a function in your function app, a code editor opens and displays the code for your function, as illustrated in the following screenshot.

Screenshot of the Azure portal showing the function editor blade, including the expanded View files menu, with the selected "HttpTriggerJS1" function in our app service navigation and the View files menu highlighted.

As you can see in the preceding screenshot, there’s a flyout menu on the right that includes a tab to View files. Selecting this tab shows the file structure that makes up your function.

Testing your Azure function

Once you’ve created a function, you’ll want to test it. There are a couple of approaches: manual execution and testing from within the Azure portal itself.

Manual execution

You can start a function by manually triggering the configured trigger. For instance, if you are using an HTTP trigger – you can use a tool such as Postman or cURL to initiate an HTTP request to your function endpoint URL, which is available from the HTTP trigger definition (Get function URL).

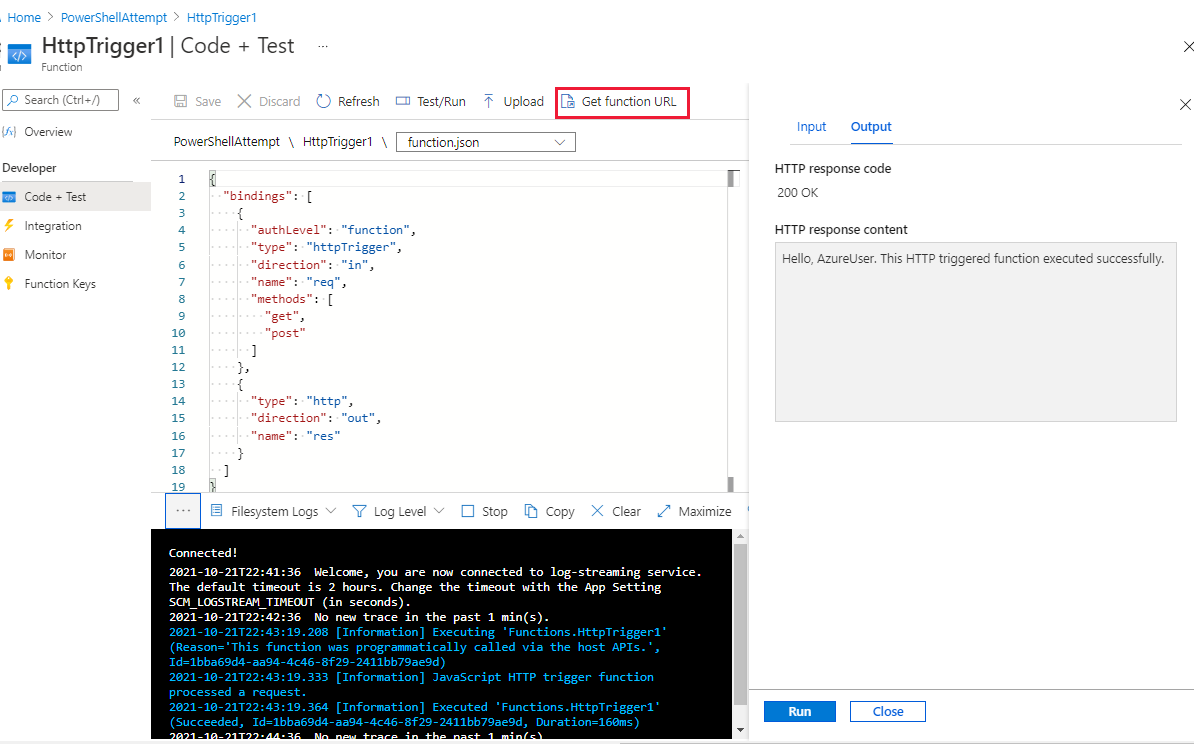
Testing in the Azure portal

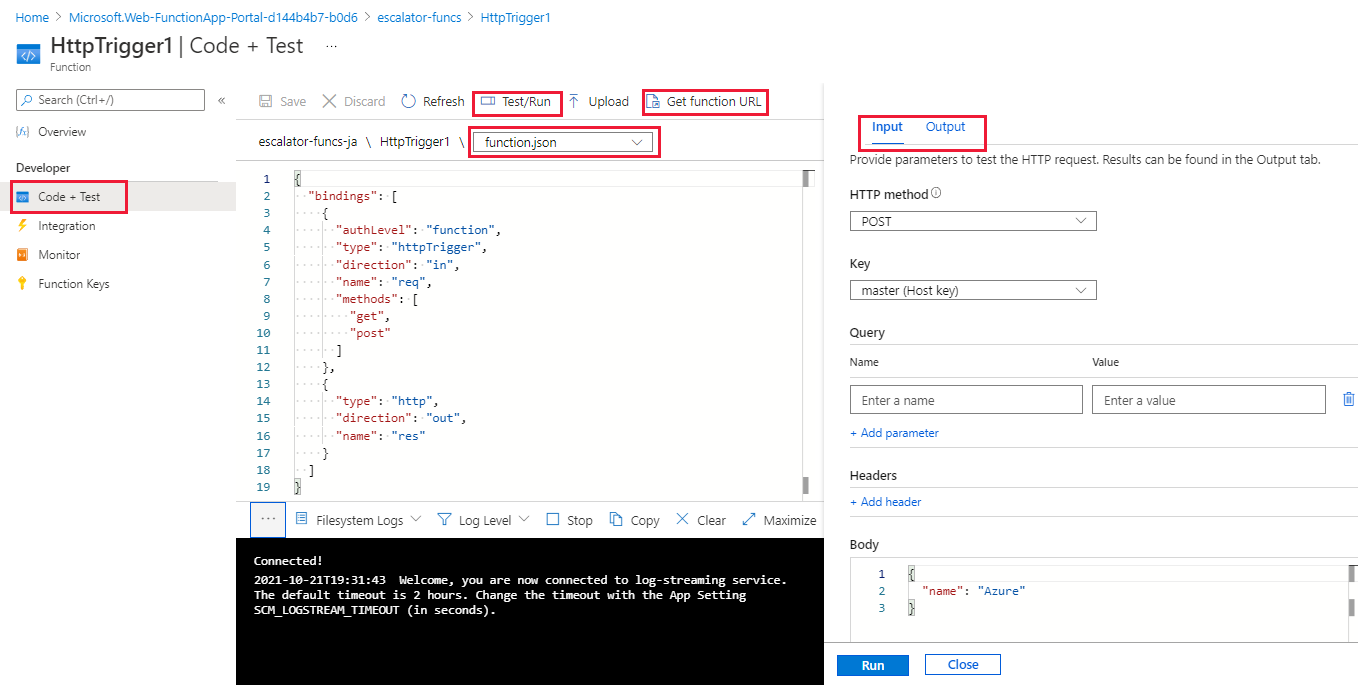
The portal also provides a convenient way to test your functions. On the right side of the code window, there is a flyout tabbed navigation menu. This menu contains a Test item. Expanding the menu and selecting this tab gives you another way to execute your function and view the result. When you click Run in this test window, the results are displayed in the output window, along with a status code.

Monitoring dashboard

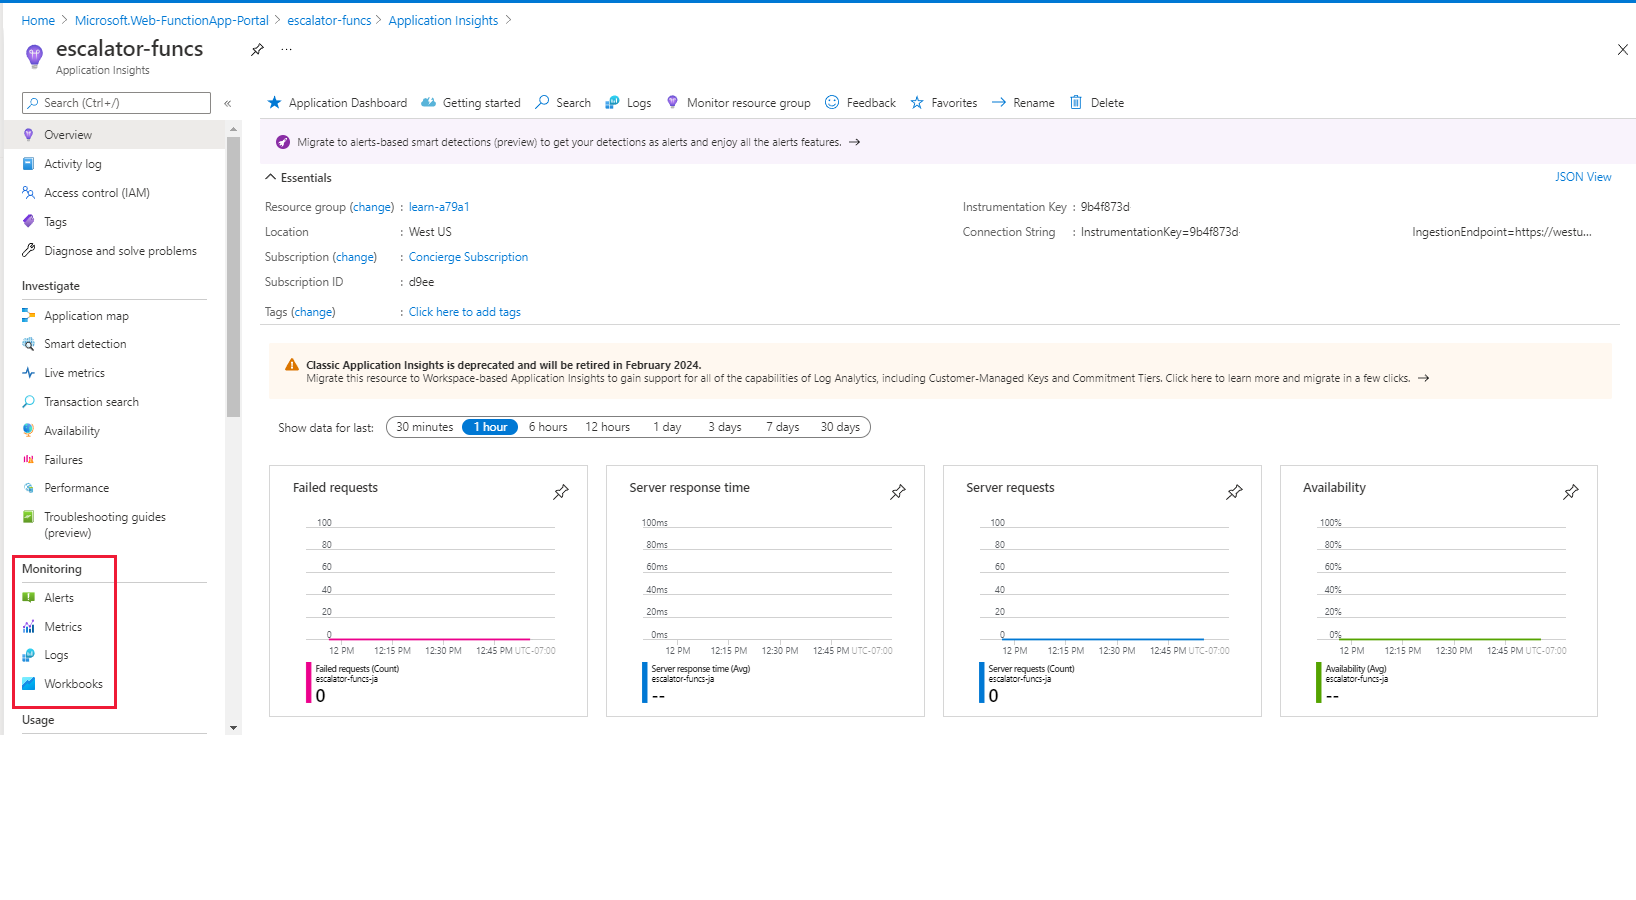
The ability to monitor your functions is critical during development and in production. The Azure portal provides a monitoring dashboard available if you turn on the Application Insights integration. In the function app navigation menu, once you expand the function node you’ll see a Monitor menu item. This monitor dashboard provides a quick way to view the history of function executions and displays the timestamp, result code, duration, and operation ID populated by Application Insights.

Screenshot of the Azure portal showing an HTTP function Monitor blade with several function results and their corresponding HTTP status codes, with the Module menu item of the function highlighted.

Streaming log window

You’re also able to add logging statements to your function for debugging in the Azure portal. The called methods for each language are passed a “logging” object, which may be used to log information to the log window located in a tabbed flyout menu located at the bottom of the code window.

The following JavaScript code snippet shows how to log a message using the context.log method (the context object is passed to the handler).

JavaScript
context.log('Enter your logging statement here');

We could do the same thing in C# using the log.Info method. In this case, the log object is passed to the C# method processing the function.

C#
log.Info("Enter your logging statement here");

In PowerShell, use Write-Host to write to the log:

PowerShell
Write-Host "Enter your logging statement here"

Errors and warnings window

You can locate the errors and warnings window tab in the same flyout menu as the log window. This window will show compilation errors and warnings within your code.

Add logic to the function app

Let’s continue with our gear drive example and add the logic for the temperature service. Specifically, we’re going to receive data from an HTTP request.

Function requirements

First, we need to define some requirements for our logic:

  • Temperatures between 0-25 should be flagged as OK.
  • Temperatures between 26-50 should be flagged as CAUTION.
  • Temperatures above 50 should be flagged as DANGER.

Add a function to our function app

As we discussed in the preceding unit, Azure provides templates that help you get started building functions. In this unit, we’ll use the HttpTrigger template to implement the temperature service.

  1. Sign in to the Azure portal .
  2. Select the resource group from the first exercise by choosing All resources in the left-hand menu, and then selecting “[sandbox resource group name]“.
  3. The resources for the group will then be displayed. Click the name of the function app that you created in the previous exercise by selecting the escalator-functions-xxxxxxx item (also indicated by the lightning bolt Function icon).Screenshot of the Azure portal showing the All resources blade highlighted as well as the escalator function app we created.
  4. Select the Add (+) button next to Functions. This action starts the function creation process.
  5. On the Azure Functions for JavaScript – getting started page, select In-portal and then select continue.
  6. In the Create a function step, select More templates… and then select Finish and view templates.
  7. In the list of all templates available to this function app, select HTTP trigger .
  8. Enter DriveGearTemperatureService in the name field of the New Function dialog that appears. Leave the Authorization level as “Function” and press the Create button to create the function.
  9. When your function creation completes, the code editor opens with the contents of the index.js code file. The default code that the template generated for us is listed in the following snippet.
    JavaScript
    module.exports = async function (context, req) {
        context.log('JavaScript HTTP trigger function processed a request.');
    
        if (req.query.name || (req.body && req.body.name)) {
            context.res = {
                // status: 200, /* Defaults to 200 */
                body: "Hello " + (req.query.name || req.body.name)
            };
        }
        else {
            context.res = {
                status: 400,
                body: "Please pass a name on the query string or in the request body"
            };
        }
    };
    

    Our function expects a name to be passed in either through the HTTP request query string or as part of the request body. The function responds by returning the message Hello, {name}, echoing back the name that was sent in the request.

    On the right-hand side of the source view, you’ll find two tabs. The View files tab lists the code and config file for your function. Select function.json to view the configuration of the function, which should look like the following:

    JavaScript
    {
      "bindings": [
        {
          "authLevel": "function",
          "type": "httpTrigger",
          "direction": "in",
          "name": "req",
          "methods": [
            "get",
            "post"
          ]
        },
        {
          "type": "http",
          "direction": "out",
          "name": "res"
        }
      ],
      "disabled": false
    }
    

    This configuration declares that the function runs when it receives an HTTP request. The output binding declares that the response will be sent as an HTTP response.

Test the function

 Tip

cURL is a command line tool that can be used to send or receive files. It’s included with Linux, macOS, and Windows 10, and can be downloaded for most other operating systems. cURL supports numerous protocols like HTTP, HTTPS, FTP, FTPS, SFTP, LDAP, TELNET, SMTP, POP3, etc. For more information, refer to the links below:

To test the function, you can send an HTTP request to the function URL using cURL on the command line. To find the endpoint URL of the function, return to your function code and select the Get function URL link, as shown in the following screenshot. Save this link temporarily.

Screenshot of the Azure portal showing the function editor, with the Get function URL button highlighted.

Securing HTTP triggers

HTTP triggers let you use API keys to block unknown callers by requiring the key to be present on each request. When you create a function, you select the authorization level. By default, it’s set to “Function”, which requires a function-specific API key, but it can also be set to “Admin” to use a global “master” key, or “Anonymous” to indicate that no key is required. You can also change the authorization level through the function properties after creation.

Since we specified “Function” when we created this function, we will need to supply the key when we send the HTTP request. You can send it as a query string parameter named code, or as an HTTP header (preferred) named x-functions-key.

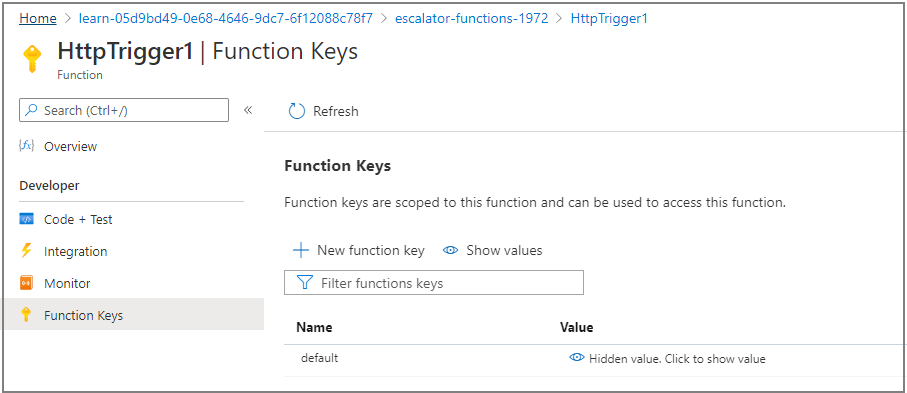
The function and master keys are found in the Manage section when the function is expanded. By default, they are hidden, and you need to display them.

  1. Expand your function and select the Manage section, show the default Function Key, and copy it to the clipboard.Screenshot of the Azure portal showing the function Manage blade with the revealed function key highlighted.
  2. Next, from the command line where you installed the cURL tool, format a cURL command with the URL for your function, and the Function key.
    • Use a POST request.
    • Add a Content-Type header value of type application/json.
    • Make sure to replace the URL below with your own.
    • Pass the Function Key as the header value x-functions-key.
    bash
    curl --header "Content-Type: application/json" --header "x-functions-key: <your-function-key>" --request POST --data "{\"name\": \"Azure Function\"}" https://<your-url-here>/api/DriveGearTemperatureService
    

The function will respond back with the text "Hello Azure Function".

 Caution

If you are on Windows, please run cURL from the command prompt. PowerShell has a curl command, but it’s an alias for Invoke-WebRequest and is not the same as cURL.

 Note

You can also test from an individual function’s section with the Test tab on the side of a selected function, though you won’t be able to verify the function key system is working, as it is not required here. Add the appropriate header and parameter values in the Test interface and click the Run button to see the test output.

Add business logic to the function

Next, let’s add the logic to the function that checks temperature readings that it receives and sets a status for each.

Our function is expecting an array of temperature readings. The following JSON snippet is an example of the request body that we’ll send to our function. Each reading entry has an ID, timestamp, and temperature.

JSON
{
    "readings": [
        {
            "driveGearId": 1,
            "timestamp": 1534263995,
            "temperature": 23
        },
        {
            "driveGearId": 3,
            "timestamp": 1534264048,
            "temperature": 45
        },
        {
            "driveGearId": 18,
            "timestamp": 1534264050,
            "temperature": 55
        }
    ]
}

Next, we’ll replace the default code in our function with the following code that implements our business logic.

Open the index.js file and replace it with the following code. Make sure to save the file after updating it.

JavaScript
module.exports = function (context, req) {
    context.log('Drive Gear Temperature Service triggered');
    if (req.body && req.body.readings) {
        req.body.readings.forEach(function(reading) {

            if(reading.temperature<=25) {
                reading.status = 'OK';
            } else if (reading.temperature<=50) {
                reading.status = 'CAUTION';
            } else {
                reading.status = 'DANGER'
            }
            context.log('Reading is ' + reading.status);
        });

        context.res = {
            // status: 200, /* Defaults to 200 */
            body: {
                "readings": req.body.readings
            }
        };
    }
    else {
        context.res = {
            status: 400,
            body: "Please send an array of readings in the request body"
        };
    }
    context.done();
};

The logic we added is straightforward. We iterate over the array of readings and check the temperature field. Depending on the value of that field, we set a status of OKCAUTION, or DANGER. We then send back the array of readings with a status field added to each entry.

Notice the log statements. When the function runs, these statements will add messages in the log window.

Test our business logic

In this case, we’re going to use the Test pane in the portal to test our function.

  1. Open the Test window from the right-hand side flyout menu.
  2. Paste the sample request into the request body text box.
    JSON
    {
        "readings": [
            {
                "driveGearId": 1,
                "timestamp": 1534263995,
                "temperature": 23
            },
            {
                "driveGearId": 3,
                "timestamp": 1534264048,
                "temperature": 45
            },
            {
                "driveGearId": 18,
                "timestamp": 1534264050,
                "temperature": 55
            }
        ]
    }
    
  3. Select Run and view the response in the output pane. To see log messages, open the Logs tab in the bottom flyout of the page. The following screenshot shows an example response in the output pane and messages in the Logs pane.Screenshot of the Azure portal showing the function editor blade with the Test and Logs tabs visible. A sample response from the function is shown in the output pane.

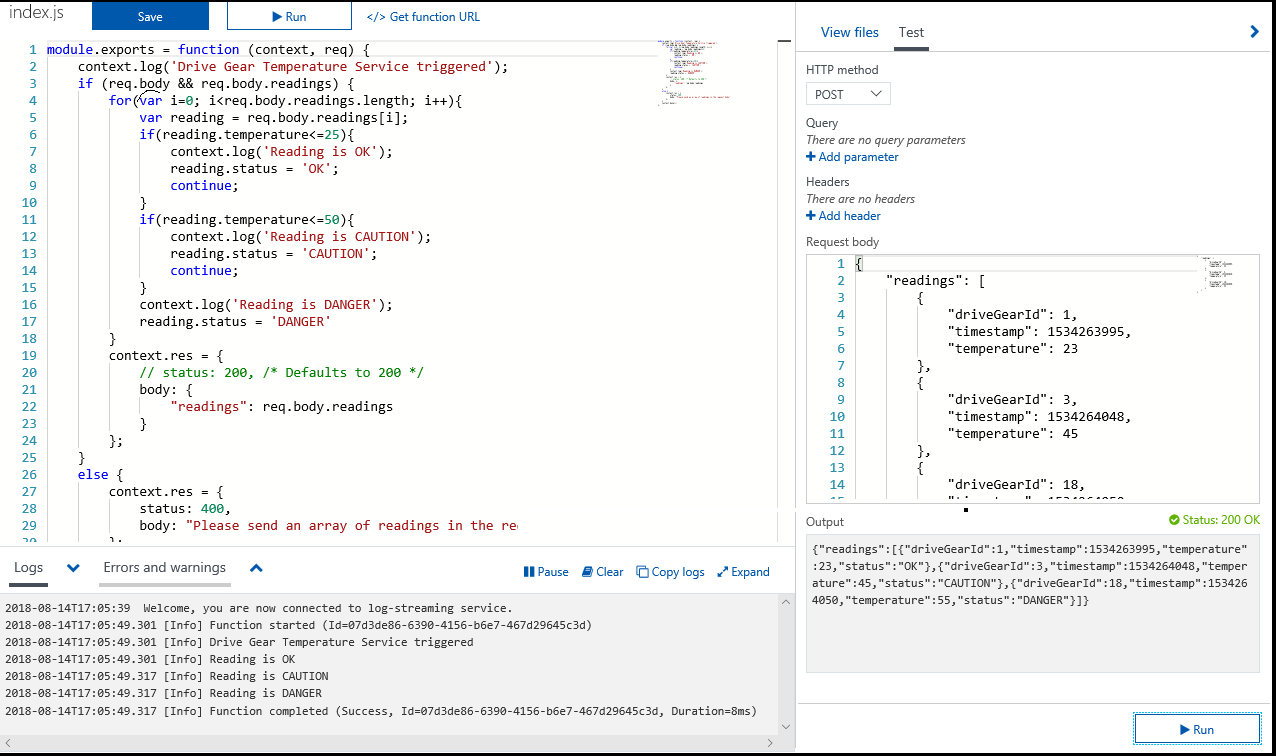
    You can see in the output pane that our status field has been correctly added to each of the readings.

    If you navigate to the Monitor dashboard, you’ll see that the request has been logged to Application Insights.

    Screenshot of the Azure portal showing the prior test success result in the function Monitor dashboard.


Summary

You’ve learned how to use Azure Functions to host business logic services in the cloud. It’s a great way to add hosted services to your solution that can scale and grow with your business. You focus on the code using the language of your choice, and Azure manages the infrastructure. Functions can integrate with other services, like Event Grid, GitHub, Twilio, Microsoft Graph, and Logic Apps to create complex and robust serverless workflows quickly and easily.

Clean up

The sandbox automatically cleans up your resources when you’re finished with this module.

When you’re working in your own subscription, it’s a good idea at the end of a project to identify whether you still need the resources you created. Resources left running can cost you money. You can delete resources individually or delete the resource group to delete the entire set of resources.

Why Azure is the Best Cloud Computing Platform & Services to Automate your Business Processes

Introduction

Modern businesses run on multiple applications and services. How well your business runs can often be impacted by how efficiently you can distribute the right data to the right task. Automating this flow of data can streamline your business even further. Choosing the right technology for these critical data integrations and process automation is also an important consideration.

Suppose you’re a developer at a company that operates a bike rental system at a large state university. Your company recently acquired the rights to operate at another university in the next state.

The other university also has a rental system in place. You’ll need to integrate with those existing systems too. The systems include bike tracking, inventory management, rental scheme registration, and more.

It’s June and the university would like to have the rental system in place before students arrive on campus in late August. Your business runs on Azure and a requirement of this integration is that you don’t take on any infrastructure maintenance or heavy upfront costs. As you expand into other universities across the country, you need to be able to scale efficiently in order to keep costs down and your low margins viable.

In this module, we’ll describe the Azure technologies that are available to you and teach you how to evaluate each one for your business needs.

Identify the technology options

You don’t have much time to get business processes properly integrated between your existing bike rental system and the system in use in the second campus. You’d like to make the most of your existing Azure expertise and you’ve read that Azure includes several different technologies that you can use to solve problems like this.

In this unit, we’ll explore the Azure technology options that are available to automate and integrate your business processes.

Common Business Problems

In business, one way to guarantee a high-quality service to users and high-quality products is to design and implement strict business processes. Such processes may involve multiple steps, multiple people, and multiple software packages. Each process may run in a simple line of activities that workers perform one after the other or they may branch or loop. Each process may also run quickly or take days or weeks to complete.

Frequently, a business runs into issues when it merges with a second business or integrates with a partner organization. How can administrators integrate the separate processes used in the two organizations, which may have been implemented using different software?

Business processes modeled in software are often called workflows. Azure includes four different technologies that you can use to build and implement workflows that integrate multiple systems:

  • Logic Apps
  • Microsoft Flow
  • WebJobs
  • Azure Functions

These four technologies have some similarities. For example:

  • They can all accept inputs. An input is a piece of data or a file that is supplied to the workflow.
  • They can all run actions. An action is a simple operation that the workflow executes and may often modify data or cause another action to be performed.
  • They can all include conditions. A condition is a test, often run against an input, that may decide which action to execute next.
  • They can all produce outputs. An output is a piece of data or a file that is created by the workflow.

In addition, workflows created with these technologies can either start based on a schedule or they can be triggered by some external event.

Design-first technologies

When business analysts discuss and plan a business process, they may draw a flow diagram on paper. With Logic Apps and Microsoft Flow, you can take a similar approach to designing a workflow. They both include user interfaces in which you can draw out the workflow. We call this approach a design-first approach.

Logic Apps

Logo for Azure Logic Apps

Logic Apps is a service within Azure that you can use to automate, orchestrate, and integrate disparate components of a distributed application. By using the design-first approach in Logic Apps, you can draw out complex workflows that model complex business processes. The following screenshot shows the Logic Apps Designer and design canvas that you use to define your workflow.

Logic Apps workflow designer in the Azure portal

Alternatively, if you prefer to work in code, you can create or edit a workflow in JSON notation by using the code view, as illustrated in the following screenshot.

Logic Apps code editor in the Azure portal

One reason why Logic Apps is so good at integration is that over 200 connectors are included. A connector is a Logic Apps component that provides an interface to an external service. For example, the Twitter connector allows you to send and retrieve tweets, while the Office 365 Outlook connector lets you manage your email, calendar, and contacts. Logic Apps provides hundreds of pre-built connectors that you can use to create your apps. If you have an unusual or unique system that you want to call from a Logic Apps, you can create your own connector if your system exposes a REST API.

Microsoft Flow

Logo Microsoft Flow

Microsoft Flow is a service that you can use to create workflows even when you have no development or IT Pro experience. You can create workflows that integrate and orchestrate many different components by using the website or the Microsoft Flow mobile app.

There are four different types of flow that you can create:

  • Automated: A flow that is started by a trigger from some event. For example, the event could be the arrival of a new tweet or a new file being uploaded.
  • Button: Use a button flow to run a repetitive task with a single click from your mobile device.
  • Scheduled: A flow that executes on a regular basis such as once a week, on a specific date, or after 10 hours.
  • Business process: A flow that models a business process such as the stock ordering process or the complaints procedure.

Microsoft Flow provides an easy-to-use design surface that anyone can use to create flows of the above types. As the following screenshot illustrates, the designer makes it easy to design and layout your process.

Microsoft Flow designer showing a workflow with a file trigger, an Office action to get a user's profile and an Outlook action to send an email.

Under the hood, Microsoft Flow is built on Logic Apps. This fact means that Flow supports the same range of connectors and actions. You can also use custom connectors in Microsoft Flow.

Design-first technologies compared

As you can see from the following table, Microsoft Flow is more appropriate for use by non-technical staff. If your workflow designers are IT professionals, developers, or DevOps practitioners, Logic Apps are usually a better fit:

Microsoft Flow Logic Apps
Intended users Office workers and business analysts Developers and IT pros
Intended scenarios Self-service workflow creation Advanced integration projects
Design tools GUI only. Browser and mobile app Browser and Visual Studio designer. Code editing is possible
Application Lifecycle Management Flow includes testing and production environments Logic Apps source code can be included in Azure DevOps and source code management systems

Code-first technologies

The developers on your team will likely prefer to write code when they want to orchestrate and integrate different business applications into a single workflow. This is the case when you need more control over the performance of your workflow or need to write custom code as part of the business process. For such people, Azure includes WebJobs and Functions.

WebJobs and the WebJobs SDK

Azure WebJobs

The Azure App Service is a cloud-based hosting service for web applications, mobile back-ends, and RESTful APIs. These applications often need to perform some kind of background task. For example, in your bike rental system, when a user uploads a photo of a bike, you may need to generate a smaller thumbnail photograph.

WebJobs are a part of the Azure App Service that you can use to run a program or script automatically. There are two kinds of WebJob:

  • Continuous. These WebJobs run in a continuous loop. For example, you could use a continuous WebJob to check a shared folder for a new photo.
  • Triggered. These WebJobs run when you manually start them or on a schedule.

To determine what actions your WebJobs takes, you can write code in several different languages. For example, you can script the WebJob by writing code in a Shell Script (Windows, PowerShell, Bash). Alternatively, you can write a program in PHP, Python, Node.js, or Java.

You can also program a WebJob by using the .NET Framework or the .NET Core Framework and a .NET language such as C# or VB.NET. In this case, you can also use the WebJobs SDK to make the task easier. The SDK includes a range of classes, such as JobHostConfiguration and HostBuilder, which reduce the amount of code required to interact with the Azure App Service.

The WebJobs SDK only supports C# and the NuGet package manager.

Azure Functions

Azure Functions

An Azure Function is a simple way for you to run small pieces of code in the cloud, without having to worry about the infrastructure required to host that code. You can write the Function in C#, Java, JavaScript, PowerShell, and Python. In addition, with the consumption plan option, you only pay for the time when the code runs. Azure automatically scales your function in response to the demand from users.

When you create an Azure Function, you can start by writing the code for it in the portal. Alternatively, if you need source code management, you can use GitHub or Azure DevOps Services.

To create an Azure Function, choose from the range of templates. The following list is an example of some of the templates available to you.

  • HTTPTrigger. Use this template when you want the code to execute in response to a request sent through the HTTP protocol.
  • TimerTrigger. Use this template when you want the code to execute according to a schedule.
  • BlobTrigger. Use this template when you want the code to execute when a new blob is added to an Azure Storage account.
  • CosmosDBTrigger. Use this template when you want the code to execute in response to new or updated documents in a NoSQL database.

Azure Functions can integrate with many different services both within Azure and from third parties. These services can trigger your function, or send data input to your function, or receive data output from your function.

Code-first technologies compared

In most cases, the simple administration and more flexible coding model provided by Azure Functions may lead you to choose them in preference to WebJobs. However, you may choose WebJobs for the following reasons:

  • You want the code to be a part of an existing App Service application and to be managed as part of that application, for example in the same Azure DevOps environment.
  • You need close control over the object that listens for events that trigger the code. This object in question is the JobHost class, and you have more flexibility to modify its behavior in WebJobs.
Azure WebJobs Azure Functions
Supported languages C# if you are using the WebJobs SDK C#, F#, JavaScript, Java
Automatic scaling No Yes
Development and testing in a browser No Yes
Pay-per-use pricing No Yes
Integration with Logic Apps No Yes
Package managers NuGet if you are using the WebJobs SDK Nuget and NPM
Can be part of an App Service application Yes No
Provides close control of JobHost Yes No

Now you know what design-first and code-first technologies are available to you, how do you narrow you choice down for a given scenario? We’ll look at this question in the next unit.

Analyze the decision criteria

There are several different business processes that run your bicycle rental business. For example, there is the bike rental process, a return process, a bike booking process, and processes that don’t directly relate to bikes, such as holiday booking for the staff.

We’ve introduced an array of Azure technology that could be used to help build these processes. Let’s try to be more concrete about how we make the decision for a given process.

How to choose a service

The following diagram shows a simplified flow chart that you can use to choose the best technology to use for your business process:

Server choice flow chart

The first question to ask is whether you prefer to design the workflow in a GUI designer tool or by writing code. The following list has some valid reasons for using a design-first tool:

  • People who design the workflow have no coding experience.
  • Later designers and users can consult the graphical design to clearly understand how the workflow proceeds.

Alternatively, you can choose to use a code-first tool because:

  • People who design the workflow are developers and prefer to work entirely in code.
  • You want the details of a workflow to be hidden from non-coders.

Choosing a design-first technology

If you choose to use a design-first approach, you must also choose from Microsoft Flow and Azure Logic Apps.

The principal question here is who will design the workflow: will it be developers or users?

In Logic Apps, there is a GUI designer on which you draw out the workflow. It is intuitive and easy to use but you also have the opportunity to delve under the hood and edit the source code for a workflow. This tool is designed for people with development skills.

In Microsoft Flow, extra help and templates are provided for common types of workflow. There is no way to edit the source code that the tool creates. This tool is designed for users who have a good understanding of the business process but no coding skills.

Choosing a code-first technology

If you choose to use a code-first approach, your next choice is between WebJobs and Azure Functions.

Because of the extra features that are included with Azure Functions, including wider ranges of trigger events and supported languages, the ability to develop test code in the browser, and the pay-per-use price model, consider Azure Functions to be your default choice. There are two situations in which WebJobs might be a better choice:

  • You have an existing Azure App Service application, and you want to model the workflow within the application. This requirement means that the workflow can also be managed as part of the application, for example in an Azure DevOps environment.
  • You have specific customizations that you want to make to the JobHost that are not supported by Azure Functions. For example, in a WebJob, you can create a custom retry policy for calls to external systems. This kind of policy can’t be configured in an Azure Function.

Mixing Technologies

Remember that there is no requirement for you to use the same technology for different workflows: if your requirements differ, you are likely to reach a different answer at the end of your decision-making process. Furthermore, you can also call one workflow from another. For example, a workflow implemented in Microsoft Flow can easily call another that is built as an Azure Function.

One reason to mix the technologies used in your business processes would be to give users control over a small section of a complete workflow. Do this by implementing that section in Microsoft Flow, then call that Flow from a Logic App, Web Job, or Function.


Choose the best design-first technology to automate your business process

You want to choose a technology to automate the booking process for your bike rental business.

You want to streamline and modernize this process as it is performed on your original campus. You also want to integrate a bike tracking technology that is used on the new campus where you’ve recently obtained the rights to operate the existing bike rental business.

In this exercise, we’ll examine this scenario in detail and choose which technology to use.

Scenario

On your original campus, you have five bike rental shops. Each shop has a list of bikes for rent and its own database that records the bikes and their features and whether they are already rented or in the shop.

Currently, each bike can only be rented from its home shop. When a customer returns a bike to another shop, your staff move it back to the shop where it is listed on the database. You’d like to change the process so that each bike can be rented from any shop. However, you want to ensure staff can find out quickly where each bike is.

At the university in the next state, the bike rental business invested in a third party system to track bike locations. When a bike arrives back at a store, a unique barcode on the crossbar is scanned. The bike tracking database is automatically updated with the name of the shop that scanned the barcode. When a bike leaves a shop with a customer, the location is changed to “On Hire” and the customer name is recorded in a separate column.

This system has proved helpful when a customer asks for a bike with specific frame size and/or specific features, such as an electric motor or all-terrain suspension. If a shop doesn’t have a bike with the right equipment, the shop can quickly find out where such a bike is and get it or send the customer to the right shop. This bike location database has a REST API that you can call from other systems.

Your managing director wants to be able to understand clearly the workflow that you develop. There were problems in the past when documentation has not been kept in-sync with custom code and your director wants to see the process as it’s implemented.

Business Process

You want to update the bike reservation and rental process on both campuses to the following workflow:

Bike booking and rental workflow

The details are as follows:

  1. A customer requests a bike on the phone, in person, or through the website.
  2. Shop staff record the customer’s details and frame size.
  3. Does the customer need specific features such as an electric motor, suspension, or a child trailer? If so what are those features?
  4. Where are all the bikes with that frame size and those features? This information is obtained from the bike location database and is kept up-to-date by the barcode scanning system.
  5. Is there a bike with the right features and frame size in the right shop? If yes book that bike.
    1. If not, where is the nearest bike? Reserve that bike.
    2. Send an email to staff to move the bike to the customer.
    3. Scan barcode in new location.
  6. Give the bike to the customer and update location to “On Hire”.
  7. Take payment from the customer.

This is a simplification of the entire process. For simplicity, we’ve omitted edge cases such as no bike with the desired frame size or features is available for rent. Perhaps you can think of other cases not covered by this simplified process.

Choosing a technology

Let’s look at the Azure technologies available to implement the business process and integrate with the bike location database:

  • Microsoft Flow
  • Azure Logic Apps
  • Azure Functions
  • Azure Service Apps WebJobs

You could use any of these technologies and others to build a workflow for this business process. Each technology can also integrate with any REST API, so you could also use any of these technologies to integrate with the bike location system. How then, can you choose?

Design-first or code-first?

We know that your Managing Director and her staff want to understand the workflow and a higher level than examining the code and implementation. She also doesn’t like separate documents describing a process, because it so easily becomes out-of-date when the process changes.

If you choose a design-first approach, the workflow is visualized in an easy-to-understand design surface. In addition, that diagram is not a separate document, but a picture of the process as it is implemented. The benefit is that there’s no possibility that the diagram is not updated when the process is changed.

For this reason, choose a design-first approach.

Microsoft Flow or Azure Logic Apps?

Now you must choose from the two design-first technologies:

  • Microsoft Flow
  • Azure Logic Apps

There’s no suggestion in the scenario that shop staff should be able to modify the business process. In addition, to connect to the bike location database through its REST API, you will need to create a custom connector. This is a developer task.

It seems sensible that the development of the custom connector and the workflow should be done by the same person or team. Since these must be developers, it’s best to use Azure Logic Apps.

As this exercise shows, we can narrow down the technology to use for a given solution by simply understanding the business process and the audience.

When to choose Azure Functions to run your business logic


Now let’s look at another process from our bike rental business and decide what technology best fits our needs. We’ll consider the technical aspects of the process as well as audience and how our process needs to evolve.

Your App Scenario

Your bike technicians currently use a spreadsheet to record the actions they took to repair and maintain each bike when it arrives back from a customer. Difficulties have arisen when spare parts are needed, because the staff have no way of knowing when a bike is waiting for repairs or parts. This problem has resulted in bikes being rented to customers with worn brake pads, flat tires, and other faults that may damage our brand as a high-quality bike rental company.

You want to build a system that governs the maintenance and repair process and allows everyone to find answers to the following questions.

  • What jobs have been completed on a bike?
  • What jobs remain to be completed before the bike can be rented out again?
  • Which bikes are currently available to rent?
  • Which bikes are currently unavailable to rent?
  • For each bike that is unavailable:
    • Why can’t we rent them out?
    • Are we waiting for any parts, and what are those parts?
    • When is the bike likely to be available again for rent?

You’d like to integrate this system with the bike booking and rental process from the last unit so that, when shop staff search for available bikes, they find only those bicycles that are currently available to rent. Your manager has asked you to be the developer on this project.

App Business Process

You want to ensure that bike technicians on both campuses stick to the following workflow when they maintain a bike following a rental:

Bike maintenance workflow

The details are as follows:

  1. A customer returns a bike to any location. The bike maintenance process starts.
  2. A technician marks the bike as unavailable.
  3. A technician completes a full list of checks including the tires, brakes, drive chain, and lights.
  4. Are new parts required?
    1. New parts are required, but we don’t have the parts in stock.
      1. The technician orders new parts
      2. Parts arrive
    2. Fit new parts
  5. A technician completes final changes.
  6. A technician marks the bike as available for rent.

Choose a Microsoft technology

To implement the business process and integrate with the bike location database, let’s consider the following set of technologies.

As in the previous scenario, any of these technologies could be used to build the workflow. However, there are two issues that determine the optimal choice.

Design-first or code-first?

To implement this workflow using just Logic Apps or Flow would be difficult. While we haven’t heard too many low-level details, it’s clear that this process needs to access an inventory system, place orders with a third-party parts company. This is new business logic and there is no requirement that we consider a design-first approach. We can wrap our solution in a custom connector to integrate with other workflows created with Logic Apps or Flow. As a developer, you have most flexibility by approaching this scenario from a code-first approach, so let’s do that!

Azure Functions or Azure Apps Service WebJobs?

We have to make a decision between the following two technologies.

  • Azure Functions
  • Azure App Service WebJobs

The following factors will influence your choice:

  • Cost: With Web Jobs, you pay for the entire VM or App Service Plan that hosts the job. Azure Function can run on a consumption plan, so you only pay when the function runs. Since this process only kicks off when a bike is returned, we might stand to save by selecting Azure Functions.
  • Integrations: You want to integrate the maintenance workflow with the Logic App that you build for the bike booking and rental process in the previous unit. Although it is possible to call a WebJob from a Logic App, the integration between Logic Apps and Functions is closer. For example, you can more easily control your call to a Function from the Logic Apps designer.

For these reasons, we’ll select Azure Function to manage your bike maintenance business process.


Summary

Some business processes are simple, but often they include challenges such as:

  • They might involve many different steps, sometimes with loops or conditional branches.
  • They may be long-running and complete over days or weeks as staff become available or because of other delays.
  • They may involve several different systems such as databases, web services, email servers, and other components.
  • You may want to integrate a custom or third-party system, which may require a custom connector.
  • You may want non-developers to be able to modify and update the workflow.

As you have seen, Azure includes the following technologies that you can use to overcome these challenges:

  • Microsoft Flow
  • Azure Logic Apps
  • Azure Functions
  • Azure App Service WebJobs

Your choice of technology depends on whether you prefer a design-first or a code-first approach, and whether you have skilled developers to work on the project.

Principles of cloud computing Summary

Cloud Concepts – Summary

In this Series of post, you’ve learned about cloud computing, what it is and what its key characteristics are. Here are some of the things you covered.

  • Different types of cloud models that are available and the considerations of using those different models.
  • Some of the key terms and concepts such as high availability, agility, elasticity, fault tolerance, and CapEx vs. OpEx.
  • The different cloud services available, the benefits of using the different types, and the management responsibilities under each service type.
  • Cloud models such as public, private and hybrid, and what the key characteristics of each model are.
  • The different types of cloud service available: IaaS, PaaS, and SaaS; what the key characteristics of each service are and when you would choose one over the other.

Microsoft Azure

Azure is Microsoft’s cloud computing platform. Azure provides over 100 services that enable you to do everything from running your existing applications on virtual machines to exploring new software paradigms such as intelligent bots and mixed reality.

Here are just a few kinds of services you’ll find on Azure:

  • Compute services such as VMs and containers that can run your applications
  • Database services that provide both relational and NoSQL choices
  • Identity services that help you authenticate and protect your users
  • Networking services that connect your datacenter to the cloud, provide high availability or host your DNS domain
  • Storage solutions that can accommodate massive amounts of both structured and unstructured data
  • AI and machine-learning services can analyze data, text, images, comprehend speech, and make predictions using data — changing the world of agriculture, healthcare, and much more.
  • And many more!

Learn more

Stay on the Azure Fundamentals Learning Path to learn more about how Microsoft Azure can help you build more secure, reliable, performant applications in the cloud.