How to Create an AI Web Application Using Flask in Python 3

Creating a web application with artificial intelligence (AI) doesn’t need to involve a lot of code or creating services from scratch. Let’s imagine we wanted to create a website that can translate text for the user.

For the front end, we want something that will allow us to integrate our services without having to jump through a lot of hoops. A framework like Flask is a perfect choice. Flask is described by its creators as a “micro-framework”, meaning it provides the core services required, such as routing and templating, but otherwise allows you to use whatever backend services your application needs. It’s also lightweight, making it quick to set up and deploy. We don’t need a database or anything fancy. We just need a framework to create our UI, and be able to call the back-end service.

For the back end, rather than creating a machine learning model on your own, you can use a collection of Microsoft AI services (known as Azure Cognitive Service). These services can either be accessed via an SDK or an HTTP call. We can use the Translator service to meet our primary goal of translating text.

In this blog post, we’re going to explore Flask and the Translator service. We’ll see how we can create a web application to translate text into various languages.

Setting up a development environment

To get started writing our Flask application with Python, we need to set up our development environment, which will require a couple of items to be installed. Fortunately, the tools we’ll use are relatively common, so they’ll serve you well even beyond this module. You might even have them installed! We’ll use these tools to develop and test your application locally.

In this unit, you’ll learn how to install Python tooling and create a virtual Python environment. You’ll install Flask, which is the framework we’ll use for creating the website.

At a high level, we’ll perform the following steps:

  • Install Visual Studio Code (if not already installed)
  • Install Python (if not already installed)
  • Create a directory for your code
  • Create a virtual environment
  • Install Flask and other libraries

Install Visual Studio Code

Visual Studio Code is an open-source code editor that allows you to create almost any type of application you might like. It’s backed by a robust extension marketplace where you can find add-ons to help make your life as a developer easier.

Install Visual Studio Code


Install Python

To complete this unit, you must have Python 3.6 or later installed on your computer. There’s a chance you might already have Python installed, especially if you’ve already used it. You can confirm whether it’s installed by executing one of the following commands:

python --version


If Python is installed, the output shows the Python version number. If you need to install Python, follow the steps in the Install Python 3 documentation for Visual Studio Code. At the top of the article, choose the instructions for your configuration: Windows, Linux, or Mac.

If you’re using Windows, make sure that the folder location where you installed Python is added to your PATH environment variable. If you miss this step you’ll receive an error message “Python isn’t found”, even after performing the installation.


Create the project directory

Create a directory in the location of your choice. This directory will be your project directory, and will contain all of the code we’ll create. You can create a directory from a command or terminal window with one of the following commands:

# Windows
md contoso
cd contoso ## macOS or Linux
mkdir contoso
cd contoso


Create a Python virtual environment

A Python virtual environment isn’t necessarily as complex as it sounds. Rather than creating a virtual machine or container, a virtual environment is a folder that contains all of the libraries we need to run our application, including the Python runtime itself. By using a virtual environment, we make our applications modular, allowing us to keep them separate from one another and avoid versioning issues. As a best practice you should always use virtual environments when working with Python.

To use a virtual environment, we’ll create and activate it. We create it by using the venv module, which you installed as part of your Python installation instructions earlier. When we activate it, we tell our system to use the folder we created for all of its Python needs.

# Windows
# Create the environment
python -m venv venv
# Activate the environment
.\venv\scripts\activate # macOS or Linux # Create the environment python -m venv venv # Activate the environment source ./venv/bin/activate


Install Flask and other libraries

With our virtual environment created and activated, we can now install Flask, the library we need for our website. We’ll install Flask by following a common convention, which is to create a requirements.txt file. The requirements.txt file isn’t special in and of itself; it’s a text file where we list the libraries required for our application. But it’s the convention typically used by developers, and makes it easier to manage applications where numerous libraries are dependencies.

During later exercises, we’ll use a couple of other libraries, including requests (to call Translator service) and python-dotenv (to manage our keys). While we don’t need them yet, we’re going to make our lives a little easier by installing them now.

    1. In the command or terminal window, run the following command to open the directory in Visual Studio Code:   code .
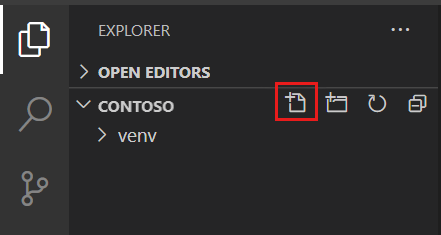
    2. In Visual Studio Code, in the Explorer window, select New File next to the contoso directory
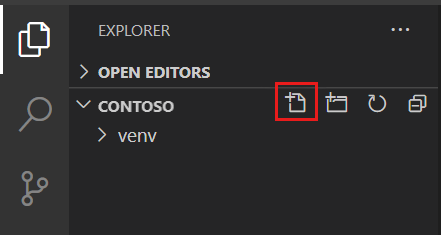
      file
    3. Name the file requirements.txt, and add the following text:
      flask
      
      python-dotenv
      
      requests
    4. Save the file by clicking Ctrl-S, or Cmd-S on a Mac
    5. Return to the command or terminal window and perform the installation by using pip to run the following command:
pip install -r requirements.txt

The command downloads the necessary libraries and their dependencies.

Congratulations! You’ve now setup your environment for development!


Flask fundamentals

Flask is an open-source web “micro-framework”. When the creators use the term “micro-framework”, they mean that the framework will perform the required tasks of a web framework, but that it doesn’t include advanced features, or other specific requirements that your application must follow to work correctly. This approach allows Flask to be extremely flexible, and perfect for use as a front end to existing back ends or APIs – like Cognitive Services!

When creating a web application with any framework, there are a couple of core concepts we need to understand – routing, methods, and templating. Let’s explore these concepts before we write our code.

Responding to user requests with routes

When a user uses a web application, they indicate what they want to do, or the information they’re seeking, by browsing to different uniform resource locators (or URLs). They might type out an address directly (say https://adventure-works.com), or select a link, or a button that includes the appropriate URL. On an e-commerce site you might have URLs that look like the following:

  • https://adventure-works.com/ for the main page
  • https://adventure-works.com/products/widget for details on a Widget
  • https://adventure-works.com/cart/buy to complete a purchase


As a developer, we actually don’t need to worry about the first part of the URL, or the domain (adventure-works.com in our example). Our application is put into action based on whatever comes after the domain name, starting with the /. The portion after the domain name is what’s known as a route.

A route is a path to an action. Similar to tapping on a button in a mobile app, a route indicates the action the user wants to perform. We’ll register different routes in our web application to respond to the various requests our application supports.

In our application, we indicate how we want to respond to a particular route request by providing a function. A route is a map to a function. When we think about writing code in general, this concept is relatively natural. When we want to perform a particular action, we call a function. Our users will do the exact same thing! They’ll just do it a little differently, by accessing a route.


Methods or verbs

Routes can be accessed in many ways, through what are known as methods or verbs (the two terms mean the same thing and can be used interchangeably). How the route is accessed provides additional context about the state of the user request and what action the user wants to perform.

There are many methods available when creating a web application, but the two most common (and the only two we’ll focus on) are GET and POST. GET typically indicates that the user is requesting information, while POST indicates that the user needs to send us something and receive a response.

A common application flow that uses GET and POST revolves around using a form. Let’s say we create an application where the user wants to register for a mailing list:

  1. The user accesses the sign-up form via GET
  2. The user completes the form and selects the submit button
  3. The information from the form is sent back to the server by using POST
  4. A “success” message is returned to the user

As you might suspect, the user doesn’t directly indicate the verb they want to use, it is controlled by the application. Generally speaking, if the user navigates to a URL directly, by typing it in or by selecting a link, they access the page by using GET. When they select a button for a form, they typically send the information via POST.

Templates

Hypertext Markup Language, or HTML, is the language used to structure the information displayed on a browser, while Cascading Style Sheets, or CSS, is used to manage the style and layout. When creating an application, most of the HTML will be static, meaning it won’t change. However, to make our pages dynamic we need to be able to programmatically put information into an HTML page. Nearly every web framework supports this requirement through templates.

A template allows you to write the core HTML (or a template) and indicate placeholders for the dynamic information. Probably the most common syntax for placeholders is {{ }}. Jinja, the templating engine for Flask, uses this syntax.

<h1>Welcome, {{ name }}</h1>

In the preceding example, we have our HTML of h1 (a header), with the text we want to display. The {{ name }} indicates that we want to display a variable named name right after Welcome. By using this syntax we can write our HTML with our existing skills, and inject the dynamic information as needed.

Create an app

We’re going to create our application iteratively, focusing on specific concepts as we go. To start, we’ll create the landing page for our application, which will display the form the user will use.

Typically, the entry point for Flask applications is a file named app.py. We’re going to follow this convention and create the core of our application. We’ll perform the following steps:

  • Create our core application
  • Add the route for our application
  • Create the HTML template for our site
  • Test the application

Create core application

    1. Returning to the instance of Visual Studio Code we were using previously, create a new file named app.py by clicking New file in the Explorer tabapp
    2. Add the code to create your Flask application
from flask import Flask, redirect, url_for, request, render_template, session

app = Flask(__name__)

The import statement includes references to Flask, which is the core of any Flask application. We’ll use render_template in a while, when we want to return our HTML.

app will be our core web application. We’ll use it when we register our routes in the next step.

Learn More:  5 Best Web Hosting Reddit Users Recommend in 2022 (FAST & SECURE)

Add the route

Our application will use one route – /. This route is sometimes called either the default or the index route, because it’s the one that will be used if the user doesn’t provide anything beyond the name of the domain or server.

Add the following code to the end of app.py

@app.route('/', methods=['GET'])
def index():
return render_template('index.html')

By using @app.route, we indicate the route we want to create. The path will be /, which is the default route. We indicate this will be used for GET. If a GET request comes in for /, Flask will automatically call the function declared immediately below the decorator, index in our case. In the body of index, we indicate that we’ll return an HTML template named index.html to the user.

Create the HTML template for our form

Jinja, the templating engine for Flask, focuses quite heavily on HTML. As a result, we can use all the existing HTML skills and tools we already have. We’re going to use Bootstrap to lay out our page, to make it a little prettier. By using Bootstrap, we’ll use different CSS classes on our HTML. If you’re not familiar with Bootstrap, you can ignore the classes and focus on the HTML (which is really the important part).

Templates for Flask need to be created in a folder named templates, which is fitting. Let’s create the folder, the necessary file, and add the HTML.

  1. Create a new folder named templates by selecting New Folder in the Explorer tool in Visual Studio Code
  2. Select the templates folder you created, and select New File to add a file to the folder
  3. Name the file index.html
  4. Add the following HTML


<!DOCTYPE html>
<html lang="en">
<head>
<meta charset="UTF-8">
<meta name="viewport" content="width=device-width, initial-scale=1.0">
<link rel="stylesheet" href="https://cdn.jsdelivr.net/npm/[email protected]/dist/css/bootstrap.min.css"
integrity="sha384-TX8t27EcRE3e/ihU7zmQxVncDAy5uIKz4rEkgIXeMed4M0jlfIDPvg6uqKI2xXr2" crossorigin="anonymous">
<title>Translator</title>
</head>
<body>
<div class="container">
<h1>Translation service</h1>
<div>Enter the text you wish to translate, choose the language, and click Translate!</div>
<div>
<form method="POST">
<div class="form-group">
<textarea name="text" cols="20" rows="10" class="form-control"></textarea>
</div>
<div class="form-group">
<label for="language">Language:</label>
<select name="language" class="form-control">
<option value="en">English</option>
<option value="it">Italian</option>
<option value="ja">Japanese</option>
<option value="ru">Russian</option>
<option value="de">German</option>
</select>
</div>
<div>
<button type="submit" class="btn btn-success">Translate!</button>
</div>
</form>
</div>
</div>
</body>
</html>

The core components in the HTML above are the textarea for the text the user wishes to translate, and the dropdown list (select), which the user will use to indicate the target language. If you want to add more languages, you can consult the list of supported languages for other options. Set the value attribute to the language code, for example, pl for Polish.

Finding the Best Django Hosting Providers 2022

Test the application

With our initial site created, it’s time to test it! We’re going to use the integrated terminal inside Visual Studio Code to make our lives a little easier.

  1. Open the integrated terminal by selecting Ctrl-` or Cmd-` on a Mac
  2. Run the following command to set the Flask runtime to development, which means that the server will automatically reload with every change
    # Windows
    set FLASK_ENV=development
    
    # Linux/macOS
    export FLASK_ENV=development
  3. Run the application!  flask run
  4. Open the application in a browser by navigating to http://localhost:5000


You should see the form displayed! Congratulations!

(Continue )

 

Why You Shouldn’t Use Cloudflare Proxy

There is such a wonderful thing as Cloudflare. Almost everyone knows it and many people use it not only as a DNS provider, but also as a reverse proxy with a CDN (for which it is more and sharpened). But few people think about how it works and what they may encounter when using it. They just add a domain there, turn on proxy, connect a free SSL certificate     and think that Cloudflare will become a magic wand for all problems.

Problems when proxying through Cloudflare

Now let’s throw some shit on the fan 🙂

No guarantee of DDOS protection

Many people think that Cloudflare’s free plan will protect them from DDOS, but daam it. The best thing it will do in a DDOS is give an error page until the attack is over. That’s all. No one will filter traffic for you for free, because. it costs resources and therefore money. You will have to fork out for paid tariffs. And then there are rumors that normal traffic filtering will be only on the Enterprise tariff.

Turning on captcha when suspicious individuals enter the site will help quite a bit, but do not forget that the algorithm often does not work as it should, and unfortunate users will endure this mockery of them.

Unstable work

Cloudflare may suddenly turn off abuse proxying without warning or if they think that you are pumping too much traffic on a free plan.

Also, something might break. But no one is immune from mistakes.

I still often notice several errors, And most often these errors are not related to what they write in the documentation. Yes, I checked many times, the occurrence of the error was not related to the firewall, errors on the server and accessibility. Other errors appear less frequently. Most people will not even notice errors, but if you put the site on monitoring, then it is hard not to notice them.

Some people notice that sites start to work slower when proxying. There are no proofs, but there are such reviews.

Incorrect operation of protection on the server

(if you have a regular shared hosting, you can skip this paragraph)

When proxying through Cloudflare, the server receives requests not from real IP clients, but from IP subnets of Cloudflare. The real IP of the client can be found through the same PHP (X-Forwarded-For header), but the server software sees only the final IP. As a result, server protection will not work very correctly. And it becomes even more complicated if there are several sites on the server and some of them are not proxied.

Let’s take Fail2ban as an example. Most often, incorrect authorizations on sites are recorded in error logs and set Fail2ban on these logs. As a rule, end IP addresses get there, i.e. Cloudflare IP addresses. When brute-forcing proxied sites, it will block not real IP addresses, but Cloudflare IP addresses. If a massive brute force starts, it will block part of the Cloudflare addresses, from which real clients will also come. And if the duration of the ban is long, then this will result in massive 521 errors with high attendance. Well, if you make a separate log, where to throw real IP addresses? In this case, Fail2ban will block real IPs, but traffic will come from Cloudflare’s IP addresses, and the firewall will continue to let villains into the server. Here, breakers can even break, and Fail2ban will work for nothing.

There is a solution for Fail2ban to block the real IPs of hackers, and they, in turn, could not access the server. In this case, Fail2ban gets the real IP and sends it to Cloudflare via their API. Cloudflare, in turn, blocks this IP already on its side. IP unblocking works the same way. Fail2ban receives a command to unban or sees that the ban is about to expire and sends a request to Cloudflare to unban that IP. Everything seems to be great, but in this case intermediaries appear, additional delays appear, and protection goes over to Cloudflare. We can only hope that it does not fall, does not suddenly turn off proxying, and API requests do not break. Or, for example, imagine that bad people find out the real IP of the server (and you can find it out in different ways), register it in the hosts of the attacking system (or botnet) and start hacking the site. Fail2ban sees unsuccessful logins to the site and starts sending them to Cloudflare for blocking. But they are no longer accessing the site through Cloudflare, but directly. And here they are not blocked. Alternatively, you can allow access via http and https only via Cloudflare IP addresses directly to iptables or pass them there via IPset. At the same time, the list of subnets must be kept up to date and pray that proxying does not fall off. Or support both options: classic blocking on the server with whitelisting Cloudflare subnets and sending real IPs to Cloudflare. But do you need such complication? Moreover, in this case, different nuances are possible. The easiest option is to block Cloudflare IP addresses for a short period of time.

Another example is the mass blocking of IPs by lists of bad IPs, for example via IPset. These IP addresses will simply not be blocked, because they will hide under the Cloudflare IPs. As an option, transfer them to Cloudflare in parallel, but you can run into limits, which is also not very good.

Secure traffic can be sniffed on the Cloudflare side

When using SSL and proxying traffic through Cloudflare, it connects its certificate. And this means that the traffic is first decrypted, and then encrypted with another certificate. This is all happening on the side of Cloudflare. When their servers are compromised, an important part of the traffic can be intercepted and modified by third parties.

When Proxying through Cloudflare

Hiding the real IP address of the server

One of the important reasons for some. But do not forget that there are many ways to find the real IP of the server.

It also often happens that on shared hosting, several dozen sites (or even more) hang on one IP, some of which do not have a very good reputation and partially spoil the reputation of the site in the eyes of search engines and mail services. When proxying through Cloudflare, the IP of the site is substituted and saves money on purchasing a dedicated IP.

Shared hosting and unattended servers

In this case, there are basically only pluses, because. Cloudflare partially solves the problems with protection and parasitic load. Better that way than nothing at all.

Unoptimized sites

If you have a site that is not cached in any way and without any optimization, then theoretically enabling proxying will fix some problems by caching some statics, compressing scripts and styles, and so on.

Using paid plans

Here and so everything is clear. For a fee, you will already have at least some kind of traffic filtering and all sorts of interesting goodies. Any commercial organization is interested in making money.

 CDN

If you have an extensive audience around the world, then of course there will be sense. But most often, the server with the site is located close to the main narrow audience, and there is no need for a CDN.

Conclusion

I do not dissuade you from refusing to proxy through Cloudflare. The service itself is good, a lot of goodies even in the free plan. Easy setup for everything. But first of all, you need to think about whether you need proxying. If you think that it is fashionable or you just activate it automatically, then most likely it is not necessary.

How to Create a GitHub Action to deploy to Azure AKS

In this unit, you’ll complete the following tasks: Create a GitHub Action to implement a deployment pipeline Increment the coupon service version in the Helm chart, Verify that the changes were deployed to the AKS cluster, Roll back a deployment

Create the deployment action

Create a GitHub Action for cloud deployment(vps promo) of the coupon service with the following steps:

  1. Select the Actions tab again, select the New workflow button, and select the set up a workflow yourself link.
  2. Replace the YAML in the editor with the following YAML:
    name: eShop deploy
    
    on:
      push:
        paths:
        - 'deploy/k8s/helm-simple/coupon/*'
        branches: [ main ]
    
    jobs:
      deploy-to-aks:
        runs-on: ubuntu-latest
        steps:
        - name: Azure Kubernetes set context
          uses: Azure/aks-set-context@v1
          with:
            creds: ${{ secrets.AZURE_CREDENTIALS }}
            resource-group: 'eshop-learn-rg'
            cluster-name: 'eshop-learn-aks'
    
        - name: Get code from the repository
          uses: actions/checkout@v1
          with:
            ref: main
    
        - name: Helm tool installer
          uses: Azure/setup-helm@v1
    
        - name: Azure Login
          uses: Azure/[email protected]
          with:
            creds: ${{ secrets.AZURE_CREDENTIALS }}
    
        - name: Deploy
          run: >
            helm upgrade 
            --install eshoplearn-coupon
            --namespace=default 
            --set registry=${{ secrets.REGISTRY_LOGIN_SERVER }} 
            --set imagePullPolicy=Always 
            --set host=${{ secrets.IP_ADDRESS }} 
            --set protocol=http './deploy/k8s/helm-simple/coupon'
    

    The preceding YAML defines a GitHub Action that:

    • Is triggered when a commit is pushed to the coupon service’s Helm chart in the main branch.
    • Has one job, named deploy-to-aks, that deploys new images. The job runs in an ubuntu-latest runner and has five steps:
      1. Azure Kubernetes set context sets the AKS credentials in the runner’s .kube/config file.
      2. Get code from the repository checks out the code from the repository.
      3. Helm tool installer installs Helm, an open-source package manager for Kubernetes.
      4. Azure Login logs in to Azure using the service principal credentials.
      5. Deploy executes the helm upgrade command, passing the ACR instance name as the registry parameter. This parameter tells Helm to use your ACR instance rather than the public container registry.
  3. Replace the default workflow file name of main.yml with deploy.yml.
  4. Commit the deploy.yml workflow file directly to the main branch.

These two GitHub Action definitions are stored in the repository’s .github/workflows directory. To make changes, update the appropriate file locally and push to the main branch. Alternatively, create a pull request (PR). If you create a PR, the Action is triggered when merging to main.

Trigger a deployment

To trigger a deployment, you’ll increment the appVersion in the coupon service’s Helm chart. Helm charts are used to define the service specification in a YAML template format.

  1. From the Code tab, edit the deploy/k8s/helm-simple/coupon/Chart.yaml file by clicking the edit icon. Update the appVersion property value to 1.1.0:
    apiVersion: v2
    name: coupon
    
    # YAML omitted for brevity
    
    # This is the version number of the application being deployed. This version number should be
    # incremented each time you make changes to the application.
    appVersion: 1.1.0
    

    It’s important that you update the app version in the Helm chart. This change causes the pod to be replaced when the chart is deployed to AKS with helm upgrade.

  2. Commit and push this change to the main branch.The deployment workflow is triggered automatically. The app is deployed after a few minutes.

More Article : Best web hosting Reddit

Monitor the deployment

  1. Select the Actions tab in your repository to monitor the deployment’s progress.
  2. Select the most recent workflow run listed for the eShop deploy workflow. The commit message used in the previous step becomes the run’s name.
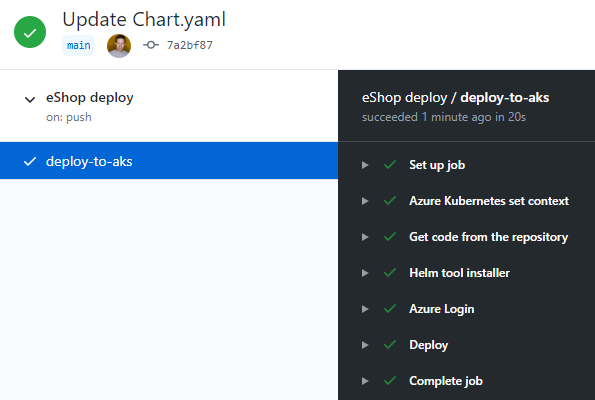
  3. Select the deploy-to-aks task:deploy-to-aks-taskIn the preceding image, you can see details of the deploy-to-aks job for this particular workflow run. The Set up job and Complete job steps are listed. In between those two steps are the custom steps defined within the deploy-to-aks job.
  4. Select the Actions tab again. You’ll see a variation of the following screen when the deployment completes:deployment-action
  5. Back in the command shell, run the following command to monitor the coupon service pods in your AKS cluster:
    kubectl get pods --selector service=coupon --watch
    

    In the preceding command:

    • The --selector flag filters the list to only pods for the coupon service. For this reason, pods for other services in the cluster aren’t displayed.
    • The --watch flag instructs kubectl to watch for changes. When a change is detected, an additional table row is appended to the command shell output. The status of the existing and newly deployed pods is displayed in real time.

    A variation of the following output appears:

    NAME                              READY   STATUS              RESTARTS   AGE
    coupon-5b9597995-7s4hh            1/1     Running             1          31m
    coupon-74fd48bbd-rqgfd            0/1     ContainerCreating   0          22s
    

    In the preceding output, notice that a new coupon pod was created. While the old pod is still running and when the new pod is ready, the old one is terminated. This process makes the transition to the new version as smooth as possible.

  6. Once the new pod’s Ready status displays 1/1, press Ctrl+C to stop kubectl‘s watch mode.
  7. Run the following command to check the coupon service deployment history:
    helm history eshoplearn-coupon
    

    The history shows the new coupon service version has been deployed.

    REVISION        UPDATED                         STATUS          CHART           APP VERSION     DESCRIPTION
    1               Thu Sep 10 19:19:31 2020        superseded      coupon-0.1.0    1.0.0           Install complete
    2               Thu Sep 10 19:51:10 2020        deployed        coupon-0.1.0    1.1.0           Upgrade complete
    

Read more: WordPress hosting 2022 reddit

Best WordPress hosting reddit 

Verify the deployment

Complete the following steps to verify your change is deployed:

  1. Run the following command in the command shell:
    cat ~/clouddrive/aspnet-learn-temp/deployment-urls.txt
    
  2. Select the Web SPA application URL to launch the app.
  3. Log in from the LOGIN page.
  4. Add your favorite products to the shopping bag by selecting the images.
  5. Select the shopping bag icon in the upper right, and select CHECKOUT.
  6. Enter the code DISC-5 in the HAVE A DISCOUNT CODE? text box for a five USD discount, and select APPLY.
  7. Select PLACE ORDER to complete the purchase.
  8. Back in the command shell, select the Centralized logging URL.
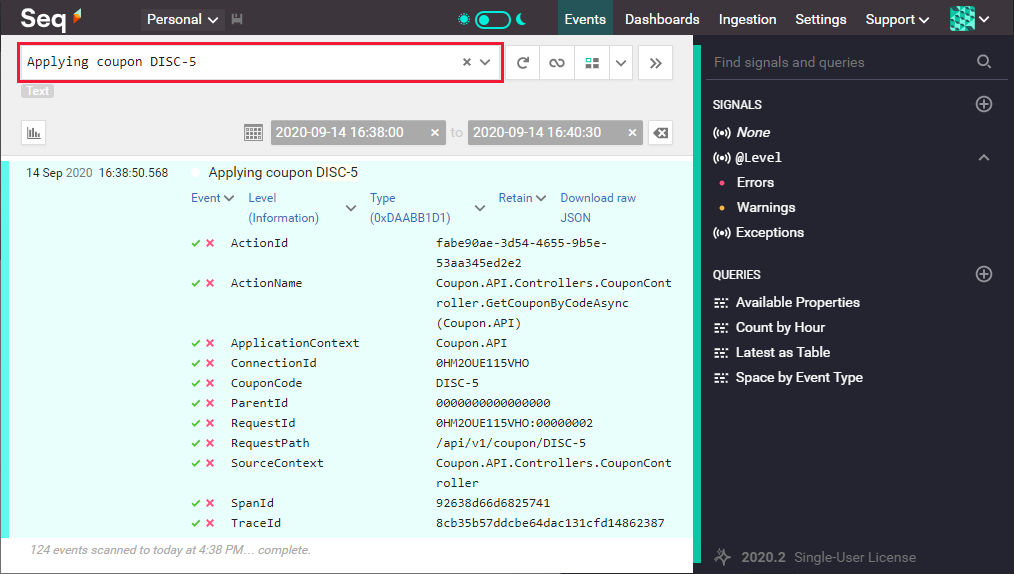
  9. In the Seq logs search text box, enter Applying coupon DISC-5 and press Enter.The logs are filtered to display the following entry:seq-logs-azure

Roll back the deployment

During production issues, one common mitigation is to revert a deployment to a known good deployment. Use the following command to roll back from version 1.1.0 to 1.0.0.

helm rollback eshoplearn-coupon

The deployment history confirms that everything is back to normal:

Rollback was a success! Happy Helming!

 Note: In a real-life scenario, you’ll have multiple environments to which the build’s artifacts can be deployed. For example, you might have development, testing, and staging environments. The deployment workflows can be triggered by events like merging PRs. Quality or approval gates, such as a stakeholder’s PR approval, can be added to prevent unexpected deployments to production.

In this unit, you created a GitHub Action to deploy the coupon service to AKS. To test the deployment workflow, you incremented the coupon service version in its Helm chart. Upon completion of the deployment workflow run, you searched the Seq logs to confirm the discount code redemption message was present. Finally, you reverted the coupon service in AKS to version 1.0.0.

Happy deploying!