Clean up your Azure Web Hosting DevOps environment

You’re all done with the tasks for this module. You can now move the work item to the Done state on Microsoft Azure web hosting Boards and clean up your Microsoft Azure DevOps environment.

Move the work item to Done

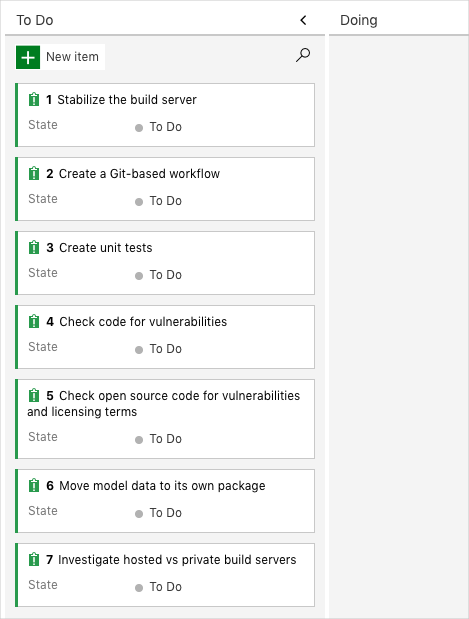
In this part, you move the work item that you assigned to yourself earlier in this module, Create unit tests, to the Done column.

In practice, the definition of “Done” often means that working software is in the hands of your users. In this unit, for learning purposes, you mark this work as complete because you have working unit tests and code coverage tests set up in your build pipeline.

At the end of each sprint, or work iteration, you and your team might hold a retrospective meeting, where you share the work you completed, what went well in the sprint, and what could be improved.

To complete the work item:

  1. In Azure web hosting DevOps, go to Boards and then, in the left pane, select Boards.
  2. Move the Create unit tests work item from the Doing column to the Done column.

azure cloud build

Disable the pipeline or delete your project

Each module in this learning path provides a template that you can run to create a clean environment for the duration of the module.

Running multiple templates gives you multiple Azure cloud hosting Pipelines projects, each pointing to the same GitHub repository. This can trigger multiple pipelines to run each time you push a change to your GitHub repository, which can cause you to run out of free build minutes on our hosted agents. Therefore, it’s important that you disable or delete your pipeline before you move on to the next module.

Choose one of the following options.

Option 1: Disable the pipeline

This option disables the pipeline so that it doesn’t process further build requests. You can reenable the build pipeline later if you want to. Choose this option if you want to keep your Azure web hosting DevOps project and your build pipeline for future reference.

To disable the pipeline:

  1. In Azure Pipelines, navigate to your pipeline.
  2. From the drop-down menu, select Settings:
  3. Under Processing of new run requests, select Disabled and then select Save.Your pipeline will no longer process build requests.


Option 2: Delete the Azure DevOps project

This option deletes your Azure hosting DevOps project, including what’s on Azure Boards and your build pipeline. In future modules, you’ll be able to run another template that brings up a new project in a state where this one leaves off. Choose this option to delete your Azure web hosting DevOps project if you don’t need it for future reference.

To delete the project:

      1. In Azure cloud hosting DevOps, go to your project. Earlier, we recommended that you name this project Space Game – web – Tests.
      2. Select the gear icon next to the project name.

    The icon might not appear until you move your mouse over that area.

    1. In the Project details area, scroll to the bottom, and then select Delete.
    2. In the window that appears, enter the project name, and then select Delete a second time.

Your project is now deleted.

Thanks for reading.

How to View Application Insights metrics in the Azure portal

The Azure portal provides many types of visualizations for viewing web app data captured by Application Insights.

You need to analyze the data captured about the video-sharing app so you can determine the cause of poor performance.

In this unit, you’ll learn how to navigate the data in the Application Insights resource and dashboards. You’ll also learn how to drill into a specific aspect of the web app’s behavior by creating a custom chart.

Tools for data visualization

Now that you’ve enabled an Application Insights resource to gather metrics from the web app, you can view and analyze that data to diagnose issues if they arise. There are several tools you can use to display that data:

  • The Azure portal. You can find a variety of tools by going to the Application Insights resource in the portal. These tools include a set of common performance charts on the Overview page, an Application map, and Performance and Failures pages. There’s also an Application Insights dashboard that contains a common set of charts. You can use the Metrics page to design new charts and add them to dashboards.
  • Power BI. This tool is often used by business analysts to investigate business values like sales and profit margins. You can connect Power BI to an Application Insights resource and use it to display web app telemetry data.
  • Visual Studio. Developers can connect Visual Studio to Application Insights to view the same charts and visualizations that are shown in the Azure portal. It’s convenient to see code and performance data in one tool.
  • Custom tools. Application Insights includes a comprehensive API for accessing telemetry and analytics. Custom tools and applications can use the API to power their own visualizations. For example, if you have a custom mobile app that your business decision makers use to view sales data, you can add a visualization of web site performance statistics to the app.

In this module, we’ll view data in the Azure portal.

Read more article : Best WordPress Hosting Providers List

Custom charts

There are many useful charts and diagrams in an Application Insights resource and in the dashboard, but sometimes you’ll need to create a custom chart. On the Application Insights resource pane, you can create your own chart on the Metrics page. For example, you can:

  • Specify a time period for the chart. This could be the last 30 minutes or the last 30 days, or somewhere in between. You can also specify a start and end time for the period that interests you.
  • Specify the type of chart. You can choose line, area, bar, or scatter.
  • Specify a metric to display. This metric will be shown on the vertical axis.
  • Specify an aggregation method. This option specifies whether the chart will show the average, minimum, maximum, sum, or count for the chosen metric at each plotted point.
  • Specify a filter. Data that doesn’t satisfy the filter won’t be displayed. Use filters when you need to focus on a specific data set.azure custom chart creation

After you create the chart you need, you can pin it to an Application Insights dashboard to save it and then publish the dashboard to share it with other users and stakeholders.

Go to the Application Insights resource and dashboard

The Application Insights resource is separate from the App Service resource that contains the instrumented web app. In the Azure portal, you can see both resources on the All resources pane and select them to see their details or make configuration changes.

When you enable runtime instrumentation in a web app, a link appears in the Azure portal that takes you from the web app resource to the Application Insights resource that receives the data. From the web app, you can go to the Application Insights page and select View Application Insights data to go to the Application Insights resource and make configuration changes. From there, select Application Dashboard on the Overview page to see the dashboard for that resource.

Another way to view the Application Insights dashboard is to select Dashboard from the Azure portal menu. If more than one dashboard is stored for your user account, you might need to switch to the Application Insights dashboard you want by selecting it in the drop-down list in the upper-left corner. 

Manage and deploy web applications on compute web hosting nodes

The Azure web hosting batch client API allows you to programmatically control all the components of an Azure web hosting Batch account.

Continuing to enhance your companies console app, you’ll now add all the components needed to convert the videos you uploaded in the last exercise.

By the end of this exercise, you’ll have a working Batch process that can convert MP4 videos to animated GIFs. The app will add a job to the existing pool, and add and start the video conversion tasks on cloud web hosting.

Enhance the code using the batch client

  1. In the Cloud Shell, edit the Program.cs file in the editor:
  2. Add a constant to Program.cs for the JobId we’ll use in our Batch job.
  3. Replace these lines in the Main method:

With a using block for the batchClient

using (BatchClient batchClient = BatchClient.Open(sharedKeyCredentials))
{
    // Create the Batch pool, which contains the compute nodes that execute the tasks.
    await CreateBatchPoolAsync(batchClient, PoolId);

    // Create the job that runs the tasks.
    await CreateJobAsync(batchClient, JobId, PoolId);

    // Create a collection of tasks and add them to the Batch job.
    await AddTasksAsync(batchClient, JobId, inputFiles, outputContainerSasUrl);
}


Create a job on cloud web hosting

  1. Add this new method, CreateJobAsync() to Program.cs to create and add a job to the pool.
private static async Task CreateJobAsync(BatchClient batchClient, string jobId, string poolId)
{
        Console.WriteLine("Creating job [{0}]...", jobId);

        CloudJob job = batchClient.JobOperations.CreateJob();
        job.Id = jobId;
        job.PoolInformation = new PoolInformation { PoolId = poolId };

        await job.CommitAsync();
}

The code above uses the batch client to create a job. The method assigns the given job id and information about the pool.

Add a task

  1. With the job created, the last step is to add a task to the job. Add the following method, AddTaskAsync(), to Program.cs.
private static async Task<List<CloudTask>> AddTasksAsync(BatchClient batchClient, string jobId, List<ResourceFile> inputFiles, string outputContainerSasUrl)
{
    Console.WriteLine("Adding {0} tasks to job [{1}]...", inputFiles.Count, jobId);

    // Create a collection to hold the tasks added to the job
    List<CloudTask> tasks = new List<CloudTask>();

    for (int i = 0; i < inputFiles.Count; i++)
    {
        // Assign a task ID for each iteration
        string taskId = String.Format("Task{0}", i);

        // Define task command line to convert the video format from MP4 to animated GIF using ffmpeg.
        // Note that ffmpeg syntax specifies the format as the file extension of the input file
        // and the output file respectively. In this case inputs are MP4.
        string appPath = String.Format("%AZ_BATCH_APP_PACKAGE_{0}#{1}%", appPackageId, appPackageVersion);
        string inputMediaFile = inputFiles[i].FilePath;
        string outputMediaFile = String.Format("{0}{1}",
            System.IO.Path.GetFileNameWithoutExtension(inputMediaFile),
            ".gif");

        // This is the dos command built by using the ffmpeg application package, the paths from the input container
        string taskCommandLine = String.Format("cmd /c {0}\\ffmpeg-3.4-win64-static\\bin\\ffmpeg.exe -i {1} {2}", appPath, inputMediaFile, outputMediaFile);

        // Create a cloud task (with the task ID and command line) and add it to the task list
        CloudTask task = new CloudTask(taskId, taskCommandLine);
        task.ResourceFiles = new List<ResourceFile> { inputFiles[i] };

        // Task output file will be uploaded to the output container in Storage.
        List<OutputFile> outputFileList = new List<OutputFile>();
        OutputFileBlobContainerDestination outputContainer = new OutputFileBlobContainerDestination(outputContainerSasUrl);
        OutputFile outputFile = new OutputFile(outputMediaFile,
                                                new OutputFileDestination(outputContainer),
                                                new OutputFileUploadOptions(OutputFileUploadCondition.TaskSuccess));
        outputFileList.Add(outputFile);
        task.OutputFiles = outputFileList;
        tasks.Add(task);
    }

    // Call BatchClient.JobOperations.AddTask() to add the tasks as a collection rather than making a
    // separate call for each. Bulk task submission helps to ensure efficient underlying API
    // calls to the Batch service.
    await batchClient.JobOperations.AddTaskAsync(jobId, tasks);

    return tasks;
}

This final method does all the complex actions of the web app. A task is added to the job for each file that has been uploaded. The task takes the form of a shell command. The app (ffmpeg) has been installed on each node at a specific location because we used an application package. The Batch service stores that location in an environment variable on the node so that it can be accessed via:

%AZ_BATCH_APP_PACKAGE_ffmpeg#3.4%

Using this approach it’s easy to upload and increment newer versions of the ffmpeg web app. The command looks into the zip folder, and executes:

ffmpeg.exe -i input-filename output-filename

For the best performance, the tasks are added as a list to the batchClient.JobOperations.AddTaskAsync. This is more efficient than making a separate call for each file.

Test the console app

  1. Select the ellipses in the top-right corner of the code editor.
  2. Select Close Editor, and in the dialog select Save.
  3. In the integrated terminal, build and run the app.
  4. The below messages are written to the terminal.
Creating container [input].
Creating container [output].
Uploading file ~\cutifypets\InputFiles.mp4 to container [input]...
Creating pool [WinFFmpegPool]...
Creating job [WinFFmpegJob]...
Adding 2 tasks to job [WinFFmpegJob]...
  1. The console web app closes as soon as it has added the tasks. In Azure web hosting, the pool, nodes, job, and tasks are created. There’s nothing monitoring what’s happening within the app as it has exited. To see the current status of the conversion, and check the results, return to the Azure portal.
  2. In the Azure portal, on the Dashboard select the Batch account beginning cutify.result
  3. The health dashboard is shown on the Overview page, from here you can check the status of the current running job and the pool of  hosting nodes.
  4. On the left, select Jobs, select WinFFmpegJob. On this page, you’ll see the current status of the tasks.
  5. When the tasks have completed, on the left select Storage accounts, then select the storage account your created in the first exercise.
  6. On the left select Blobs, then select the output folderoutput
  7. Download a file to check the cutest pet video from cloud.