What is DNS Propagation ?

DNS Propagation

DNS propagation is an important concept in the Domain Name System (DNS). It is the process of updating the DNS servers across the Internet with the new information about a domain name’s IP address. When a domain name is registered, the domain name is associated with an IP address. Whenever the domain name is accessed, the DNS servers look up the IP address associated with the domain.

When the domain name is changed, the associated IP address is also changed. This change must be propagated to all the DNS servers on the Internet so that they can serve the new IP address associated with the domain.

DNS propagation is essential to keep the Internet updated. There are hundreds of millions of domain names registered and millions of them are changed every day. The DNS system needs to be updated with the new information about the domain name and its associated IP address.

The DNS propagation process starts when the registrar updates the name servers with the new IP address. This process is called DNS propagation. The registrar informs the DNS servers of the new IP address and they update their records with the new information. This process can take anywhere from a few minutes to several days depending on the registrar and the DNS server.

How long does DNS propagation take?

DNS propagation typically takes anywhere from 24 hours to 48 hours, but can take up to 72 hours in some cases. It is important to note that the time it takes for the changes to take effect is dependent on the DNS record’s Time To Live (TTL) value. The TTL value is the amount of time a DNS record is cached on a server before it is queried again.

Read more : Best web hosting 2023

In addition, DNS propagation can be affected by factors such as the number of DNS servers around the world, the distance between the server and the user, the speed of the user’s internet connection, and the amount of traffic the server is handling.


How to create a website free with Gatsby

Imagine you are working on an e-commerce site. You want to ensure that your product pages can be found through a search engine and that they load quickly. Regardless of what tech approach you choose, you want to ensure you use something that follows best practices for architecture. The frameworks and techniques you select should be commonly used so you can find help if you need it.

One way to approach building an app like this is to use a static site generator. With a static site generator, you can assemble a static site from content and data in all sorts of places like inside of JSON, XML, YAML files, or in a database, or even a third-party service accessible through the Web. Producing these static pages is for that reason a bit of a complex process. Using a static site generation tool to produce these static pages have therefore become a necessity.

Once you have produced these static pages, you need to think about how to deploy them to the Web. To stay competitive, you need a service that can allow for easy and fast deployment of our pages. The less time you spend on configuring your app deployment, the more time you can spend on improving its features.

In this module, you will use the Gatsby command-line tools to create a new web app. You’ll create a page in the app and add content to it with Gatsby’s querying tools. Lastly, you will deploy your app to the web using the Azure Static Web Apps service.

By the end of the tutorial, you will be able to create web apps with Gatsby and publish them to the web.

Static websites have been around since the web’s inception. At their essence, static web sites are made up of HTML, CSS and JavaScript, which are served to the user. A Static Site Generator (SSG) is a tool that can take higher level tools and generate these static assets.

Gatsby is one such tool that we can use to create a static website. It uses React as a UI layer and GraphQL as a query language to access data available within the site.

Gatsby is built on top of React and React Router, which allows you to mix both dynamic and static parts. So even though it’s a tool for primarily producing static sites, it’s fully capable of compiling a React project. Thereby Gatsby can replace your normal set-up for producing apps with React, providing you have part of your React app that you want to make static.

Gatsby has a clever system of plugins that can help import data from different types of data sources. The data sources can be as varied as databases to JSON to your local file system. All this imported data can then be paired up with static assets like HTML and CSS to produce the static pages you want to serve to a user. Thanks to the plugin system, more and more different types of data sources can be supported and is being supported as soon as the Gatsby team or the community writes a new plugin.

How does Gatsby do this? In the pre-compilation phase, each plugin scans a source. A source can be a file system, a database, or, for example, a set of JSON files. The data is read and added to a data Graph. The Graph is an in-memory tree of nodes that you can query for. Gatsby then lets you query for these nodes when you proceed to author your static pages in your app.

Installing and using Gatsby

Gatsby is available via the gatsby-cli JavaScript package. You have two ways you can use it:

  • Global install, run npm install gatsby-cli -g, this will install the executable gatsby on your machine. You can now use Gatsby like so, gatsby <command>.
  • Use npxnpx is a tool that makes it possible to run executable files without first installing them on your machine. If you use this way of installing you need to prefix your calls to Gatsby like so npx gatsby <command>.

These three commands will get you started working with a new Gatsby app:

  • gatsby new <project name> <optional GitHub URL>: Use this command to generate a new project. It takes a name as a mandatory argument and optionally a GitHub URL as the second argument. Using the latter argument will create a Gatsby project based on an existing Gatsby project on GitHub.
  • gatsby develop: Start a development server where your project can be accessed. A development server is an HTTP server able to host your files so you can access them from your browser. You will find your Gatsby app running on address http://localhost:8000. It will also start an instance of GraphiQL, which is a graphical development tool you can use to explore the data available to your app and build queries. You can use GraphiQL by browsing to http://localhost:8000/___graphql.
  • gatsby build: Create a deployable static representation of your app. All the resulting HTML, JavaScript, and CSS will end up in the sub directory public.

Project anatomy

A scaffolded Gatsby project consists of some parts that you need to understand to work with Gatsby effectively and efficiently.

  • /pages: React components placed in this directory will become routes and pages.
  • gatsby-config.js: A configuration file. Part of the configuration will be used to set up and configure plugins and part of it is global data that you can render on your pages.
  • gatsby-node.js: A file used to implement life-cycle methods of the Gatsby API. In here you can do things such as sourcing files, add/update nodes to the Gatsby graph and even bring in data from the outside that should be part of the website.
  • /styles: Gatsby lets you apply styles in many ways, everything from imported CSS, SASS, and LESS to CSS Modules.
  • /components: For React components meant as helper components like header, layout and more.

In this unit, you’ll create a new Gatsby application and add a single page to it.

Install Gatsby

Run the following command in a terminal to install Gatsby globally to your system:

npm install -g gatsby-cli

Create and run a Gatsby site

All Gatsby projects are created by the Gatsby CLI. The CLI is able to help you with scaffolding a new Gatsby project, host it and also build the final product, which is a static set of files that you can deploy into any static host you wish.

Create a Gatsby app

Now, create a new Gatsby app by typing the following command in the terminal:

gatsby new myApp

gatsby new creates a new Gatsby application, to which you can start adding content pages.

Run Gatsby

To start developing with Gatsby, you need to navigate to the project directory before starting the development server.

Run the following commands to move to your project folder and start the server:

cd myApp
gatsby develop

You should see the following output in the terminal:

You can now view gatsby-starter-default in the browser.
  http://localhost:8000.
View GraphiQL, an in-browser IDE, to explore your site's data and schema
  http://localhost:8000/___graphql

Now open up a browser and navigate to http://localhost:8000.

 Gatsby app


If you see the above, you successfully created your first Gatsby app. Congrats!

Add a page component

Now you’ll create a component that you can navigate to in the browser: a page component.

Open the “myApp” project folder in your text editor. Find the pages/ directory and create a file and name it about.js. Give the file the following content:

import React from 'react';
import { Link } from 'gatsby';

export default () => (
  <React.Fragment>
    <div>About page</div>
    <Link to="/">Back to home</Link>
  </React.Fragment>
)

The code above creates a presentation component that is only able to show data. This component simply renders the text “About page” and a link that point to the root of the application.

Once you’ve pasted in the code above and saved it in the file about.js, the development server will recompile the application automatically. If you now visit http://localhost:8000/about you should see the following content rendered:

page-component

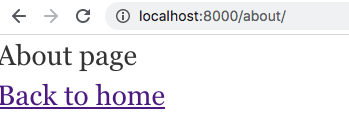
You’ve got your first page! Now you can see how any component placed in the /pages directory can be navigated to.

Add data to Gatsby app

Gatsby has a system of plugins that scans various data sources and places the resulting data in an in-memory object, the data graph. It does all this at build time, so when you are crafting a new page you can assume the data from that graph is available.

Tools

The data graph is something you can interact with. Once you start up the development server, the data graph will be available on http://localhost:8000/___graphql. This will render the data graph in a tool called GraphiQL.

graphiql-data

GraphiQL allows you to do the following:

  • Navigate: Drill down into the data graph and its content by expanding nodes to find just the data you need.
  • Construct queries: As you drill down into the graph, the tool will craft a query for you. You can also edit the query text as you see fit to see the results.
  • Browse results: Run the query you construct to see it rendered in the tool. You will know exactly what response a query renders before venturing on to include it in a component.

Use data in a page component

When you create a page component that wants to use data from the above mentioned graph, there are three things you will do:

  1. Define a query. Craft a query in the GraphQL query language that asks for a resource and some columns on that resource.
  2. Write the code to Execute the query. In your page’s .js file, call the graphql() function with your query as an input and store the result in a variable named query. Here’s an example:
    export const query = graphql ("query {} ");
    

    Naming the variable query is an important convention: Gatsby will automatically process the query variable, fetch the data and insert it into the React component in the same file.

  3. Create a parameterized component that uses the data. Create a React component with a data parameter. When you build the application, data will be populated with the answer from your query. The shape of the result looks exactly like the query you authored. Inside of the rendering section of your component you can now read from the data property and layout its data in the template in a way you find appropriate.

A plugin example: loading images from files

Data can be almost anything. Gatsby helps you pull in data and place it in its data graph using plugins. The plugin gatsby-source-filesystem looks at your file system and populates its data graph based on that. What it does is that it looks through the file system, on a place we specify and makes the results available in the Graph. Let’s have look at how this plugin is configured in gatsby-config.js:

{
  resolve: `gatsby-source-filesystem`,
  options: {
    name: `images`,
    path: `${__dirname}/src/images`,
  },
},

The path property tells us where this plugin should look for files. In our case, it looks for __dirname, which is the current working directory and specifically the sub directory /images. At pre-compilation time Gatsby will now look through the image/ directory and collect information on the files. It will also add that information to Gatsby’s in-memory data graph.

So how do we use information on images that we configured via the gatsby-source-filesystem plugin? As the plugin scans the images/ directory it collects information such as path, type, size, and dimensions. We can then query for this information from the in-memory data graph and use it to render the image via its path that is stored in the graph. Additionally, we can perform various image manipulations on the image before displaying it, like scaling for example. The image manipulation functionality is something built into Gatsby and not provided by the plugin. However, the built-in functionality and this plugin really work in tandem to make it a great experience to work with image assets.

Any additional plugins you add to Gatsby follow this pattern:

  1. Download the plugins via NPM.
  2. Configure the plugin via the gatsby-config.js file.


Gatsby’s querying capabilities let you build a static site from data gathered from many different sources.

Here, you’ll build a query to capture some data from a configuration file and render it into a page.

Add data to your component

The way you work with data in Gatsby is powerful. Gatsby can query for data from almost anywhere, from your files, from static data and even data from API endpoints and databases. To query for data, we’ll use GraphQL.

gatsby-config.js is where you store metadata for your site along with configurations of the plugins in a JavaScript object. There’s a property in said JavaScript object called siteMetadata. This property along with its values gets read into the data graph as part of the build process and gets stored in a node called site. You’ll see how querying for data works by constructing an About component to query for title and description.

Below is a depiction of what the siteMetadata property looks like:

siteMetadata: {
  title: `Gatsby Default Starter`,
  description: `Kick off your next, great Gatsby project with this default starter. This barebones starter ships with the main Gatsby configuration files you might need.`,
  author: `@gatsbyjs`,
}

We can construct a query given the above, read out the data and have a component render it.

Start development server

Start the development server by typing the following command at the root of your project:

gatsby develop

You should now have two routes up and running:

  • http://localhost:8000/, where your app is rendered
  • http://localhost:8000/___graphql, where the built-in data graph is displayed with GraphiQL

Construct a query

Go to http://localhost:8000/___graphql in your browser so you can get help creating the query.

graphiql-data

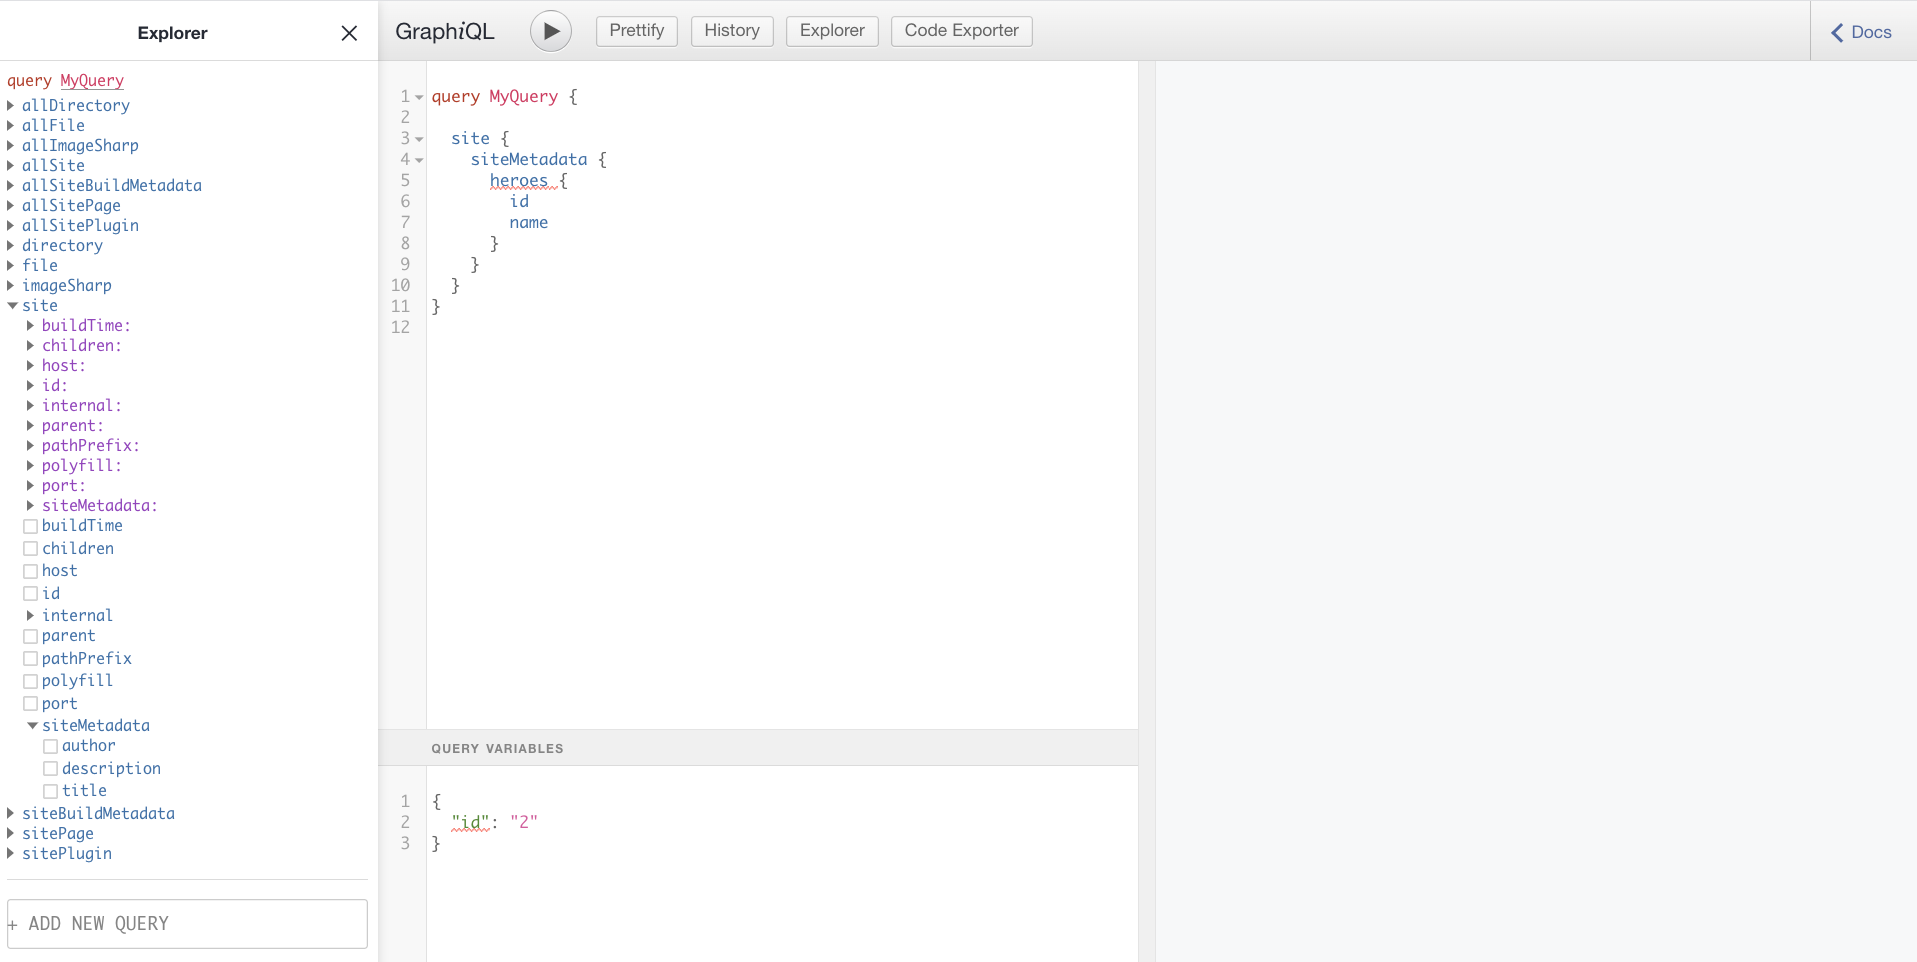
In the above image, you can see the Explorer section on the left. You can use the Explorer to drill down into our Graph until you find the data we need. In the middle section, you can see how the query is written for you as you perform selections on the left. On the right, you see the result of running the query. You can run the query by clicking the play button in the middle section.

Select the following constructed query from the middle section:

site {
  siteMetadata {
    author,
    description,
    title
  }
}

Copy it to the clip board.

Return back to the editor and locate the file about.js in the pages/ directory. Change its content to the following code:

import React from 'react';
import { Link, graphql } from 'gatsby';

export default ({ data }) => (
  <React.Fragment>
    <h2>{data.site.siteMetadata.title}</h2>
    <div>{data.site.siteMetadata.description}</div>
    <Link to="/">Back to home</Link>
  </React.Fragment>
)

export const query = graphql `
  query {
    site {
      siteMetadata {
        author,
        description,
        title
      }
    }
  }
`

Here, you’re calling the graphql function using the query as an argument and assigning it to the variable query. It’s important that its called query so Gatsby knows to process it and put the result into the component and build time.

During build time Gatsby will input the query result into the component’s data property as indicated below, where you can reference it from your component’s JSX.

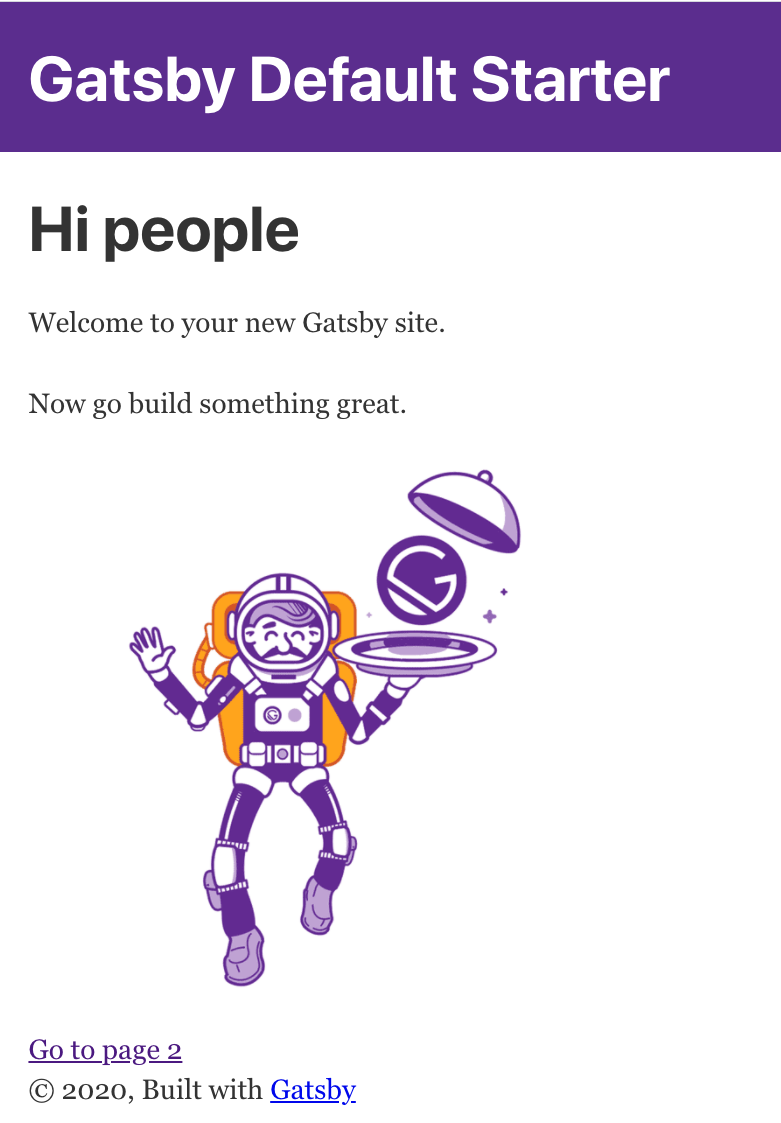
Save the file and browse to http://localhost:8000/about and you’ll see the following:

component-with-data

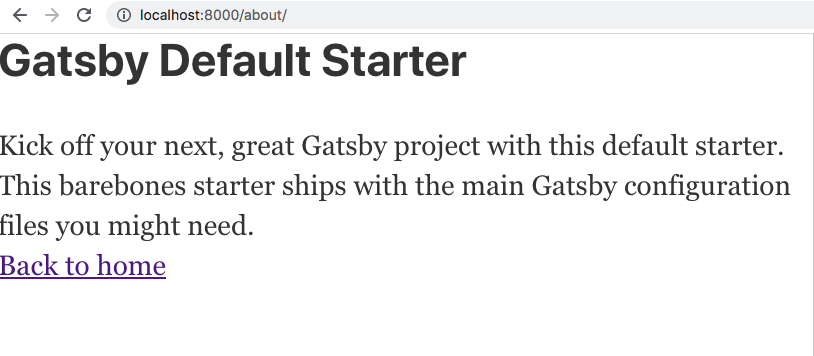
You’ve added data to your component with a GraphQL query! You also got to use the GraphiQL querying tool and Gatsby development server in the process.

Up to this point, we have focused on authoring our Gatsby app using React, GraphQL, and plugins. The next step after you’re done authoring, is to build your application. Following that, you are able to deploy to any web server or hosting service that can serve static files.

Build your app

Gatsby’s command-line tool provides a command to build your project to create something that you can deploy anywhere you like. The build consists of HTML, JavaScript, CSS, and any additional assets you’ve included.

Create the build

Gatsby runs the React compiler underneath, so when it produces the build, it does many things. It compiles the React code by translating the JSX to JavaScript and HTML. It also extracts all the JavaScript code, and places it in a set of bundles. Each bundle is then optimized meaning it has white space removed, variables are renamed, and expressions are generally optimized for speed. The styles go through a similar process. If you have chosen a library like LESS, SCSS, or Stylus for your CSS, there will be a preliminary step in which your CSS is being compiled from a high-level language to CSS. There are no further actions needed to deploy the files at this point. It’s just a set of static files that can be hosted from any webserver that can serve files.

Deploy the build

There are many technologies and services capable of hosting static apps. After all, it’s just HTML, CSS, and JavaScript, and can be hosted by most web services out there. For this tutorial, we’ll deploy to Static Web Apps, an Azure service that specializes in hosting static apps like those built with Gatsby.

Azure Static Web Apps

Static Web Apps is an Azure service that allows you to take some static files and serve them from the cloud. What you deploy is not a deployment package, but just a set of static files. This is a good fit for Gatsby as what Gatsby ends up producing from a build is static files.

Speaking of build, the service actually does the build step for you so there’s no need to build anything up front. How it does this is by locating the build command in the package.json of the Gatsby project. All you need to do is put your project in a GitHub repository.

Currently, your code sits in a directory on your machine, so you’ll need to do a few things to deploy Azure:

  1. Create a GitHub repository and push to it: Gatsby creates a Git repo for you, which will need to be pushed to GitHub.
  2. Create an Azure Static Web Apps instance: When you use the Azure portal to create an Azure Static Web Apps instance, you’ll provide the URL to your GitHub repository, and the name for the sub-directory where the static files live in your project. In Gatsby’s case, this directory is called public/.

Azure Static Web Apps hosts static applications, like those made with Gatsby, by building the applications static assets and then deploying them to the cloud.

Here, you’ll build your app’s static assets to see what they look like and host them locally to try them out. Then, you’ll push your code to GitHub and create an Azure Static Web Apps instance to host your app on the web.

Build your site

When it comes to building your site and making it ready for deployment Gatsby does the heavy lifting for us.

Run the following command from your project directory:

gatsby build

This command will create a production build. All your files will end up in a sub directory public/.

Once the process finishes building, you can go to your public/ directory and open up the files in a browser. You can explore your build as it would be hosted in the web with http-server, a command-line tool that serves up local files over HTTP so you can see them in a browser.

Now you’ll serve up the whole application from a local web server. cd your terminal to the public/ directory and type the following command:

npx http-server -p 5000

Go to the browser on http://localhost:5000.

You should now see the following content rendered:

 Gatsby app

You’ve built your site and taken it from being a Gatsby app to a set of static pages containing nothing but HTML, CSS, and JavaScript!

Going into your public/ directory now locate your rendered about component at public/about/index.html. Because of an optimization process, all whitespace have been removed and the page is represented as one long line. However you should be able to locate the rendered title and description and it should look like this:

// excerpt from about/index.html

<h2>Gatsby Default Starter</h2><div>Kick off your next, great Gatsby project with this default starter. This barebones starter ships with the main Gatsby configuration files you might need.</div>

Push your code to GitHub

To prepare the app for deployment, we need to take the following steps:

  1. Initialize a Git repository
  2. Create a GitHub repository and push to the local Git repository to it

Add the About page

In the console, navigate to root of your project, then add the code to the repository index and commit it.

git add .
git commit -m "adding About page to site"

Create a GitHub repo and push the code

  1. Go to GitHub and log on. You should now be on a URL like so https://github.com/<your username>?tab=repositories
  2. Now click the new button as indicated below:github-repo
  3. Name your repository gatsby-app and click Create repository as indicated below:github-naming
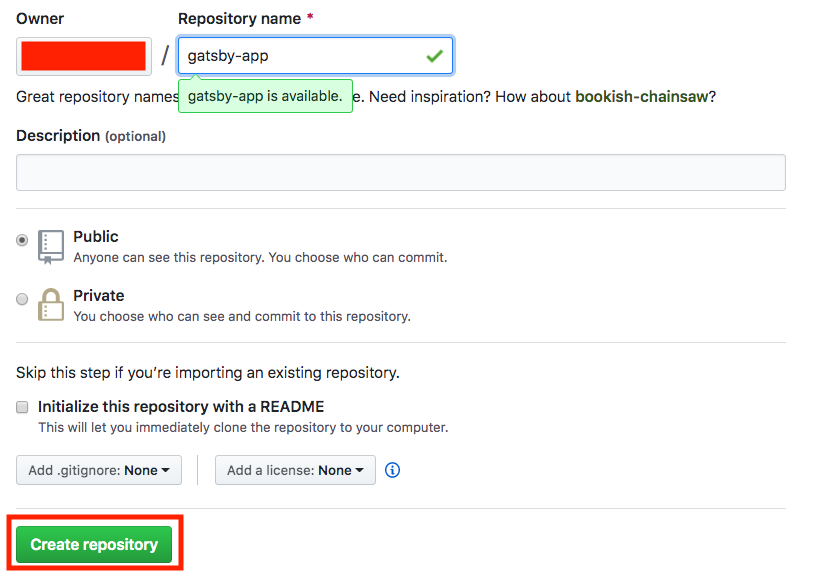
  4. Finally, add your GitHub repository as a remote and push. Type the following commands to accomplish that (Replace the <user> part with your GitHub user name):
    git remote add origin https://github.com/<user>/gatsby-app.git
    git push -u origin main
    

You are now ready to deploy to Azure Static Web Apps!

Create a Static Web App

Now that you’ve created your GitHub repository, you can create a Static Web Apps instance from the Azure portal.

This tutorial uses the Azure sandbox to provide you with a free, temporary Azure subscription you can use to complete the exercise. Before proceeding, make sure you have activated the sandbox at the top of this page.

  1. Sign in to the Azure portal, making sure you use the same account to sign in as you did to activate the sandbox.
  2. In the top bar, search for Static Web Apps.
  3. Select Static Web Apps.
  4. Select Create.

Basics

Next, configure your new app and link it to your GitHub repository.

  1. Enter the Project Details
    Setting Value
    Subscription Concierge subscription
    Resource Group [Sandbox resource group name]
  2. Enter the Static Web Apps details
    Setting Value
    Name Name your app. Valid characters are a-z (case insensitive), 0-9, and _.
    Region Select Region closest to you
    SKU Free
  3. Click the Sign-in with GitHub button and authenticate with GitHub
  4. Enter the Deployment Details
    Setting Value
    Organization Select the Organization where you created the repository
    Repository gatsby-app
    Branch main
  5. Use the Build Details drop down list to select Gatsby to populate the build information.
    Setting Value
    App location Leave default
    Api location Leave default
    Output location public
  6. Click the Review + create buttonreview-create-button

Review + create

Continue to create the application.

  1. Click the Create button
  2. Once the deployment is complete, click the Go to resource button

Review the GitHub Action

At this stage, your Static Web Apps instance is created in Azure, but your app not yet deployed. The GitHub Action that Azure creates in your repository will run automatically to perform the first build and deployment of your app, but it takes a couple minutes to finish.

You can check the status of your build and deploy action by clicking the link shown below:static-app-portal

View website

Once your GitHub Action finishes building and publishing your web app, you can browse to see your running app.

Click on the URL link in the Azure portal to visit your app in the browser.

 Gatsby app

Congratulations! You’ve deployed your first app to Azure Static Web Apps!

Summary – Create a Website for Free

You started with a challenge of addressing common problems in the web development space including SEO, page load speed and also ensuring you had a reliable architecture building out your app.

You evaluated the command-line tool Gatsby to address the above problems. Gatsby’s approach is to produce a set of static pages that loads fast and is easy for a search engine to index effectively.

Gatsby relies on React.js, GraphQL, and its in-memory data graph. Using JSON data from the in-memory graph, you can produce pages using React.js components with data and content from many sources.

You also saw how plugins extend Gatsby’s capability in handling different types of content. Plugins can source content and data from almost anywhere during the build process and place it in the built-in Graph you’ve learned to query. Learning to leverage plugins will prove useful for the future as you can continue to build out your app from different kinds of content like Markdown, JSON, and even service endpoints among many other content sources.

Additionally, you’ve learned how Gatsby produces a build, a deployable set of files consisting of nothing but HTML, CSS, and JavaScript. Building your app prepared it so it could be deployed almost anywhere.

Finally, you deployed your app. You learned about Azure Static Web Apps, a service that can host your Gatsby app in Azure. You used Static Web Apps to deploy your app in minutes.

Happy deploying!

3 Best Django Hosting Providers in 2025 – Django App Deploying on Live Server

Django Hosting Compare based on reviews and user experiences,  With us you compare various companies and choose the Best Django Web Hosting that suits you. Use our expertise and read the user experiences to choose the best Django Hosting.

Best Django Hosting services for 2022

#1. DigitalOcean best django hosting DigitalOcean 

Storage: Start From 25 GB SSD

Experiences: another Best VPS

DigitalOcean  is undoubtedly one of the best VPS hosting providers in the world . Founded in 2011, DigitalOcean  has as its principle, to bring customer satisfaction to 100% . So much so that one of its best qualities is the excellent customer service. They offer Django web hosting services, cloud hosting, managed Database and VPS. Get DigitalOcean promo codes through the  link Visit.

Score: 9.00 but unmanaged (aka Developer Friendly)

Visit website

#2.vultr django hostingVultr Cloud Hosting

Storage: Start From 32GB SSD

Experiences: Best

Price: $6.00/mo. ( Vultr HF Get 100$ free Now/for 1 Month


Vultr has extensive expertise around Python Django Hosting , choose your website from 17 Server Locations Worldwide! incl. Chicago USA. Miami,  New Jersey, Dallas, Amsterdam, Paris,Tokyo, Seattle, Singapore, London ..:) For extra speed you use: Vultr HF – High Frequency Compute (CPU Optimize)

Score: 9.9 – unmanaged (aka Developer Friendly)

Visit website 

#3.a2 best django hosting A2 Hosting

Storage: Unlimited SSD

Experiences: Best / Control panel Cpanel

Price: $3.92/mo. (50% OFF NowRegular $7.99/mo.

Server Location: United States, United Kingdom, Canada, France, Australia

A2 Hosting is one of the most reliable Django Hosting  providers in the market.For more than a decade, this hosting company has delivered:High,speed performance,High quality development tools Reliable uptime, The best customer satisfaction. The most important feature that companies demand today is the loading time of the site. The A2 Hosting SwiftServer platform has been developed in the last 10 years by the company’s IT gurus.

Score: 8.5

Visit website


Cheap = Expensive

Personally, I also believe that with web hosting you often get what you pay for. This certainly also applies in the very competitive market of Django web hosting. Just reading what is indicated on the various websites does not help you with this enough. Ask acquaintances for experiences and consult reviews and comparison websites online. What is good one year ago can suddenly be known as slow. Therefore, visit this website every time before choosing a new Django host. Of course there are other aspects that you should take into account, in particular the price is not specifically mentioned here. However, the price is an aspect that everyone automatically watches and that can often be found. We hope that the articles and reviews on this comparison site will provide a little more insight into the differences in the market.

django

Django App Deploying

After we’ve created a Django app, and we’ve finished our testing, we’ll start thinking about deploying our app to production. There are couple of directions we can take with this, and it will depend on the level of skills and effort we can invest, the cost we’re able to outlay, the flexibility we need in putting together our server software stack, and other variables.

Different Options

If we don’t want to spend a lot, or we aren’t ready to put together or maintain the software stack, we can choose to deploy to managed, shared hosting. These days, there are many shared hosts that allow for Python and Django applications-even providing one-click installations and allowing for SSH access.

The Django hosting officials said the weekend hosting configuration was a continuation of “pragmatic hosting fixing” with the python community and “not about great Django hosting searching” to the web development projects.

Shared Hosting

This may be the quickest and most worry-free solution for many needs, but it doesn’t stand out in terms of flexibility. Usually, the server, Python and Django versions, caching solutions and database are predetermined, and we can’t change them, meaning that we don’t have direct control over our hardware resources. However, for certain applications this will be a budget-effective solution, which may be the primary objective.

A2 Hosting, SiteGround, and Bluehost are examples of this sort of web host.

VPS and Linux Hosting

In recent times, there’s been a proliferation of polished, user-friendly, VPS-based hosts like DigitalOcean and Cloudways, who are trying to bridge the skills gap that deploying onto raw Linux servers presents, making it easier and easier to deploy to VPS systems without being an expert.

In addition to vendors like Cloudways (which is actually specialized in bootstrapping PHP applications), VPS and cloud vendors provide quick-install interfaces for all sorts of stacks-lower or higher level-that offer developers different levels of flexibility.

The entry barrier is a lot lower than it was in Django’s early years, but managing apps on VPS or dedicated Linux physical servers requires some Linux command-line skills regardless of the one-click solutions that hosting vendors provide. This range of products is commonly referred to as Infrastructure as a Service(IaaS).

Platform as a Service

For those developers who know what they’re doing, and yet don’t wish to have to deal with the entire software stack underlying their Django application, there’s PaaS.

cloud

The illustration above shows the difference between three prevalent cloud models, differentiated by how much control is left to the customer and how much of the infrastructure is handled by the vendor. With Platform as a Service(PaaS), every single bit of software infrastructure-on top of the hardware-is handled by the vendor. This usually includes the framework itself-in our case, Django, WSGI (or, as we will discuss, ASGI), server software, database server, middleware, and so on.

Vendors like Google App Engine, Heroku, and platforms such as Pythonanywhere and Platform.sh usually provide customers with the tooling, conventions and workflow needed to deploy Python web apps to their infrastructure. The customer provides the application logic and the vendor provides the platform.Other cloud vendors such as Microsoft Azure and Amazon also provide this model. Each vendor differs in the level of management, tooling and so on they provide to developers, so do your homework before choosing one.

Server Interfaces

Web applications essentially respond to different (web) route requests by clients, by outputting some kind of code. Usually it’s a combination of static files, HTML markup, CSS, JSON data and other formats. What makes web apps different from mere web pages is their dynamic output.


These applications aren’t equipped or optimized to serve web pages in production, to handle the HTTP protocol, to serve static files, to cache content in an optimized way that web servers like NGINX or Apache are.


That’s why we have web server interfaces. If we deal with Python web app deployments in any significant way, we need to know about WSGI, and the newer web server interface ASGI.

Web Server Gateway Interface

PEP (or Python Enhanced Proposal) 3333 from 2010 defines the Python Web Server Gateway Interface, an interface specification for communication between python web apps and servers. WSGI applications, compliant to the specification, are stackable, and pass on the requests and responses between the application and the server.

From Python release 2.5, in 2006, Python implements its own WSGI server.

The stackable nature of WSGI apps means that apps in the middle must implement both sides of the interface-server and application-and the top and bottom ones need to behave as server and application, respectively. This also means practically unlimited extendibility through middleware.


mod_python and mod_wsgi

With Django apps, for years the standard has been Apache server +mod_wsgi. mod_wsgi is an Apache server module first publicly released in 2007, when it replaced another module,mod_python, which worked by embedding a Python interpreter into the Apache server process.


Just as mod_python was a successor to CGI interface with Python in terms of efficiency, mod_wsgi succeeded mod_python.


Optimize django network performance

When you’re optimizing  django for performance, you’ll look at network and storage performance to ensure that their levels are within acceptable limits. These performance levels can affect the response time of your django web application. Selecting the right networking and web storage technologies for your architecture will help you ensure that you’re providing the best experience for your consumers.

Adding a messaging layer between services can have a benefit to performance and scalability. A messaging layer creates a buffer so that requests can continue to flow in without error if the receiving django application can’t keep up. As the application works through the requests, they’ll be answered in the order in which they were received.


Another implementation of the WSGI standard is uWSGI, an application server compliant with the WSGI standard, which has gained popularity in recent years. It’s capable of running as a standalone server, but it’s usually deployed behind NGINX as a reverse proxy. As the docs say:


uWSGI supports several methods of integrating with web servers. It is also capable of serving HTTP requests by itself.

We wrote about deployment flow of a Django app with uWSGI with Mina, which is a capable and minimal deployment tool specialized for Rails apps, along with a screencast.


Another tutorial by the author, describing deployment of a Flask web app on Alibaba Cloud, and which can be used to deploy web apps on any Linux server,can be found here.


uWSGI has extensive documentation that covers a wide range of scenarios, from standard cases like deployment of standard Django apps behind NGINX and deployment on Heroku to using WebSockets, and includes discussions about the separation of resources using Linux namespaces versus LXC containers. uWSGI is currently one of the more robust server options for the WSGI stack.


Other WSGI implementations to mention are Gunicorn, a Python web server installable via pip, which also recommends deployment behind a web server like NGINX,werkzeug,CherryPy,gevent-fastcgi and numerous others.


If we deploy a WSGI application and server behind a server like NGINX, our virtual host file will simply proxy the requests to the dynamic part of our app to the WSGI server running on a certain port on localhost, by using the proxy_pass directive:

by using the proxy_pass directive:

server {
listen 80;
server_name website.xyz;
access_log /var/log/nginx/websitexyz.log;
location / {
proxy_pass http://127.0.0.1:8000;
proxy_set_header Host $host;
proxy_set_header X-Forwarded-For $proxy_add_x_forwarded_for;
}
}

When we use uWSGI as an application server, according to the docs, we can also pass requests via Unix sockets, using theuwsgi_passdirective:

uwsgi_pass unix:///tmp/uwsgi.sock;
include uwsgi_params;

More information about the WSGI standard can be found here, and the documentation has user guides for a wide range of cases.

Asynchronous Web Server Interface

Asynchronous Web Server Interface, or ASGI, is described inits documentation as “a spiritual successor to WSGI”. It aims to be backward-compatible with WSGI, but to provide support or interface for asynchronous applications.

This interface is meant to provide for long-polling and WebSocket connections.The asynchronous ASGI server works as an event loop, so a simple application, to borrow from the docs, might look like this:

async def application(scope, receive, send):
event = await receive()

await send({“type”: “websocket.send”, …})

Aside from the async event loop, the ASGI specification also provides for WSGI applications, so that compatibility is maintained.

The project that the entire specification originates from is Django Channels, which aims to bring asynchronous support to Django.

The implementations recommended by the Django docs include Daphne, which is a reference implementation of the spec written on top of Twisted, an event-based, lower-level server or engine, and Uvicorn, an ASGI web server that supports WebSockets, includes Gunicorn worker class, and is wsgi-compatible.

According to some benchmarks, Uvicorn is faster even than Node.js, but for a real benchmark, we would have to have very similar, almost identical applications to compare on top of Uvicorn and Node.

Deployment: Some Method to the Madness

Heroku, one of the main PaaS cloud vendors today, started in 2007 mainly as a platform for Ruby applications. By 2010, when it was acquired by Salesforce, Heroku supported most modern server-side languages.

Its developers, led by Adam Wiggins, came up with a methodology framework for server applications deployment in 2011 that addresses many, if not most, deployment problems.

It’s now available as an online and EPUB book and can be read for free. Many developers have found these twelve considerations very useful, so we’ll mention them here and later discuss Django deployment in light of them.

The rules, paraphrased, are as follows:

There should exist a single codebase, tracked by a source-control system like Git, for many different deployments, such as development, staging, and production.

Dependencies should be explicit. Even implicit reliance on system tools like cURL should be avoided.

App configuration that differs from one deployment environment to the other needs to be separate from the deployed code (not stored as hard-coded constants).

Services such as databases, queueing systems, and email of caching systems, are treated as swappable resources that can be replaced, depending on the deployment environment, without code changes. All the data needed should be in the configuration.

There are three stages to deploying an app to production:build,release, and run.

The build stage prepares the codebase to be executed. It fetches the dependencies, compiles static assets, and so on.

The release stage takes the build and combines it with the deployment configuration so that it can be executed in the target environment.

The run stage launches the app into execution, so that app is live and running.

According to this framework, there is-or should be-a clear separation between these three stages of deployment. Releases have their unique identifiable IDs. All changes to the codebase or configuration should mean that there’s a new release.

The app is executed as one or more processes that are stateless: data doesn’t rely on memory of the process or disk cache for any longer time. Processes share nothing and data is outsourced to outside services like a database.

Port binding means that the web server can be decoupled from the application, and the application is self-contained: it lives at a certain port receiving requests.

Concurrency and assigning different types of tasks to different processes is required. Also, the ability to scale our application horizontally via stateless processes.

Since these processes should not be demonized or written to PID files, there will need to be a process manager such as supervisord or systemd, each having their own advantages.

Disposable processes means that processes can be shut down or started fast, and that graceful shutdowns guarantee that already started requests/tasks will finish while the app will stop creating new processes.

Parity between development and production greatly reduces complexity of deployments. Best practices mean reducing the time gap between development and production (small and frequent deployments), reducing the personnel gap (the same people developing the application are closely involved in deploying it in production) and reducing the tooling gap-by keeping the software stack similar between development and production environments. This keeps the complexities and possible issues resulting from different stacks between development and production at a minimum.

Logs should be treated as event streams, and consuming them should be left out of the application itself (sometimes sent to a specialized piece of software for more detailed and useful analysis).

Administrative tasks and management processes should be run in the deployment environment. Admin code should be part of deployed code.

These principles should be taken as guidelines, not hard rules, because they are there to make the lives of developers, DevOps engineers and administrators easier.

How does Django stack up against these demands, and how can we apply these when deploying our apps?

Regarding the first rule, which says that we should have a single, version-control-tracked codebase for multiple deployment environments, Django settings are, by default, in the settings.py file-meaning that we would need to change this file for deployment to each environment. We would be deploying different code to each environment, and our deployment flow wouldn’t be as smooth.

WSGI is the standard with Python web apps including Django. This means that when we start our project, the subfolder that contains our base app (the one with the name of our project, which we here named xyz_app ) will have a wsgi.py file:

The project that the entire specification originates from is Django Channels, which aims tobring asynchronous support to Django.

The implementations recommended by the Django docs include Daphne, which is a reference implementation of the spec written on top of Twisted, an event-based, lower-level server or engine, and Uvicorn, an ASGI web server that supports WebSockets, includes Gunicorn worker class, and is wsgi-compatible.


According to some benchmarks, Uvicorn is faster even than Node.js, but for a real benchmark, we would have to have very similar, almost identical applications to compare on top of Uvicorn and Node.


Deployment: Some Method to the Madness

Heroku, one of the main PaaS cloud vendors today, started in 2007 mainly as a platform for Ruby applications. By 2010, when it was acquired by Salesforce, Heroku supported most modern server-side languages.

Its developers, led by Adam Wiggins, came up with a methodology framework for server applications deployment in 2011 that addresses many, if not most, deployment problems.

It’s now available as an online and EPUB book and can be read for free. Many developers have found these twelve considerations very useful, so we’ll mention them here and later discuss Django deployment in light of them.

The rules, paraphrased, are as follows:

  • There should exist a single codebase, tracked by a source-control system like Git, for many different deployments, such as development, staging, and production.

  • Dependencies should be explicit. Even implicit reliance on system tools like cURL should be avoided.

  • App configuration that differs from one deployment environment to the other needs to be separate from the deployed code (not stored as hard-coded constants).

  • Services such as databases, queueing systems, and email of caching systems, are treated as swappable resources that can be replaced, depending on the deployment environment, without code changes. All the data needed should be in the configuration.

  • There are three stages to deploying an app to production:build,release, and run.

    The build stage prepares the codebase to be executed. It fetches the dependencies, compiles static assets, and so on.

    The release stage takes the build and combines it with the deployment configuration so that it can be executed in the target environment.

    The run stage launches the app into execution, so that app is live and running.

    According to this framework, there is-or should be-a clear separation between these three stages of deployment. Releases have their unique identifiable IDs. All changes to the codebase or configuration should mean that there’s a new release.

  • The app is executed as one or more processes that are stateless: data doesn’t rely on memory of the process or disk cache for any longer time. Processes share nothing and data is outsourced to outside services like a database.

  • Port binding means that the web server can be decoupled from the application, and the application is self-contained: it lives at a certain port receiving requests.

  • Concurrency and assigning different types of tasks to different processes is required. Also, the ability to scale our application horizontally via stateless processes.

    Since these processes should not be daemonized or written to PID files, there will need to be a process manager such as supervisord or systemd, each having their own advantages.

  • Disposable processes means that processes can be shut down or started fast, and that graceful shutdowns guarantee that already started requests/tasks will finish while the web hosting app will stop creating new processes.

  • Parity between development and production greatly reduces complexity of deployments. Best practices mean reducing the time gap between development and production (small and frequent deployments), reducing the personnel gap (the same people developing the application are closely involved in deploying it in production) and reducing the tooling gap-by keeping the software stack similar between development and production environments. This keeps the complexities and possible issues resulting from different stacks between development and production at a minimum.

  • Logs should be treated as event streams, and consuming them should be left out of the application itself (sometimes sent to a specialized piece of software for more detailed and useful analysis).

  • Administrative tasks and management processes should be run in the deployment environment. Admin code should be part of deployed code.

These principles should be taken as guidelines, not hard rules, because they are there to make the lives of developers, DevOps engineers and administrators easier.

How does Django stack up against these demands, and how can we apply these when deploying our apps?

Regarding the first rule, which says that we should have a single, version-control-tracked codebase for multiple deployment environments, Django settings are, by default, in the settings.py file-meaning that we would need to change this file for deployment to each environment. We would be deploying different code to each environment, and our deployment flow wouldn’t be as smooth.

WSGI is the standard with Python web apps, including Django. This means that when we start our project, the subfolder that contains our base app (the one with the name of our project, which we here named xyz_app ) will have a wsgi.py file:

"""WSGI config for xyz_app project.
It exposes the WSGI callable as a module-level variable named ``application``.
For more information on this file, see
https://docs.djangoproject.com/en/2.2/howto/deployment/wsgi/
"""
import os
from django.core.wsgi import get_wsgi_application
os.environ.setdefault('DJANGO_SETTINGS_MODULE', 'xyz_app.settings')

One environment variable here comes to our rescue: DJANGO_SETTINGS_MODULE . We could change the filename and path to our settings.py file here and make it custom.

Thanks for choose django as a web framework.