You have tested the container locally, which is great for development. Now you need to decide how to deploy it. You have the choice to deploy as a stand-alone Docker container or within a Kubernetes environment. Whichever mode you choose, you still have the option to deploy on-premises or on Azure. In this section, we will focus on what these deployment options look like within Azure.
Deploy to Azure Container Instances
Azure Container Instances is a serverless environment to run the containers. Here you can run containers on-demand with minimal setup. However, you will want to configure one or more of the security options: Azure Firewall, TLS/SSL support, and running with a managed identity.
Running containers within Azure cloud Container Instances is common for independent containers.
It allows running your container with minimal setup and you only pay for containers that are running. However, there is not much coordination with other resources, such as additional containers that connect to it. For deployments with multiple containers working together, the preferred option is Kubernetes.
Deploy to Azure Kubernetes Service
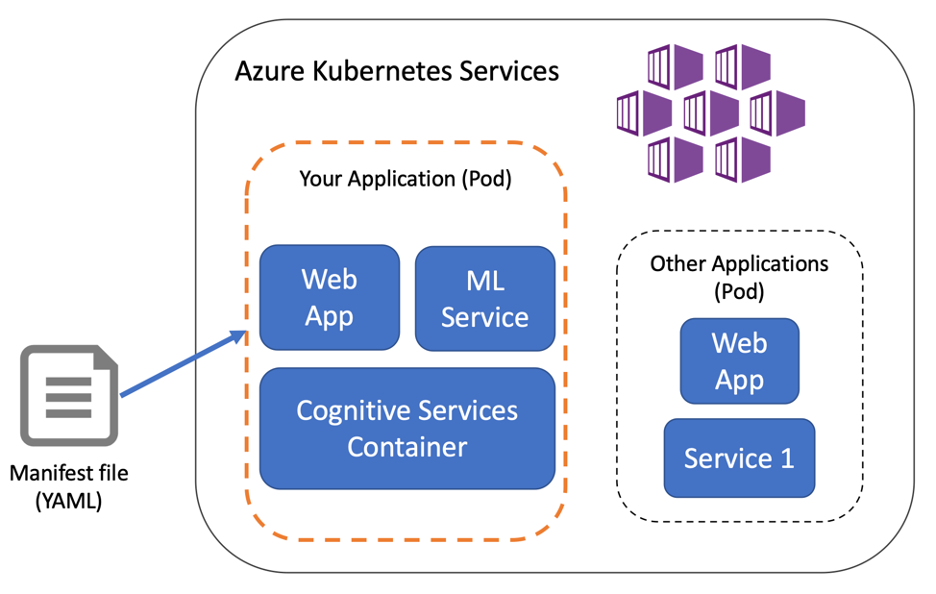
Running containers within Azure Kubernetes Service is a common path for applications that have multiple moving parts and components. Kubernetes is popular because it enables scripted deployments and easy scaling of containers. Organizations maintain control over the full application environment and deploy the containers together. The file defining your deployment is called a Kubernetes manifest. Kubernetes runs the containers described in the manifest file and self-heals if container failures occur.
Publish to Azure Container Registry
You will need to access your image from a repository whether running in Kubernetes or Docker. Azure Container Registry is a private repository for your container images. You will publish the image you built here so it can be accessed by your deployment process. It supports role-based access, which you use to ensure the image is only available to the correct people and services. You can access images stored in the registry using your Azure credentials or from another Azure service.
Next you will deploy the language detection component of your health care application.
Exercise: Deploy a container
For the health care application, you would deploy a language detection container in coordination with other containers. For example, one container may be the customer facing web app and another would run the model to recommend treatments. Since multiple containers will be deployed together, you will choose Kubernetes. Remember that the application is designed to work on-premises or in Azure, so Kubernetes fits the need. You will do the task in two parts, which are detailed below: publish a container image and deploy to Azure Kubernetes Service.
Publish Docker images to Azure Container Registry
For the first step in deployment, you will tag the Docker image and publish to Azure Container Registry.
- Use Azure CLI to log in and retrieve the Container Registry address by replacing <acr_name> and <resource_group> with your resource names.
az acr login --name <acr-name>

az acr list --resource-group <resource-group> --output table
The output of these commands includes your login server name, in this case cogsvcacr.azurecr.io
| NAME | RESOURCE GROUP | LOCATION | SKU | LOGIN SERVER |
|---|---|---|---|---|
| cogsvcacr | cognitive-services-demo-rg | westus2 | Basic | cogsvcacr.azurecr.io |
Next, find the correct docker image to publish. Use the image you created in the previous section, named cog-svc-language.
docker images
REPOSITORY TAG IMAGE ID
cog-svc-language latest 49379c513da1
3. Tag the docker image by adding the login server and push the tagged image to the Azure Container Registry. The operation may take several minutes. Be sure to replace and with the correct values.
docker tag <service-image-name> <login-server>/cog-svc:v1
docker push <login-server>/cog-svc:v1
Deploy container to Azure Kubernetes Service
To deploy to Kubernetes, you need a manifest file. This file defines the desired deploy state, including which image, port, billing endpoint, and API key will be used. In a complete project, the file will include additional resources that interact with your Cognitive Services container. However, for this example you will deploy the single Cognitive Service container and use it from your local application.
-
- Create the manifest file by copying following YAML and save as cog-svc.yml.
apiVersion: v1
kind: Service
metadata:
name: cog-svc
spec:
selector:
app: cog-svc
type: LoadBalancer
ports:
- name: cog-svc
port: 5000
targetPort: 5000
protocol: TCP
---
apiVersion: apps/v1
kind: Deployment
metadata:
name: cog-svc
spec:
replicas: 1
selector:
matchLabels:
app: cog-svc
template:
metadata:
labels:
app: cog-svc
spec:
containers:
- name: cog-svc
image: <login-server>/cog-svc:v1>
ports:
- name: public-port
containerPort: 5000
livenessProbe:
httpGet:
path: /status
port: public-port
initialDelaySeconds: 30
timeoutSeconds: 1
periodSeconds: 10

automountServiceAccountToken: false - In the cog-svc.yml file that was created, replace the value for image with the full name of the tagged cloud container.
Install kubectl, the command-line interface for working with Kubernetes.
az aks install-cli
You will authenticate to Azure Kubernetes Service before deploying the containers. Azure CLI provides a way to store Kubernetes Service credentials by appending to the file /.kube/config. Retrieve and store the credentials for the Azure Kubernetes Service with the following command, replacing and with your values.
az aks get-credentials --resource-group <resource-group> --name <aks-name>Run the deploy with the apply command.
kubectl apply -f cog-svc.ymlIf your output does not show that the application was created, check that your credentials are set and that your network location is allowed to access the Kubernetes service.
To test out the service, you need the public IP address. Run the following command to confirm the service is running and retrieve the public IP.
kubectl get service cog-svc7. A simple test from the browser will confirm you can access the service and run API commands using the swagger UI. Open your browser to http://:5000/swagger to test it out.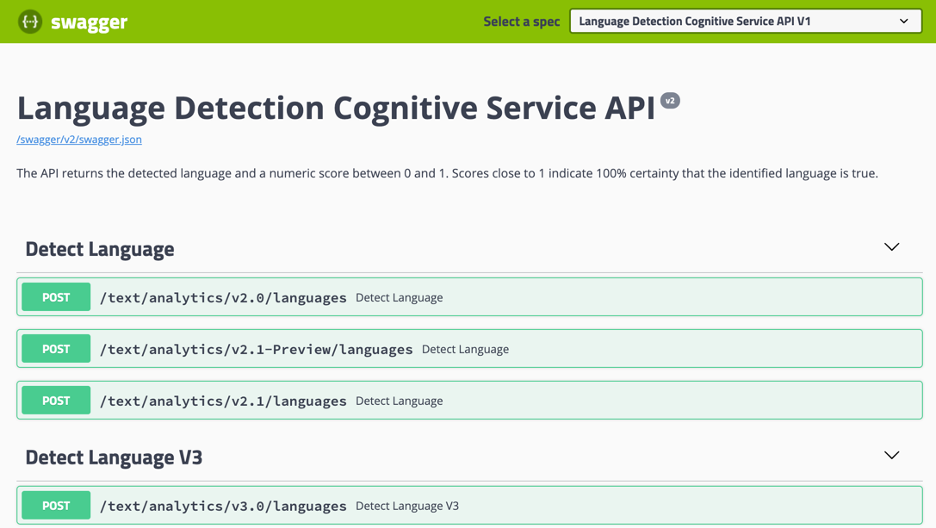
In this simple deployment, we included a public port, which makes this container accessible to everyone. This is not how you will want to deploy a long running container. You will learn about securing the container and deployment in the next section.