Set up your Azure DevOps environment

Get the Azure DevOps project

Here, you make sure that your Azure DevOps organization is set up to complete the rest of this module. You do this by running a template that creates a project for you in Azure DevOps.

The modules in this learning path form a progression, where you follow the Tailspin web team through their DevOps journey. For learning purposes, each module has an associated Azure DevOps project.


Run the template

Run a template that sets up everything for you in your Azure DevOps organization.

To run the template, on the Azure DevOps Demo Generator site, do the following:

  1. Select Sign In, and accept the usage terms.
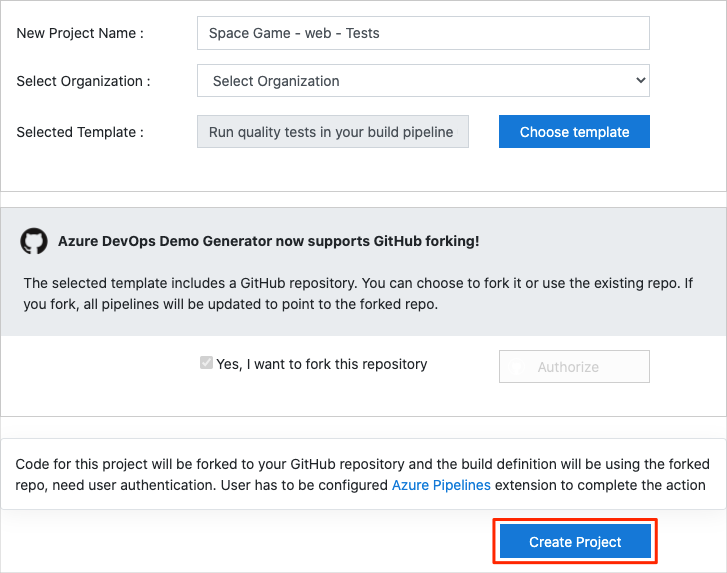
  2. On the Create New Project page, select your Azure DevOps organization, and then enter a project name, such as Space Game – web – Tests.
  3. Select Fork repository on GitHub, and then select Authorize. If a window appears, authorize access to your GitHub account.
  4. Select Create Project.azure devopsIt takes a few moments for the template to run.
  5. Select Navigate to project to go to your project in Azure DevOps.


Set your project’s visibility

Your fork of the Space Game repository on GitHub is initially public. The Azure DevOps template creates a project that’s initially private.

A public GitHub repository is accessible to everyone, whereas a private repository is accessible to you and the people you share it with. In both cases, only collaborators can commit changes to a GitHub repository.

A project on Azure DevOps works the same way. Users who aren’t signed in to the service have read-only access to public projects. Private projects require users to be granted access to the project and signed in to access the services.

For web development learning purposes, you don’t need to change any of these settings right now. But for your own projects, you need to decide what visibility and access you want to provide to others. For example, if your project is open source, you might make both your GitHub repository and your Azure DevOps project public. If your project is closed source, you would likely make both your GitHub repository and your Azure DevOps project private.

Move the work item to Doing

In this section, you assign yourself a work item that relates to this module on Azure Boards. You also move the work item to the Doing state. In practice, you and your team would assign work items at the start of each sprint, or work iteration.

Assigning work in this way gives you a checklist to work from. It gives others on your team visibility into what you’re working on and how much work is left. It also helps the team enforce work in process (WIP) limits so that the team doesn’t take on too much work at one time.

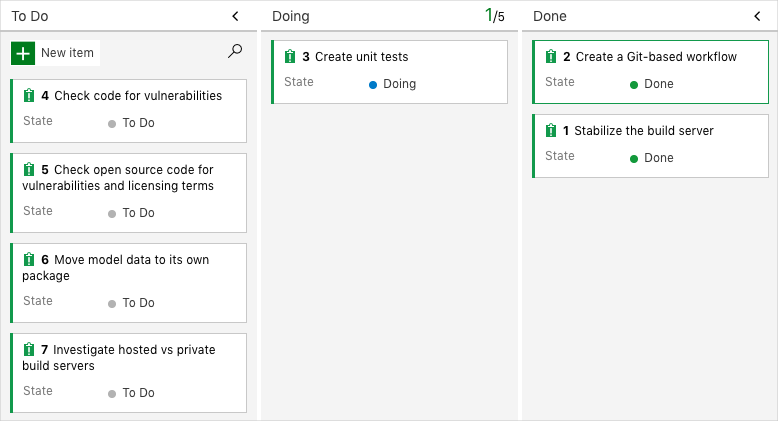
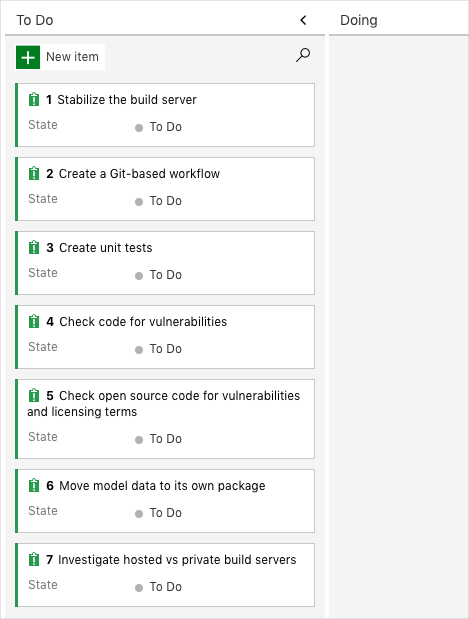
Recall that the team settled on these seven top issues:
azure cloud build

Here you move the third item, Create unit tests, to the Doing column and assign yourself to the work item.

Recall that Create unit tests relates to running unit tests during the build so that Amita doesn’t have to deal with so many regression bugs when she tests out new builds.


To set up the work item:

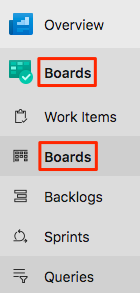
  1. In Azure DevOps, go to Boards and then, in the left pane, select Boards.azure-devops-menu
  2. In the Create unit tests work item, select the To Do down arrow, and then assign the work item to yourself.azure devops boards
  3. Drag the work item from the To Do column to the Doing column.azure devops boards doing

At the end of this module, after you’ve completed the task, you’ll move the card to the Done column.

Set up the project locally

Here, you load the Space Game project in Visual Studio Code, configure Git, clone your repository locally, and set the upstream remote so that you can download starter code.

Open the integrated terminal

Visual Studio Code comes with an integrated terminal, so you can edit files and work from the command line all from one place.

  1. Start Visual Studio Code.
  2. On the View menu, select Terminal.
  3. In the drop-down list, select bash:vscode bash terminal

The terminal window lets you choose any shell that’s installed on your system, like Bash, Zsh, and PowerShell.

Here you’ll use Bash. Git for Windows provides Git Bash, which makes it easy to run Git commands.

4. Run the cd command to navigate to the directory you want to work from, like your home directory (~). You can choose a different directory if you want.

cd ~

Configure Git

If you’re new to Git and GitHub, you first need to run a few commands to associate your identity with Git and authenticate with GitHub.

Set up Git explains the process in greater detail.

At a minimum, you’ll need to complete the following steps. Run these commands from the integrated terminal:

Set up your project in Visual Studio Code

In this part, you clone your fork locally so that you can make changes and build out your pipeline configuration.

Clone your fork locally

You now have a copy of the Space Game web project in your GitHub account. Now you’ll download, or clone, a copy to your computer so you can work with it.

A clone, just like a fork, is a copy of a repository. When you clone a repository, you can make changes, verify they work as you expect, and then upload those changes back to GitHub. You can also synchronize your local copy with changes other authenticated users have made to GitHub’s copy of your repository.

To clone the Space Game web project to your computer:

  1. Go to your fork of the Space Game web project (mslearn-tailspin-spacegame-web) on GitHub .
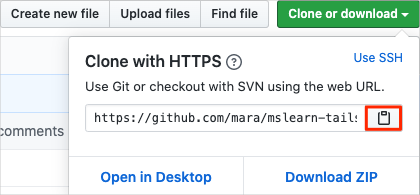
  2. Select Clone or download. Then select the button next to the URL that’s shown to copy the URL to your clipboard:github-clone
  3. In Visual Studio Code, go to the terminal window.
  4. In the terminal, move to the directory you want to work from, like your home directory (~). You can choose a different directory if you want.
cd ~

5. Run the git clone command. Replace the URL that’s shown here with the contents of your clipboard:

Bash

git clone https://github.com/your-name/mslearn-tailspin-spacegame-web.git

6. Move to the mslearn-tailspin-spacegame-web directory. This is the root directory of your repository.

Bash

cd mslearn-tailspin-spacegame-web

Set the upstream remote

A remote is a Git repository where team members collaborate (like a repository on GitHub).

Run this git remote command to list your remotes:

Bash

git remote -v

You see that you have both fetch (download) and push (upload) access to your repository:

Output

origin https://github.com/username/mslearn-tailspin-spacegame-web.git (fetch)
origin https://github.com/username/mslearn-tailspin-spacegame-web.git (push)

Origin specifies your repository on GitHub. When you fork code from another repository, it’s common to name the original remote (the one you forked from) as upstream.

Run this git remote add command to create a remote named upstream that points to the Microsoft repository:

Bash

git remote add upstream https://github.com/MicrosoftDocs/mslearn-tailspin-spacegame-web.git

Run git remote a second time to see the changes:

Bash

git remote -v

You see that you still have both fetch (download) and push (upload) access to your repository. You also now have fetch access from the Microsoft repository:

Output

origin https://github.com/username/mslearn-tailspin-spacegame-web.git (fetch)
origin https://github.com/username/mslearn-tailspin-spacegame-web.git (push)
upstream https://github.com/MicrosoftDocs/mslearn-tailspin-spacegame-web.git (fetch)

Open the project in the file explorer

In Visual Studio Code, your terminal window points to the root directory of the Space Game web project. You’ll now open the project from the file explorer so you can view its structure and work with files.

On the File menu, select Open.

Navigate to the root directory of the Space Game web project.

(You can run the pwd command in the terminal window to see the full path if you need a reminder.)

You see the directory and file tree in the file explorer.

You’re now set up to work with the Space Game source code and your Azure Pipelines configuration from your local  development environment.
Azure Spring Cloud – Create an Azure Spring Cloud instance

An Azure Spring Cloud cluster can be created either using the Azure portal or the Azure CLI. In this first module, we will configure the necessary tools, and create our first cluster.

Set up the Azure CLI

If it isn’t already installed on your machine, install the Azure CLI. You can check the version of your current Azure CLI installation by running:
Bash

az --version

Ensure your Azure CLI is logged into your Azure subscription.

Bash

az login # Sign into an azure account
az account show # See the currently signed-in account.

Ensure your default subscription is the one you intend to use for this lab, and if not, set the subscription using:

Bash

az account set --subscription

Install the spring-cloud extension for Azure CLI, by running:

Bash

az extension add -n spring-cloud -y

Congratulations, the Azure CLI is now ready to create your first cluster!


Create an Azure Spring Cloud instance

In this section, we will create our Azure Spring Cloud instance using Azure CLI. It is possible to do exactly the same configuration using the Azure portal.

First, you will need to come up with a name for your Azure Spring Cloud instance.

  • The name must be unique among all Azure Spring Cloud instances across all of Azure. Consider using your username as part of the name.
  • The name can contain only lowercase letters, numbers and hyphens. The first character must be a letter. The last character must be a letter or number. The value must be between 4 and 32 characters long.

To limit typing, set the variable  RESOURCE_GROUP_NAME  to the name of the resource group created in the previous section. Set the variable SPRING_CLOUD_NAME to the name of the Azure Spring Cloud instance to be created:

Bash

RESOURCE_GROUP_NAME=spring-cloud-workshop
SPRING_CLOUD_NAME=azure-spring-cloud-workshop

With these variables set, you can now create your resource group. In the following script, the resource group is located in the eastus region (using the -l eastus argument), but you can choose a region closer to you for better performance (use az account list-locations to list all available regions):


Bash

az group create \
-g "$RESOURCE_GROUP_NAME" \
-l eastus

And then create the Azure Spring Cloud instance:

Bash

az spring-cloud create \
-g "$RESOURCE_GROUP_NAME" \
-n "$SPRING_CLOUD_NAME"

This command takes time to complete, you can continue reading while it completes.

For the remainder of this workshop, we will be running Azure CLI commands referencing the same resource group and Azure Spring Cloud  instance. So let’s set them as defaults, so we don’t have to specify them again:

Bash

az configure --defaults group=${RESOURCE_GROUP_NAME}
az configure --defaults spring-cloud=${SPRING_CLOUD_NAME}

Public and private IP addressing in Azure

In your manufacturing company, you are moving resources into Azure, starting with a database server. You want to ensure that the database server is accessible for clients in your on-premises network. Public resources like web servers must be accessible from the internet. You want to ensure that you plan IP addresses that support these requirements.

In this unit, you’ll explore the constraints and limitations for public and private IP addresses in Azure. You also will look at the capabilities that are available in Azure to reassign IP addresses in your network.

IP address types

There are two types of IP addresses that you can use in Azure:

  • Public IP addresses
  • Private IP addresses

Both types of IP addresses can be allocated in one of two ways:

  • Dynamic
  • Static

Let’s take a closer look at how the IP address types work together.

Public IP addresses

Use a public IP address for public-facing services. A public address can be either static or dynamic. A public IP address can be assigned to a VM, an internet-facing load balancer, a VPN gateway, or an web application gateway.

Dynamic public IP addresses are assigned addresses that can change over the lifespan of the Azure resource. The dynamic IP address is allocated when you create or start a VM. The IP address is released when you stop or delete the VM. In each Azure region, public IP addresses are assigned from a unique pool of addresses. The default allocation method is dynamic.

Static public IP addresses are assigned addresses that will not change over the lifespan of the Azure resource. To ensure that the IP address for the resource remains the same, you can set the allocation method explicitly to static. In this case, an IP address is assigned immediately. It is released only when you delete the resource or change the IP allocation method to dynamic.

Basic and Standard SKUs

For public IP addresses, there are two types of SKUs to choose from: Basic and Standard. All public IP addresses created before the introduction of SKUs are Basic SKU public IP addresses. With the introduction of SKUs, you have the option to specify which SKU you would like the public IP address to be.

Basic

Basic public IPs can be assigned by using static or dynamic allocation methods. Basic IPs have an adjustable inbound originated flow idle timeout of 4-30 minutes, with a default of 4 minutes, and a fixed outbound originated flow idle timeout of 4 minutes. Basic IPs are open by default. We recommend that you use network security groups to restrict inbound or outbound traffic. Network security groups are recommended but optional for restricting inbound or outbound traffic.

Basic public IPs can be assigned to any Azure resource that can be assigned a public IP address, such as network interfaces, VPN gateways, application gateways, and internet-facing load balancers. They do not support availability zone scenarios. You must use a Standard SKU public IP for an availability zone scenario.

Standard

Standard SKU public IP addresses always use the static allocation method. They have an adjustable inbound originated flow idle timeout of 4-30 minutes, with a default of 4 minutes, and a fixed outbound originated flow idle timeout of 4 minutes.

Standard IPs are secure by default and closed to inbound traffic. You must explicitly allow inbound traffic by using a network security group.

Standard IPs can be assigned to network interfaces, Standard public load balancers, application gateways, or VPN gateways. For more information about Standard load balancers, see Azure Standard Load Balancer overview. Standard IPs are zone-redundant by default and optionally zonal (they can be created zonal and guaranteed in a specific availability zone).

Public IP address prefix

You can’t bring your own public IP addresses from on-premises networks into Azure. Based on the location of the resource, an IP address is assigned from a pool of available addresses. Public IP addresses are allocated from a range that’s unique to each region in each Azure cloud. Public IP addresses can’t be moved between regions; all IP addresses are region-specific. If your business needs to have data centers in different regions, you would have a different public IP address range for each region. You can use technology like Azure Traffic Manager to balance between region-specific instances.

To ensure a static range of public IP addresses, you can create a public IP address prefix. You can’t specify the addresses when you create the prefix, but after the prefix is created, the addresses will be fixed. The IP addresses will be a contiguous range. The advantage of a public IP address prefix is that you can specify firewall rules for these IP addresses with the knowledge that they will not change. You can assign the addresses from a public IP address prefix to any resource in Azure that supports public IP addresses.

Private IP addresses

Private IP addresses are used for communication within a virtual network. Private IP addresses are used within Azure Cloud Virtual Network virtual networks and your on-premises networks. They can be set to dynamic (DHCP lease) or static (DHCP reservation).

Dynamic private IP addresses are assigned through a DHCP lease and can change over the lifespan of the Azure resource.

Static private IP addresses are assigned through a DHCP reservation and do not change throughout the lifespan of the Azure resource. Static private IP addresses persist if a resource is stopped or deallocated.

IP addressing for Azure virtual networks

A virtual network is a fundamental component that acts as an organization’s network in Azure. In the virtual network, the administrator has full control over the IP address assignment, security settings, and security rules. When you create a virtual network, you define a scope of IP addresses. Private IP addressing in Azure works the same way as it does in the on-premises network. You choose the private IP addresses that are reserved by the Internet Assigned Numbers Authority (IANA) based on your network requirements:

  • 10.0.0.0/8
  • 172.16.0.0/12
  • 192.168.0.0/16

A subnet is a range of IP address within the virtual network. You can divide the virtual network into multiple subnets. Each subnet must have a unique address range, which is specified in classless inter-domain routing (CIDR) format. CIDR is a way to represent a block of network IP addresses. An IPv4 CIDR, specified as part of the IP address, shows the length of the network prefix.

Consider, for example, the CIDR 192.168.10.0/24. “192.168.10.0” is the network address. The “24” indicates that the first 24 bits are part of the network address, leaving the last 8 bits for specific host addresses. The address range can’t overlap with other subnets in the virtual network or with the on-premises network.

The first three IP addresses are reserved for all subnets by default in Azure. For protocol conformance, the first and last IP addresses of all subnets also are reserved. An internal DHCP service within Azure assigns and maintains the lease of IP addresses. The .1, .2, .3, and last IP addresses are not visible or configurable by the Azure customer. These addresses are reserved and used by internal Azure services. 

In Azure virtual networks, IP addresses can be allocated to the following types of resources:

  • Virtual machine network interfaces
  • Load balancers
  • Application gateways