InnerSource program – Defining workflows & Measuring program success

Defining workflows

For projects that encourage external contributions, be sure to specify what workflow the project follows. The workflow should include details about where and how branches should be used for bugs and features, how pull requests should be opened, and any other details people outside the repository team should know before they push code. If you don’t yet have a workflow in mind, you should consider the GitHub flow .

You should communicate a strategy for managing releases and deployments. These parts of the workflow will impact day-to-day branching and merging, so it’s important to communicate them to contributors. Learn more about how they relate to your Git branching strategy .

Measuring program success

Any team venturing into InnerSource should think about the kinds of metrics they want to track to gauge the success of their program. While traditional metrics like “time to market” and “bugs reported” are still applicable, they aren’t necessarily going to illustrate the benefits achieved through InnerSource.

Instead, consider adding metrics that show how external participation has improved project quality. Is the repository receiving pull requests from external sources that fix bugs and add website hosts features? Are there active participants in discussions around the project and its future? Is the program inspiring an InnerSource expansion that drives benefits elsewhere in the organization?

In short, metrics are hard, especially when it comes to measuring the value and impact of individual and team contributions. If misused, metrics can harm the culture, existing processes, and diminish the collective sentiment towards the organization or leadership team. When thinking about measuring InnerSource adoption, consider the following:

  • Measure process, not output
    • Code review turnaround time
    • Pull request size
    • Work in progress
    • Time to open
  • Measure against targets and not absolutes
  • Measure teams and not individuals
    • Number of unique contributors to a project
    • Number of projects reusing code
    • Number of cross-team @mentions

Learn about the successes others have enjoyed in these InnerSource case studies .

Cloud Dev – a successful InnerSource program with Github

What is InnerSource?

InnerSource is the practice of applying open source patterns to projects with a limited audience. For example, a company may establish an InnerSource program that mirrors the structure of a typical open source project, except that it is only accessible to the employees of that company. In effect, it’s an open source program behind your company’s firewall.

InnerSource benefits

An InnerSource program can offer numerous benefits beyond what traditional closed source models provide.

First, they encourage transparency. Access to the source code of other company projects can help developers be more productive when working on their own projects. They can see how different teams solved problems similar to the ones they’re facing, and often find code and other assets that can be reused. Access to team issues, pull requests, and project plans also provide better data for them to understand the velocity and direction of the project.

Next, they reduce friction. If a consumer team is dependent on a bug fix or new feature for a project owned by a different team, they have a channel through which they can propose the changes they need. And if those changes cannot be merged in for any reason, the consumer team has the option of forking the project to meet their needs.

Finally, they standardize practices. A common challenge development organizations face is that different teams often diverge in the ways they operate. Building an InnerSource program is a great opportunity to adopt standard conventions that can be leveraged across every development team, even if they don’t follow identical practices. For example, two teams may prefer different processes for accepting contributions. Having them standardize on the way they communicate their different processes makes it much easier for anyone to contribute to either.

These examples are just a few of the benefits enjoyed by InnerSource programs. To learn more, see An introduction to InnerSource .


Setting up an InnerSource program on GitHub

Setting repository visibility and permissions

GitHub repositories can be configured with three levels of visibility. Users who do not meet the visibility requirement will see “not found” pages when trying to access your repository. The levels are:

  • Public repositories are visible to everyone. Use this visibility for projects that are truly open source and offer access to people inside and outside of your organization.
  • Internal repositories are only visible to members of the organization that owns them. Use this visibility for InnerSource projects.
  • Private repositories are only visible to the owner and any teams or individuals they add. Use this visibility for projects that should only be accessed by specific users and groups.


Once you have established repository visibility, you can configure permissions on an individual or team basis. There are five permission levels:

  • Read level is recommended for non-code contributors who want to view or discuss the project.
  • Triage level is recommended for contributors who need to proactively manage issues and pull requests without write access.
  • Write level is recommended for contributors who actively push to the project.
  • Maintain level is recommended for project managers who need to manage the repository without access to sensitive or destructive actions.
  • Admin level is recommended for people who need full access to the project, including sensitive and destructive actions like managing security or deleting a repository.

Learn more about repository access permissions by level .

Creating discoverable repositories

As an InnerSource program grows, the number of repositories will likely scale up significantly. While it’s great to have all these assets available to the organization, it can become a challenge to efficiently find content. To proactively address this issue, it is a best practice for teams to consider what they can do to make it easier for others to find and work with their repositories.

A few best practices include:

  • Use a descriptive repository name, such as warehouse-api or supply-chain-web.
  • Include a concise description. A sentence or two should be enough for potential users to know if the project might fit their needs.
  • Include a README.md file in the root of the repository. This file is used by GitHub as the landing page when people visit the repository.
    • Articulate the purpose and vision of the project so potential consumers understand whether it fits their needs.
    • Offer visual aids, such as screenshots or code samples, to illustrate the project in action.
    • Include a link to a production or demo version of the app for review.
    • Set expectations for prerequisites and deployment procedures. If the project has disqualifying prerequisites, then let potential users know early.
    • Include references to projects you depend on. Visitors may only need to use one of the projects you depend on to meet their needs, and this will save everyone time. It’s also a good way to promote the work of others.
    • Make use of Markdown to guide readers through properly formatted content.

Check out some Awesome README examples .

Once the project has launched, use email and other networking channels to promote it. Reaching an appropriate audience could produce a significant boost in project participation.

Managing projects on GitHub

As projects gain traction, the influx of users and contributions can require a lot of work to manage. Depending on the project, a significant amount of work may be required just to manage the expectations of project participants.

To proactively address this, GitHub looks for a CONTRIBUTING.md file in the root (or /docs or /.github) of a repository. Use this file to explain the contribution policy for the project. The exact details may vary, but it’s a good idea to let potential contributors know what conventions the project follows, where the team is looking for pull requests, what details are requested for bug reports, and so on.


Creating issue and pull request templates

GitHub supports starter templates for new issues and pull requests. Use these to provide the initial description text for a newly created issue or pull request.

For example, if your project has .github/ISSUE_TEMPLATE.md, anytime a user starts the process of creating an issue, they will see this content. Rather than having to constantly reference the required details from a CONTRIBUTING.md, they’ll be able to just fill out the issue like a form using the template text.

cc


It’s the same for pull requests, except that the path is .github/PULL_REQUEST_TEMPLATE.md.

Check out some Awesome GitHub issue & pull request templates .

Web Development – How to create a release based workflow using GitHub.

Development teams around the world share one consistent goal: to release software. Whether it’s a major platform with annual releases or a web site that publishes multiple times per day, every workflow drives toward the same result.

Suppose you lead a team of software/web developers working on the next version of your product. As your team scales up, the challenges of keeping everything running smoothly become more and more difficult. Everything needs to focus on the upcoming release, and you need a workflow that fits the unpredictable nature of engineering. That workflow needs to provide a set of practical processes for managing work, code, and deliverables. The good news is that you’re already using GitHub, so there’s a light at the end of the tunnel.

In this post, you learn how to implement a release based workflow on GitHub using project boards, branches, and releases.

Here, we discuss how you can create a release based workflow using GitHub.

What is a release based workflow?

A release based workflow is a set of patterns and policies that focus on releasing software. While this notion may seem like an obvious goal for a development team, the value of this perspective is somewhat nuanced. This unit will discuss how it drives three different parts of the release cycle: managing the project, selecting a branching strategy, and releasing to customers.

Planning work with GitHub project boards

From a planning mindset, being release-centric means that issues are divided up into distinct iterations that produce a new version. These iterations are often called sprints and are time-boxed in roughly equal periods to produce incremental changes. Other teams prefer to package entire release versions into a single iteration that can last a few months or longer. In GitHub, these iterations are managed as projects.

The dominant feature of a project is its board. The board is the central plan of record for the iteration and contains all of the cards that are to be resolved. A card can represent an issue, a pull request, or even just a generic note.project board

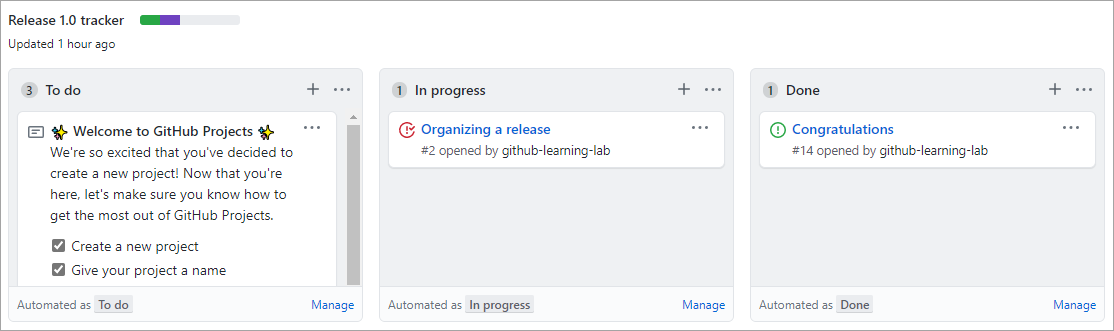
By default, each card starts in the To do column and moves to In progress after work begins before ending in Done. You may customize these columns, add additional columns, or apply automation to the movement of these cards and their properties to fit your team’s process.

Learn more about managing project boards .

The card’s project status is integrated across the repository. For example, dragging a card from To do to In progress changes its status, as well as updates the visual indicator next to the project’s title. The green section indicates the portion of cards marked as Done, whereas purple is used for cards In progress. The remaining space represents the quantity of cards that have yet to begin. In addition to dragging cards around the board, you may update them from their main view.move project card

By using a project board, all stakeholders have an easy way to understand the status and velocity of a project. You can also create boards that are scoped to individual users or a collection of repositories owned by an organization.

Learn more about tracking the progress of your work with project boards .


Tracking specific milestones

For teams, or possibly subsets of teams, GitHub offers milestone tracking.

milestones

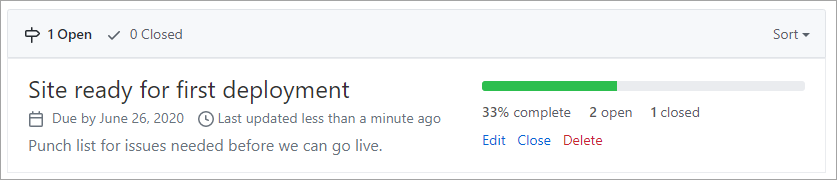
Milestones are similar to project tracking in that there is an emphasis on the prioritized completion of issues and pull requests. However, where a project may be focused on the team’s process, a milestone is focused on the product.

Learn more about tracking the progress of your work with milestones .

Selecting a branching strategy

Repositories that have multiple developers working in parallel need a well-defined branching strategy. Settling on a unified approach early in the project will save confusion and frustration as the team and codebase scale.

Learn about how we use Git at Microsoft .

The GitHub flow

In addition to providing a platform for collaborative software development, GitHub also offers a prescribed workflow designed to optimize use of its various features. While GitHub can work with virtually any software development process, it’s recommended that you consider the GitHub flow if your team has not yet settled on a process.

Working with long-lived branches

A long-lived branch is a Git branch that is never deleted. Some teams prefer to avoid them altogether in favor of short-lived feature and bug fix branches. For those teams, the goal of any effort is to produce a pull request that merges their work back into master. This approach can be effective for projects that never have the need to look back, such as first-party web applications that will never support a previous version.

However, there are certain scenarios where a long-lived branch serves the best interests of a team. The most common case for a long-lived branch is when a product has multiple versions that must be supported for an extended period of time. When a team needs to plan for this commitment, the repository should follow a standard convention, such as release-v1.0, release-v2.0, and so on. Those branches should also be marked as protected in GitHub so that write access is controlled and they cannot be accidentally deleted.

Teams should still maintain master as the root branch and merge their release branch changes upstream as long as they fit into the future of the project. When the time comes, release-v3.0 should base off of master so that servicing work for release-v2.0 doesn’t complicate the repository.

Servicing long-lived branches

Suppose a bug fix were merged into the release-v2.0 branch, and then merged again upstream into master. It was then later discovered that this bug also existed in the release-v1.0 branch and needed to be backported for customers still using that version. What’s the best way to do this?


Merging master down into release-v1.0 would not be a feasible option since it would contain a significant number of commits that were not intended to be part of that version. For the same reason, rebasing release-v1.0 onto the current master commit would not be an option.

An alternative option would be to manually reimplement the fix on the release-v1.0 branch, but that approach would require much rework and not scale well across multiple versions. However, Git does offer an automated solution to this problem in the form of its cherry-pick command.

What is Git’s cherry-pick command?

git cherry-pick is a command that enables you to apply specific commits from one branch to another. It simply iterates the selected commits and applies them to the target branch as new commits. If necessary, developers can merge any conflicts before completing the backport.

Learn more about Git’s cherry-pick .

Releasing to consumers

When a product version is ready to be released, GitHub simplifies the process of packaging it up and notifying consumers.


Creating a version is as straightforward as filling out the form:

  • Enter a Git tag to apply, which should follow semantic versioning , such as v1.0.2. GitHub manages the process of creating the Git tag you specify.
  • Enter a name for your release. Some common practices are to:
    • Use a descriptive name.
    • Use the Git version.
    • Use a concise summary of how this release has changed since the previous one.
    • Use a code name or random phrase.
  • Provide release notes. This can be automated with the Release Drafter app , which analyzes the changes since the previous version and includes the associated pull request titles.
  • If you would like to provide files as part of the release, such as pre-built installers, you can drag and drop them onto the form. You don’t need to package the source as GitHub handles that for you automatically.
  • Indicate whether this is a pre-release version by checking that box. This will help customers avoid pre-release versions if they want to.