An SSL certificate is basically the standard that most websites use. It has a positive effect on security, user trust and helps in website positioning. So I don’t have to convince you that it is also worth running it on your WordPress site. The only question is how to do this?
SSL certificate – the choice is important
The first step, of course, is to enable the certificate for your domain. Most hosting companies offer the option of purchasing such a certificate. Here, the choice is quite large, which depends mainly on the budget. If it is larger and you run, for example, an online store, it is worth considering a paid solution that gives an additional guarantee. If your budget is modest or none at all, you can take advantage of the free Let’s Encrypt certificate. Check how to enable such a certificate in your WordPress website.
What’s next?
Suppose you are using the Let’s Encrypt certificate. It is on, but the page is still unsecured. I get this message in my browser.
This is because the page is still loading with an address prefixed with HTTP rather than HTTPS. To change this, create the appropriate redirects, update all links, and make changes to the database. It sounds scary, but in practice it’s not that complicated.
Two methods – good and better
We can distinguish two main methods how to run an SSL certificate in WordPress. I will discuss both of them step by step below.
The first is to use the Really Simple SSL plugin. This is a simpler solution, but unfortunately not without its drawbacks. In fact, you just need to install and run the plugin. However, as it usually happens in such situations, it has a negative impact on the speed of the website. If this is not an essential element for you and you just want to get your SSL certificate up and running quickly, you can use this method. However, it is not recommended.
The second and better method is to manually enable SSL. Yes, it takes more work. We have to tamper with the files and get our hands dirty with code. This seems difficult, but with the tutorial below, it is basically limited to plain copy-paste.
Method 1 – Really Simple SSL plugin
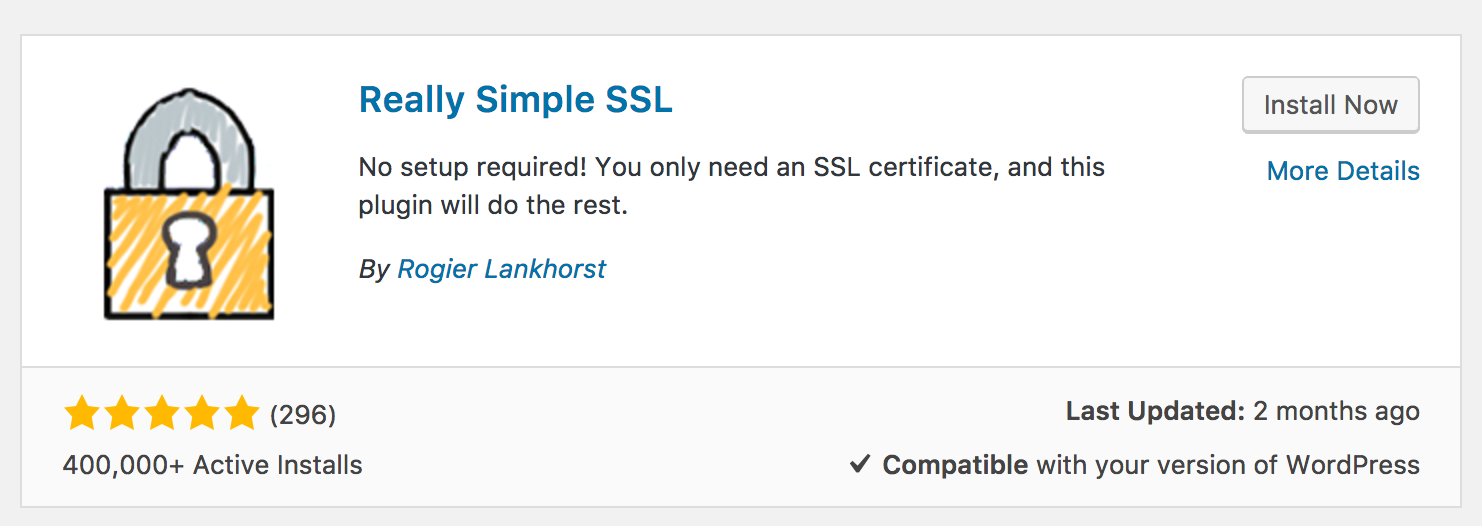
As is usually the case with WordPress, everything can be done with the right plugin. When it comes to running an SSL certificate in WordPress, the choice is simple – the free Really Simple SSL plugin. As its creators advertise, all you need to do is have an SSL certificate and she will do the rest. Each time the page loads, the plugin detects the elements loaded via HTTP and converts their address to the one we want with the secure HTTPS protocol. This solves many problems, such as the one with mixed content, but it can slow down the performance of the page.
Plug-in installation
It installs like any other WordPress plugin. The easiest way to do this is to go to the admin panel and then to Plugins> Add New. In the search engine on the right, enter “Really Simple SSL“, The plugin should appear in the list.
Plug-in activation
Click Install Now and then Activate. The Really Simple SSL window will appear on the page, which will allow you to run an SSL certificate in WordPress. Before this step, it is worth making a website backup. A plug-in is popular and works well, but it can make all pages get a 404 error. This is usually due to different plug-ins or extra security being used. You can find the entire list of errors on the plugin’s official website.
Really Simple SSL plug-in activation
When ready, you can click the “Next, activate SSL!” Button. You will likely be logged out of the WordPress admin panel. So log in again.
Really Simple SSL plugin overrides direct link settings. So let’s finally go to Settings> Direct Links and save the changes. This will overwrite the link structure after installing the SSL certificate.
That’s it, You have an SSL certificate running on your WordPress site. If you are concerned about the speed of the website, the plugin allows you to block some of its functionality in the settings.
Method 2 – Manually enabling SSL in WordPress
If you want to do something properly, roll up your sleeves and do it yourself. It is the same in this case. Manual SSL activation is more reliable, it will not make the website dependent on any plugin, and it will also help to avoid website slowing down. There are several stages, so let’s discuss them step by step.
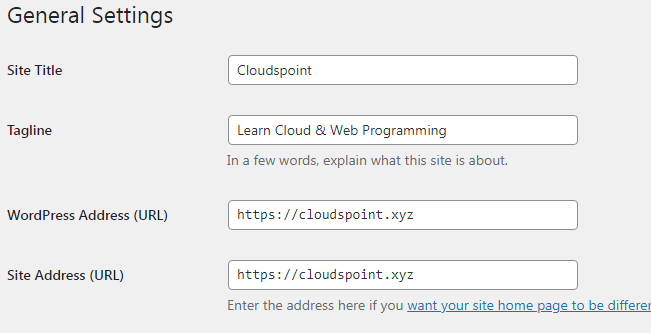
Updating URLs in WordPress settings
Let’s start with the simplest. Go to the admin panel and then to Settings> General. In the WordPress address (URL) and Site address (URL) fields, update the addresses with the HTTPS prefix and save the changes.
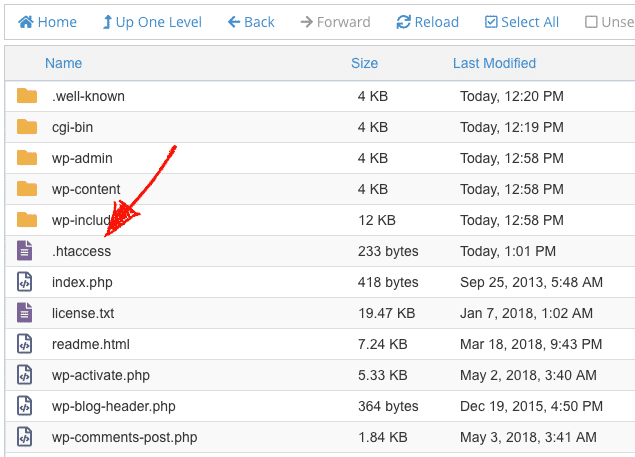
Redirection in the .htaccess file
The next step is to create a 301 redirect in the .htaccess file. You have to get to him. To do this, use an FTP client (eg FileZilla or Total Commander) and log in to your hosting. Go to the main WordPress folder, find and open the “.htaccess” file.
At the very beginning of the file, add the following code:
<IfModule mod_rewrite.c>
RewriteEngine On
RewriteCond %{HTTPS} off
RewriteRule ^(.*)$ https://%{HTTP_HOST}%{REQUEST_URI} [L,R=301]
</IfModule>
Finally save the file.
If you are using Bluehost WordPress hosting, you can add this code even more easily. All you need to do is log in to the Direct Admin panel, enter File Manager and click the edit icon next to the .htaccess file.
The file editing window will appear. All you have to do is paste the code provided earlier and click the Save button.
Update Permalinks
Despite previous actions, some links can still open with the insecure HTTP protocol. This is a mixed content problem. Some of the links will be secured, but for others you will still get the unsecured message. However, it can be remedied quite simply.
Let’s start with the database. Even with the manual method, we will not avoid using the plugin. This time, however, it will be a one-time use, which will not affect the speed of the website. As in the previous method, go to the admin panel and then to Plugins> Add New. In the search box on the right, type “Better Search Replace“. The plug should appear in the list.
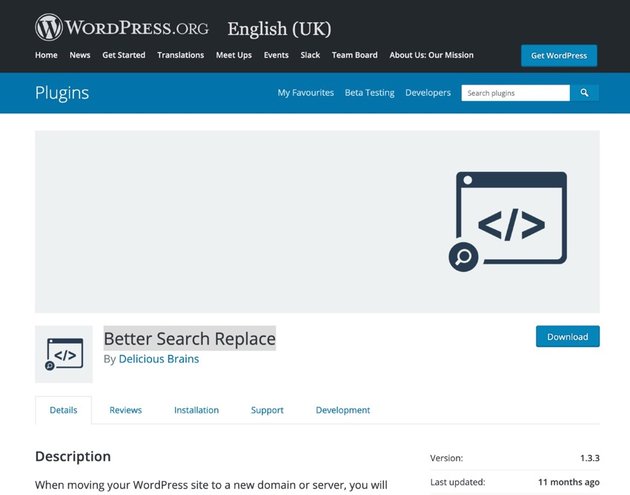
Click Install Now and then Activate. With the plug-in enabled, go to Tools> Better Search Replace. In the Search / Replace tab you can replace all references in the database. Then, in the Search For field, enter the address of your HTTP website. In the Replace With field, enter your HTTPS website address.
Select all tables, check the Replace GUIDs option, uncheck Run as dry run and click Run Search / Replace. The plugin itself will replace all addresses from HTTP to HTTPS. After these actions, you can disable and remove the plug-in. Its operation was one-time and there is no need for it to be on all the time.
The problem with mixed content can also be with the theme or other plugins. However, this is rare. If you developed the plugin or theme following the right practices, you shouldn’t have any problems. When something like this happens, contact the plugin / theme developer. If this is not possible, it is worth considering looking for a better alternative.
Good practice at the end
Regardless of the method you choose, it is a good practice when running an SSL certificate on your WordPress website to notify Google of the changes by adding a new version of the website to Google Search Console. Why new? From a technical point of view, the HTTPS version of the website is a separate version of it.
Now you know how to run an SSL certificate in WordPress. Regardless of which method you choose, your website will become safer and you will start to reap the benefits of image and positioning. Good luck!